
Scanbot SDK always put mobile first – Android and iOS SDKs were the first SDKs we published. Over time, as our customers needed to use our technology on more frameworks and devices, our portfolio expanded. Soon, we had SDKs for Cordova, React Native, Flutter, Xamarin and Web frameworks. Under the hood, all of them use the same core code, written in C++. We provide binary builds for each of these platforms.
In 2022, we discovered the need to support yet another platform: As it turns out, tablets running Windows are commonly used in warehouses.
When I was given the opportunity to develop a Windows version of Scanbot SDK from scratch, I had to jump on it.
I barely knew anything about Windows development, but that didn’t stop me from making some bold claims to impress the team.
Which meant I had to deliver on them.
Win32, WPF, MAUI, UWP, WTF?
Diving into the Microsoft ecosystem, the first thing I noticed was the variety of development frameworks available. There are a lot of weird acronyms that didn’t make much sense to me at first.
So the first question was: Which one should I choose? Which one would be the most stable, yet also the most future-proof?
The answer is surprisingly straightforward: UWP with Windows.UI.Xaml is the current hot thing. Win32, WPF and Silverlight are giants of the past, whereas the viability of two newer contenders, App SDK and MAUI, has not yet been established.
Win32 is, of course, still the foundation for all the frameworks mentioned above and will still be there when I have a long, gray beard. But just to make things more complicated, its UI component is deprecated.
Since we’re dealing with the Microsoft ecosystem, everything is intertwined. The Windows.UI.Xaml framework is something of a spinoff of WPF and Silverlight. And Silverlight is based on WPF to begin with.
Why do all these relationships matter? Let me provide an oddly specific example.
The Scanbot Barcode Scanner SDK features a semi-transparent overlay with a hole in the middle. The technical term for this is “viewfinder”. This is a relatively complex piece of UI, and cutting a hole in an overlay may or may not be trivial, depending on the framework.
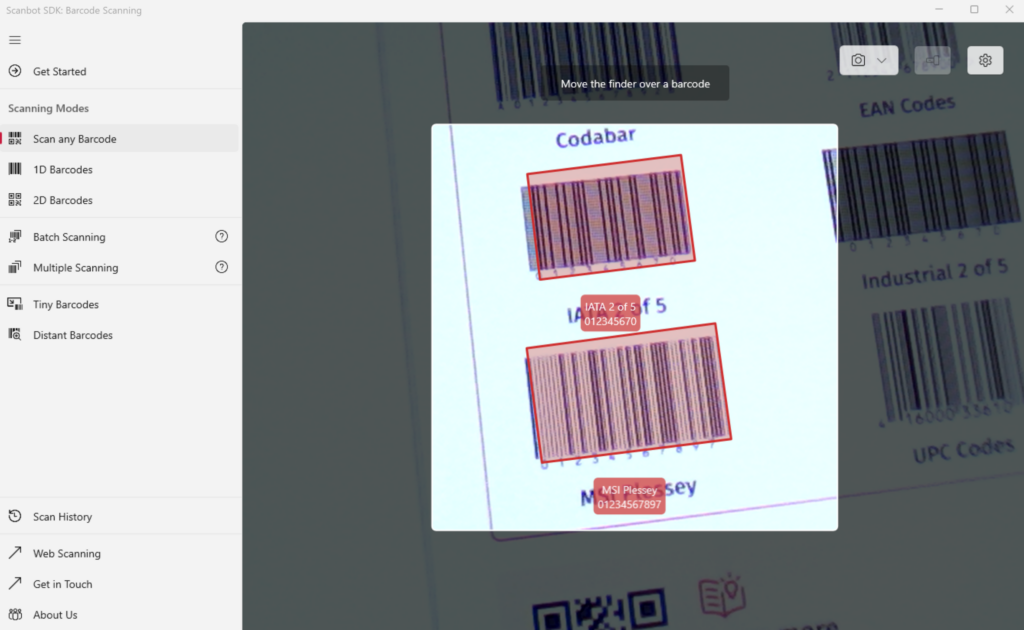
You may need to use pure math to create a path and cut out a polygon, one geometric point at a time. Or, if you’re lucky, there may be a convenience function for it.
When googling how to approach this, the first piece of documentation I stumbled upon had fairly simple advice: Set the corner radius of the holes in the grid and you’re good to go.
However, when I tried to do that, I could not, for the life of me, find the necessary properties. After pulling out a few strands of hair, I noticed that the guide I was using had been written for Silverlight. That’s the thing about Microsoft’s documentation, all the documentation on every framework version exists all the time. Everything everywhere all at once. The syntax is familiar, class names the same, and they do not explicitly note which framework the one you’re reading one is for. If you miss (or are unfamiliar with) the namespace reference at the top of the page, you may end up trying to implement a deprecated framework.
At the time of writing this article, Silverlight had already been discontinued for more than three years. And yet here I was.
But this was just the start. Now we’ll get to the actual nitty-gritty of creating this product…
Bridging: P/Invoke, C++/CX and WinRT/C++
We had to find a way of bridging our Core’s C++ code to C#, the main language of .NET and Windows apps. We went through a few of these, looking for a reasonably stable solution.
First off, P/Invoke and its sibling, COM interop, allow you to use code from unmanaged libraries from .NET. This is the original way to bridge C++ and C# code. How it works is that you directly import the DLL via the attribute/annotation API like so:
// Import user32.dll (containing the function we need) and define
// the method corresponding to the native function.
[DllImport("user32.dll", CharSet = CharSet.Unicode, SetLastError = true)]
private static extern int MessageBox(IntPtr hWnd, string lpText, string lpCaption, uint uType);
P/Invoke is still very much used in a variety of situations, as it only relies on System.Runtime.InteropServices, which makes the whole solution more versatile.
However, since the Scanbot SDK needs to work with .NET types (e.g., SoftwareBitmap) and custom SDK classes (e.g., BarcodeResult), we needed a more modern, debuggable approach.
This led us to the more advanced bridging technologies: C++/CX and C++WinRT.
To give an overview, C++ is a programming language, whereas C++/CX is an extension to C++ that facilitates developing WinRT/UWP apps. C++/WinRT is the next-generation approach for apps. Instead of an extension to C++, it’s simply an API based on regular C++.
Initially, we at Scanbot SDK decided to go the more traditional route of C++/CX, simply because it had a longer track record, the most guides available, most StackOverflow posts used that syntax, and there even were guides on how to bind and bridge OpenCV, an essential part of the Scanbot SDK.
Specifically, this guide simplified our work immensely. We managed to build a fully functional camera-stream-to-OpenCV-matrix converter in a matter of days.
But our joy was short-lived, because we soon found out C++/CX was to be deprecated. Since the syntax was a bit foreign to our C++ developers anyhow, we decided to scratch it and rewrite everything in the new and improved C++/WinRT syntax.
The two major differences between C++/CX and C++/WinRT are the hat operators and the use of mIDL rather than ref bridging classes.
“The handle declarator (^, pronounced “hat”), modifies the type specifier to mean that the declared object should be automatically deleted when the system determines that the object is no longer accessible.”
(from Microsoft’s documentation for C++/CX)
To put it in simple terms, C++/CX, you use the hat operator instead of the asterisk (*) in order to manage pointers.
As for the ref class versus the mIDL class, here’s an example of a simple ref class:
public ref class Barcode sealed {
public:
    Platform::String^ GetType();
    Platform::String^ GetText();
private:
    Platform::String^ type;
    Platform::String^ text;
internal:
    Barcode(doo::BarCode::BarCodeItem);
;
It functions as the header class and the implementation is in a separate file.
Here’s an example of the same class as a mIDL interface:
[bindable]
[default_interface]
runtimeclass Barcode
{
    Barcode();
    String Text;
    String Type;
}
Not too different, right? Well, that’s what we thought. But switching to mIDL is a bit more cumbersome because:
- Visual Studio offers no linter (meaning no autocomplete), nor syntax highlighting for mIDL files
- It has its own types, e.g.,
Stringin mIDL becomeshstringin C++, which needs to be converted once more tostd::stringin order to actually communicate with the core. - It is a separate file, which means a lot more bloat.

Extract 1D and 2D barcodes in milliseconds
Automating ineffcient and time-consuming workflows boosts productivity and reduces costs.
Barcodes make the transition seamless and can be scanned by any mobile device with a camera and the right software.
Our Barcode Scanner SDK can be integrated into your mobile or web app in less than a week to transform any mobile device into a powerful barcode scanner!
Download our Demo App:
Handling native dependencies
Scanbot SDK has several native dependencies, including openjpeg, zxing, boost, tiff, zlib, and OpenCV, which itself contains many native binaries. In total, that’s around 35 libraries (excluding Scanbot SDK’s native libraries) that need to be manually added just to compile the WinRT component.
With CMake, that would be a relatively straightforward task, but due to time constraints during development and limitations of the platform, it was easier to follow Microsoft’s pattern in creating a WinRT component.
That means adding 35 different Additional Include Directories under C/C++ -> General, roughly 25 different Additional Library Directories under Linker -> General, and all 35 libraries under Additional Dependencies under Linker -> Input.
Rinse and repeat for both the Release and Debug target, and also for both the x86 and the x64 architecture. This was just about the most annoying part to properly implement.
Later I realized that I can define additional directories as variables directly in the .vcxproj file:
<PropertyGroup>
    <CoreDir>$(ProjectDir)\..\..\..\</CoreDir>
    <x64ReleaseDir>x64-build-release\</x64ReleaseDir>
    <x64DebugDir>x64-build-debug\</x64DebugDir>
    <x86DebugDir>x86-build-debug\x86-Clang-Debug\</x86DebugDir>
</PropertyGroup>
This makes dependency handling much cleaner.
In general, I recommend managing dependencies directly in .vcxproj, even though it’s a hassle. But it’s still, and I’ll repeat myself here, infinitely better than managing the whole thing via Visual Studio’s UI, which seems unchanged since the 90s.
Dependencies, in the project file itself, are defined like so:
<ItemDefinitionGroup Condition="'$(Configuration)'=='Debug'">
    <ClCompile>
      <AdditionalIncludeDirectories Condition="'$(Configuration)|$(Platform)'=='Debug|x64'">
      </AdditionalIncludeDirectories>
      <AdditionalIncludeDirectories Condition="'$(Configuration)|$(Platform)'=='Debug|x86'">
      </AdditionalIncludeDirectories
      ...
    <ClCompile>
    <Link>
      <AdditionalLibraryDirectories Condition="'$(Configuration)|$(Platform)'=='Debug|x64'">
      </AdditionalLibraryDirectories>
      <AdditionalDependencies Condition="'$(Configuration)|$(Platform)'=='Debug|x86'">
      </AdditionalDependencies>
      ...
   </Link>
</ItemDefinitionGroup>
You add headers under the compile flag. Once headers are added, the project itself should compile. If some library directories are missing, the linker should throw errors in the following vein:
Error LNK2019 unresolved external symbol
__itt_thread_set_nameA_ptr__3_0 referenced in function "public:
__cdecl cv::'anonymous namespace'::ThreadID::ThreadID(void)"
(??0ThreadID@?A0xe57175de@cv@@QEAA@XZ)
opencv_core453.lib(system.cpp.obj) 1
Seems obscure, right? No idea what to do? Let’s examine.
We can see that opencv_core453 is the part complaining. OpenCV’s core library cannot be compiled because some cdecl cannot find external symbols.
What’s the missing symbol? __itt_thread_set_nameA_ptr__3_0 isn’t really all that descriptive.
Let’s look at all the dependencies that do exist in the build directory, or anywhere, for that matter. Then we notice that the unresolved symbol starts with __itt. That’s gotta be something, right? After a bit of headscratching, it turned out that ittnotify.lib was another dependency we had to add in order for it to compile.
This was a relatively rudimentary example. However, imagine going through this sort of debugging/research process hundreds of times, for each potentially missing dependency.
But that’s more or less how you manage unmanaged dependencies.
It gets better over time, since you learn to read between the lines and know exactly what symbols to look for. Plus, you get to know all those native binaries. Fortunately, we’re now on a pretty low level, so there aren’t that many libraries you need to be aware of.
Integration with the Core Component
Thus we managed to build what I would call the initial architecture. Took quite a bit of time, right? First, we had to build an initial working prototype, then figure out native dependency management, and then rewrite the whole thing from C++/CX to WinRT/C++.
Now we decided to move the WinRT component closer to our core code.
As I’ve implied before, the core of Scanbot SDK is its own repository. We don’t just rewrite everything for each platform. All the heavy lifting (machine learning and image recognition) is done on the C++ level, in its own repository and ecosystem.
There are numerous advantages to keeping the WinRT core of the Windows SDK together with the Core SDK itself, rather than with the C# Windows UI layer. This way, it can be run in the core CI/CD pipeline, which means we can run all automatic testing on it, ensuring it always uses the latest build core and so on.
How would we do that?
My initial thought was that we could just move the project directory itself and be done with it.
Unfortunately, it’s not that simple, as a project is not an independently buildable solution, nor can it contain package dependencies required by the platform.
Nor can a separate project be attached to an existing solution… well, it could, but that would mess up all the pathing.
If we moved the project itself to the core, we could technically build it, but not restore dependencies, as they are part of the same solution. And at this point, the solution is still the Windows SDK project, in a separate repository.
The solution was to create a new .NET solution (heh) for our WinRT component. This contains all necessary package dependencies and project references.
The entire project structure, at this point, is as follows:
- UWP solution (windows repository)
- Windows SDK Debug App (C#)
- Windows SDK (C#)
- WinRT solution (core repository)
- WinRT project (C++)
Tracking down an image decoding issue
After working on the solution for approximately one and a half months, I was pretty happy with what we’d built. But when we released the alpha version, QA discovered that Aztec barcodes weren’t being recognized.
In the core itself, everything was working properly, but when testing on Windows, Aztec recognition was returning invalid results for the exact same images. We had run tests for about 20 different types of barcodes, over 200 different barcodes at this point. The problem was just Aztec.
And that had us stumped at first. If the issue was image processing in the C# or WinRT layer, then no recognition should be taking place. That would be a fundamental issue affecting every barcode type.
But no, it was just Aztec.
I spent a couple of days debugging the core itself on both Windows and a MacBook. Every number in the process itself was identical, from the image resolution before and after TensorFlow to the number of errors and points found.
At that point, I was starting to pull my hair out again. I took a deep breath and went for a run. While out there, I realized that since Aztec barcodes can be recognized by the CLI engine built by the code, the problem must be somewhere in the code that I wrote.
After some more messing around, I noticed that the automated tests contained the following line:
cv::normalize(inputImage, debugImage, 0, 255, cv::NORM_MINMAX, CV_8U);Images were being normalized in CV_8U, but I had been using CV_8UC4 dtype to translate the pixels to OpenCV format. Well, maybe the channels were to blame.
This still didn’t make a lot of sense, mind you. If this were a real issue, we would see this with other barcode types as well.
Still, why not, let’s go with it. If it’s a 4-channel image, let’s transform it so it doesn’t have an alpha channel. So I added the following transformation to the matrix:
cv::cvtColor(mat, mat, cv::COLOR_BGRA2BGR);After removing the alpha channel, Aztec worked. It just worked. It didn’t make a whole lot of sense to me.
Well, it turned out that the issue was our math behind decoding the Aztec format. It was interpreting the alpha channel as another color channel and that caused the 8-bit matrix shift.
I was really expecting this saga to have a more grandiose or mysterious ending. Debugging this issue sure led me to some dark places, and I wish I could have, for example, opened up an issue in the TensorFlow repository.
But that’s what software development is like most of the time. You feel like you’re an investigator uncovering a massive conspiracy, but it turns out to be just a typo.
Exploring camera configurations
One of the most fascinating aspects of this project was learning about camera technologies. Windows does not really provide a convenient API where everything just works out of the box, as it is for iOS and Android.
That means you really need to get your hands dirty to extract the best possible image from the camera.
You need to know about focus modes. What’s continuous focus, what’s autofocus? In what situations might manual focus be necessary? Then there’s the fact that some laptops have fixed-focus lenses, where the mode actually cannot be customized. You have to account for these scenarios.
Now, I am far from an expert in the field of photography, but I will say that you will have to take the following things into account when playing around with the camera API:
Exposure, exposure compensation, flash, focus assist light, ISO speed, OIS (optical image stabilization), powerline frequency, and white balance.
Before this project, I hadn’t even heard of many of those terms. But truth be told, this was one of the more interesting parts of the project. I do recommend playing around with these configurations to everyone who’s at least a little bit interested in camera technology.
Distribution
Distributing the internal dev app has been a bit of a nightmare, as Windows does not offer the freedom of Android, where you can just install the APK, nor the infrastructure of iOS, where you can register devices and distribute the ipa internally with their enterprise program.
You need to have a trusted certificate in your root certificates, but Microsoft does not offer a convenient way to achieve that without actually uploading your app to the Store.
So it needs to be done manually, which is a bit of a hassle. At some point, I’ll try to write a script to at least simplify the process a bit. Another option would be to use the Microsoft Store’s internal beta channel, but managing internal testing through that is a bit cumbersome.
Unfortunately, the only way for QA to test it is to install Visual Studio on their own Windows devices.
Conclusion
What a wild ride it’s been. In some ways, it was a chaotic mess, and that’s also reflected in this post. But it’s also been very interesting to learn about all the inner workings of Microsoft’s ecosystem. This experience has been immensely valuable to me.
As the team grows, the native dependency inclusion logic will have top priority for refactoring. Microsoft’s preferred approach for adding native dependencies to WinRT components turned out to be very cumbersome. We need a proper CMake build to handle dependencies.
We will need a simpler way to distribute our product internally as well. Manual installation of certificates is not something we should be doing in 2023. If someone has an idea, please reach out!