What is YOLO object detection?
You Only Look Once (YOLO) is a real-time object detection system first described in a 2015 paper by Redmon et al. Following the paper’s publication, its authors released improved versions of the YOLO algorithm yearly. In 2020, however, project lead Joseph Redmon decided to stop his research on the topic due to concerns about its applications in military and surveillance contexts.
The project was picked up by Bochkovskiy et al. in 2020, who presented YOLOv4 as a fork of Redmon’s original work. Since then, several developers have been improving the open-source code and releasing new versions of the algorithm. As of this article, YOLO v7 is the current version.
What are the advantages of YOLO?
The main difference between YOLO and other object detection systems is right there in its name: It only looks at an image once. When the algorithm was first introduced, it demonstrated the viability of a one-stage approach. Other methods use a two-stage process, first locating and then identifying objects.
With its single stage, YOLO is blazingly fast and capable of processing up to 45 frames per second, depending on the hardware used. This means that videos recorded at that framerate or lower can be processed in real time. There is also a version of YOLO capable of handling 155 frames per second – at the expense of accuracy.
What are the disadvantages of YOLO?
The speed of the YOLO algorithm and similar one-stage models makes them especially suited for use cases like self-driving cars, where incoming objects must be processed as fast as possible.
However, YOLO v1 had some disadvantages compared to the two-stage object detection systems available at the time: First, its object localization mechanism made more mistakes than that of other models, e.g., R-CNN. Second, YOLO struggled with detecting small objects and objects that are very close to each other. This is because the original YOLO algorithm could only recognize one object per grid cell, though newer versions can detect around five.
To understand why, let’s take a look at how exactly YOLO processes an image.
How does YOLO object detection work?
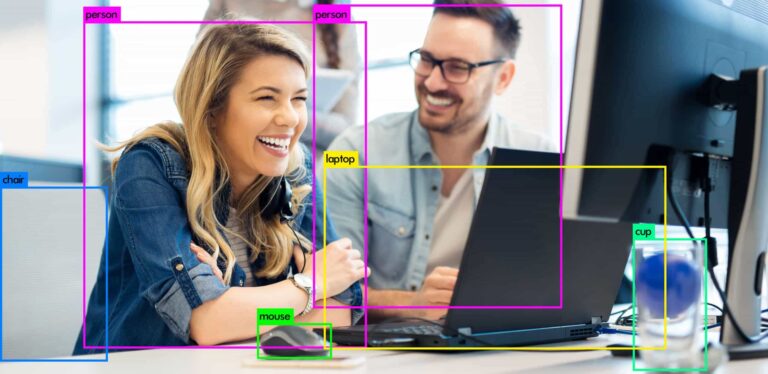
YOLO processes images in one go, but there are several smaller steps involved. It’s important to note that the algorithm must first be trained on the objects it should detect. In this example, it has been trained to recognize the following object classes: person, chair, laptop, cell phone, cup, potted plant, and vase (with several other possible classes not appearing in the picture, e.g., bird).
With this in mind, we input the following image:

- YOLO takes the input image and divides it into a grid. For simplicity’s sake, we divided this example image into a 4 x 4 grid.
- Each grid cell then checks if it contains (part of) a known object and which class the object belongs to. If an object is present, the cell draws two possible bounding boxes around it.
- Finally, all but one bounding box per object is eliminated, leaving only the one the model thinks is the most likely to frame the object correctly.

This brings us back to the shortcomings of the YOLO algorithm described earlier. Since each cell has to decide whether it contains an object or not, very small objects may not be recognized as distinct from the rest of the image at all.
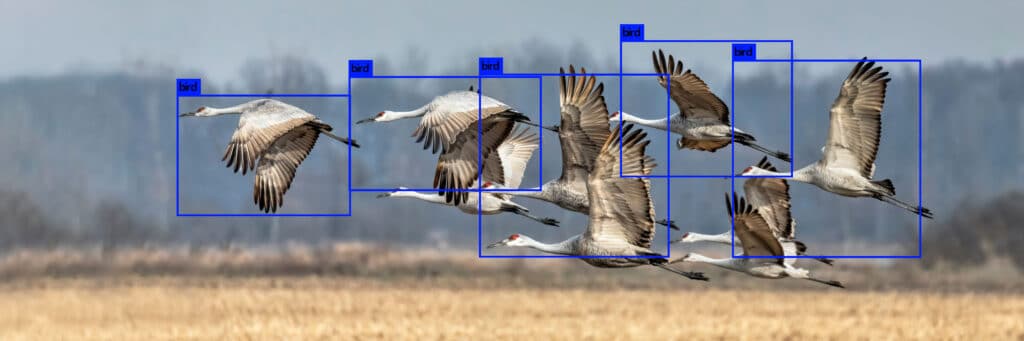
Additionally, each cell can only contain a small number of objects, so if there are several objects close together, it may only recognize one of them. For example, it only detects five out of the nine birds in this image:
Despite these disadvantages, YOLO is a compelling object detection system due to its speed and the fact that it sacrifices very little accuracy in return. It does a great job even with fast-moving video files, as demonstrated in this clip, in which YOLO v2 was let loose on a scene from the movie “Skyfall”.
How to try out YOLO yourself
You don’t need powerful hardware to try out YOLO yourself, although you probably won’t be able to perform real-time object detection on a James Bond chase sequence.
On Mac and Linux (Windows is a bit more complicated), all you have to do is clone Joseph Redmon’s original GitHub repository of YOLO v3 using the following command (or if you don’t have Git installed, download and extract a ZIP file of the repository):
git clone https://github.com/pjreddie/darknet.git(Don’t worry, this repository has nothing to do with shady online activities. Darknet is an open-source neural network framework written in C and CUDA.)
Next, change into the darknet folder and compile it:
cd darknetmakeNow, download the pre-trained weight file from Redmon’s website and put it into the darknet folder or use the command:
wget https://pjreddie.com/media/files/yolov3.weightsYOLO is now ready to process your images!
If you put your image file into the data folder inside the darknet folder, you can use the detect command to start the object detection. (Just replace {filename.extension} with your image file’s name and extension, e.g., example.jpg.)
./darknet detect cfg/yolov3.cfg yolov3.weights data/{filename.extension}After running the algorithm, YOLO will tell you how long it took to process your image and how confident it is about each object it detected. You can try out many different images depicting various kinds of objects to see how well the algorithm performs.
In case you were wondering: Yes, YOLO can also detect objects in drawings, although the error rate is much higher. Perhaps training the model on a self-created data set of illustrations is exactly the challenge you’re looking for.
Alternatives to YOLO object detection
As mentioned before, there are several alternatives to YOLO when it comes to real-time object detection. Our Scanbot SDK uses computer vision and deep learning to recognize barcodes, documents, and data patterns. It contains multiple real-time object detectors, some of them custom-designed, some adapted from existing architectures. All these detectors are designed and trained specifically for our use cases. This means we can integrate more assumptions into our models, making them smaller, more memory-efficient, and faster compared to general object detectors like YOLO.
Our models are designed with low-power devices in mind, which is why we make extensive use of computationally efficient building blocks, like separable convolutions. Our solutions use a hybrid approach in computer vision and machine learning: They first apply a shallow object detection model based on CNN architecture and then refine the results based on heuristics. These are defined by the task at hand and vary from one feature to another.
Our specially trained object detection algorithms are part of all three Scanbot SDKs: The Barcode Scanner SDK, the Document Scanner SDK, and the Data Capture SDK. If you would like to benefit from their computer vision and deep learning capabilities, feel free to get in touch with our solution experts! They will be glad to help you apply this technology to your use case.