Implementing a viewfinder in your barcode scanning interface significantly improves the user experience. It allows users to aim the camera more precisely at a specific barcode and ignore other nearby codes.
The term “viewfinder” usually describes a photo camera component that allows the photographer to see and frame the scene being captured. It shows the area of the subject that will be included in the photograph, helping to compose shots effectively by indicating what will be in focus and how much of the scene will be captured in the final image.
When scanning barcodes from a camera feed, a visual representation of a viewfinder on the screen similarly helps focus on a single barcode.
To illustrate the difference, we’ll first create a barcode scanning interface without a viewfinder using the browser-based Barcode Detection API and scan some barcodes. Then we’ll update the code to add a viewfinder and scan them again.
Creating the barcode scanning interface
To get our barcode scanner up and running, we need to build a small web app using HTML, CSS, and JavaScript. We’ll then run it in a browser compatible with the Barcode Detection API. At the time of writing, the API’s browser support is as follows:
| Chrome Android | ✅ fully supported |
| Opera Android | ✅ fully supported |
| WebView Android | ✅ fully supported |
| Samsung Internet | ✅ fully supported |
| Chrome | ➖ partly supported |
| Edge | ➖ partly supported |
| Opera | ➖ partly supported |
| Firefox | ❌ not supported |
| Firefox Android | ❌ not supported |
| Safari | ❌ not supported |
| Safari iOS | ❌ not supported |
| WebView iOS | ❌ not supported |
Let’s start by creating a simple index.html file:
<!DOCTYPE html>
<html lang="en">
<head>
    <meta charset="UTF-8">
    <meta name="viewport" content="width=device-width, initial-scale=1.0">
    <title>Web Barcode Scanner</title>
    <link rel="stylesheet" href="styles.css">
</head>
<body>
    <div class="container">
        <h1>Web Barcode Scanner</h1>
        <div class="video-container">
            <video id="video" autoplay playsinline></video>
        </div>
        <div id="result">Scanned Barcode: <span id="barcodeResult">None</span></div>
    </div>
    <script src="script.js"></script>
</body>
</html>
Next, we’re going to style it with a styles.css file:
body {
    font-family: Arial, sans-serif;
    margin: 0;
    padding: 0;
    display: flex;
    justify-content: center;
    align-items: center;
    min-height: 100vh;
    background-color: #f0f0f0;
}

.container {
    text-align: center;
}

h1 {
    color: #333;
}

.video-container {
    width: 100%;
    max-width: 640px;
    margin: 20px auto;
}

#video {
    width: 100%;
    height: auto;
    border: 2px solid #333;
}

#result {
    margin-top: 20px;
    font-size: 18px;
}

#barcodeResult {
    font-weight: bold;
    color: #007bff;
}
And finally, let’s implement the actual barcode scanning logic in a script.js file:
document.addEventListener('DOMContentLoaded', () => {
    const video = document.getElementById('video');
    const resultSpan = document.getElementById('barcodeResult');

    if ('BarcodeDetector' in window) {
        const barcodeDetector = new BarcodeDetector();

        navigator.mediaDevices.getUserMedia({ video: { facingMode: "environment" } })
            .then(stream => {
                video.srcObject = stream;
                video.onloadedmetadata = () => {
                    video.play();
                    scanBarcodes();
                };
            })
            .catch(err => {
                console.error("Error accessing the camera:", err);
            });

        function scanBarcodes() {
            barcodeDetector.detect(video)
                .then(barcodes => {
                    if (barcodes.length > 0) {
                        resultSpan.textContent = barcodes[0].rawValue;
                    } else {
                        resultSpan.textContent = "None";
                    }
                    requestAnimationFrame(scanBarcodes);
                })
                .catch(err => {
                    console.error("Barcode detection error:", err);
                    requestAnimationFrame(scanBarcodes);
                });
        }
    } else {
        console.error('Barcode Detection API is not supported by this browser');
        resultSpan.textContent = "Barcode Detection not supported";
    }
});
The scanBarcodes function uses the barcodeDetector.detect(video) method to analyze the video feed. If barcodes are detected, the function updates the barcodeResult element with the value of the first detected barcode. If no barcode is detected, it updates the result to “None”.
After detecting barcodes, the function uses requestAnimationFrame(scanBarcodes) to recursively call itself, creating a continuous loop. This allows the barcode detection process to keep running in real time as the video feed updates.
Let’s try it out!
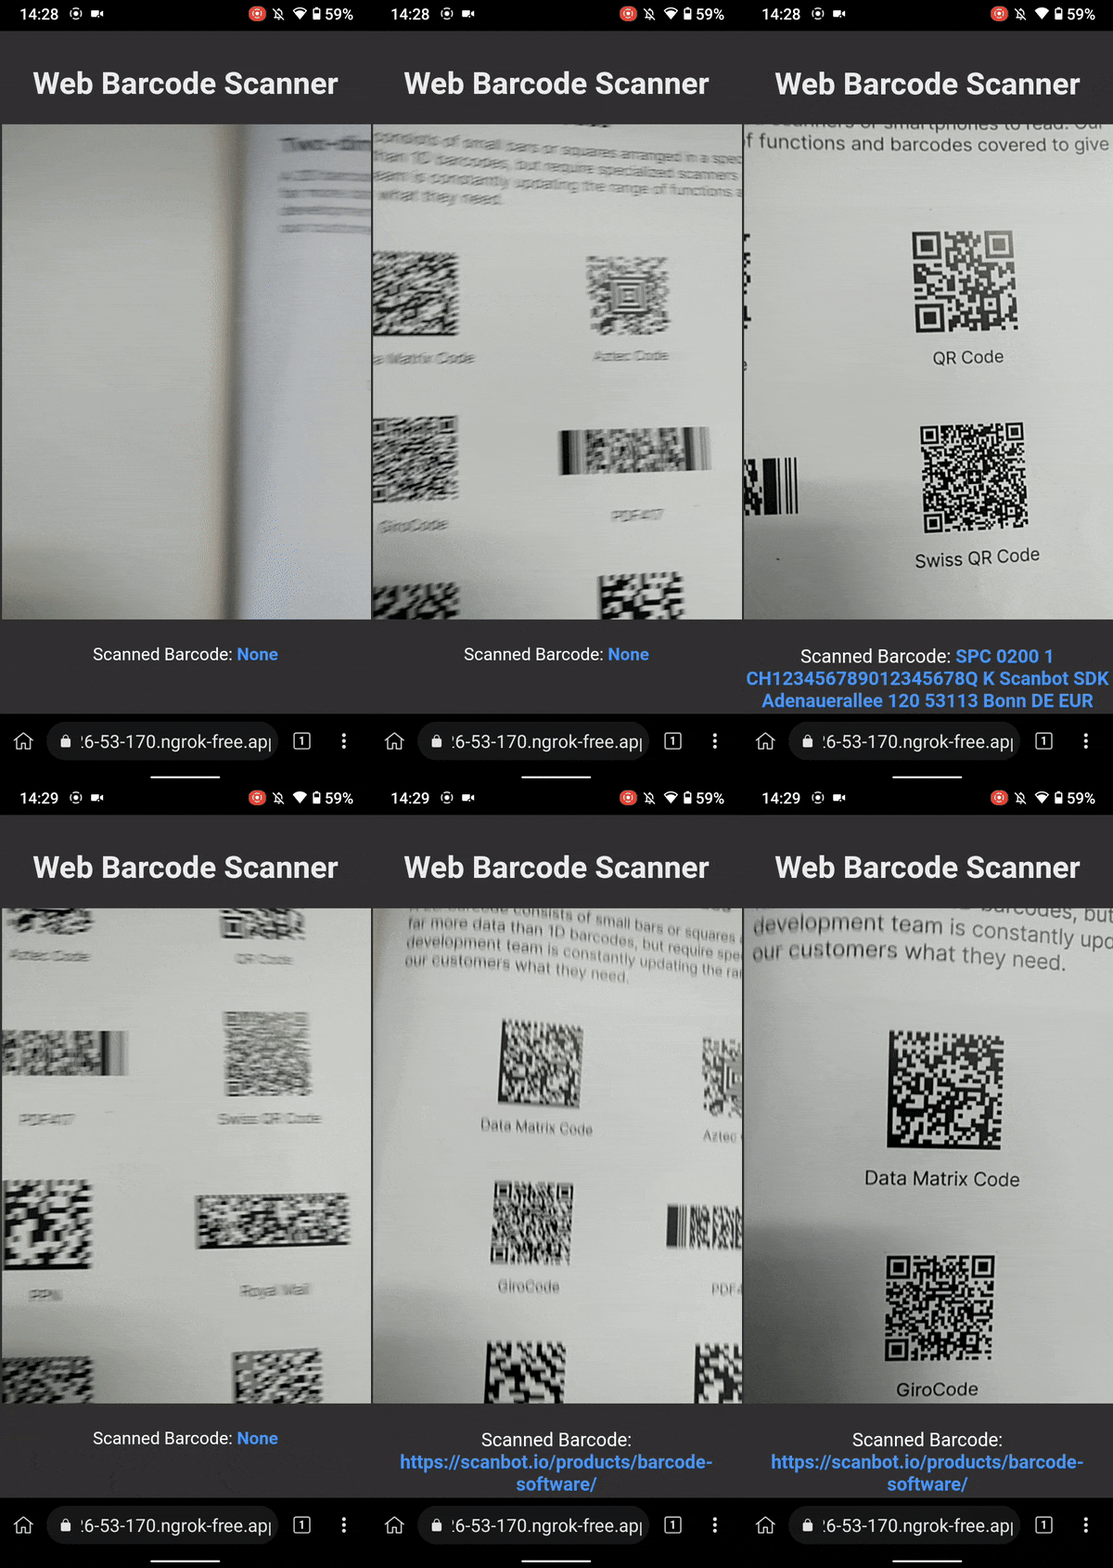
Without a viewfinder, any barcode in the camera feed will be picked up, making it hard to know which code was scanned.
To improve this, we’ll update the code to include a viewfinder and try again.
Implementing the viewfinder
First, add a <div class="viewfinder"></div> element within the <div class="video-container"> in index.html:
<!DOCTYPE html>
<html lang="en">
<head>
    <meta charset="UTF-8">
    <meta name="viewport" content="width=device-width, initial-scale=1.0">
    <title>Web Barcode Scanner</title>
    <link rel="stylesheet" href="styles.css">
</head>
<body>
    <div class="container">
        <h1>Web Barcode Scanner</h1>
        <div class="video-container">
            <video id="video" autoplay playsinline></video>
            <div class="viewfinder"></div> <!-- new -->
        </div>
        <div id="result">Scanned Barcode: <span id="barcodeResult">None</span></div>
    </div>
    <script src="script.js"></script>
</body>
</html>
In styles.css, include a .viewfinder class and add position: relative to .video-container so the viewfinder will be centered correctly. Its 1:1 aspect ratio mimics that of a QR or Data Matrix code.
body {
    font-family: Arial, sans-serif;
    margin: 0;
    padding: 0;
    display: flex;
    justify-content: center;
    align-items: center;
    min-height: 100vh;
    background-color: #f0f0f0;
}

.container {
    text-align: center;
}

h1 {
    color: #333;
}

.video-container {
    position: relative;
    width: 100%;
    max-width: 640px;
    margin: 20px auto;
}

#video {
    width: 100%;
    height: auto;
    border: 2px solid #333;
}

/* new */
.viewfinder {
    position: absolute;
    top: 50%;
    left: 50%;
    transform: translate(-50%, -50%);
    width: 200px;
    height: 200px;
    border: 2px solid #FF0000;
    box-shadow: 0 0 0 9999px rgba(0, 0, 0, 0.5);
}

#result {
    margin-top: 20px;
    font-size: 18px;
}

#barcodeResult {
    font-weight: bold;
    color: #007bff;
}
Lastly, apply the following changes to script.js:
- Include a constant for the
.viewfinderelement:
const viewfinder = document.querySelector('.viewfinder');- Introduce additional logic to calculate the position and size of the
.viewfinderrelative to thevideoelement:
const viewfinderRect = viewfinder.getBoundingClientRect();
const videoRect = video.getBoundingClientRect();
const viewfinderX = (viewfinderRect.left - videoRect.left) / videoRect.width * videoWidth;
const viewfinderY = (viewfinderRect.top - videoRect.top) / videoRect.height * videoHeight;
const viewfinderWidth = viewfinderRect.width / videoRect.width * videoWidth;
const viewfinderHeight = viewfinderRect.height / videoRect.height * videoHeight;- In the
scanBarcodes()function, filter any detected barcodes based on whether they’re within the bounds of the viewfinder:
const viewfinderBarcodes = barcodes.filter(barcode => {
    const { x, y, width, height } = barcode.boundingBox;
    return (
        x >= viewfinderX &&
        y >= viewfinderY &&
        x + width <= viewfinderX + viewfinderWidth &&
        y + height <= viewfinderY + viewfinderHeight
    );
});- Also in the
scanBarcodes()function, change the code so that the result is updated with the first barcode found that fits inside the.viewfinderarea:
barcodeDetector.detect(video)
    .then(barcodes => {
        const viewfinderBarcodes = barcodes.filter(barcode => {
            const { x, y, width, height } = barcode.boundingBox;
            return (
                x >= viewfinderX &&
                y >= viewfinderY &&
                x + width <= viewfinderX + viewfinderWidth &&
                y + height <= viewfinderY + viewfinderHeight
            );
        });

        if (viewfinderBarcodes.length > 0) {
            resultSpan.textContent = viewfinderBarcodes[0].rawValue;
        } else {
            resultSpan.textContent = "None";
        }
        requestAnimationFrame(scanBarcodes);
    })
The resulting JavaScript looks like this:
document.addEventListener('DOMContentLoaded', () => {
    const video = document.getElementById('video');
    const viewfinder = document.querySelector('.viewfinder');
    const resultSpan = document.getElementById('barcodeResult');

    if ('BarcodeDetector' in window) {
        const barcodeDetector = new BarcodeDetector();

        navigator.mediaDevices.getUserMedia({ video: { facingMode: "environment" } })
            .then(stream => {
                video.srcObject = stream;
                video.onloadedmetadata = () => {
                    video.play();
                    scanBarcodes();
                };
            })
            .catch(err => {
                console.error("Error accessing the camera:", err);
            });

        function scanBarcodes() {
            const videoWidth = video.videoWidth;
            const videoHeight = video.videoHeight;

            const viewfinderRect = viewfinder.getBoundingClientRect();
            const videoRect = video.getBoundingClientRect();

            const viewfinderX = (viewfinderRect.left - videoRect.left) / videoRect.width * videoWidth;
            const viewfinderY = (viewfinderRect.top - videoRect.top) / videoRect.height * videoHeight;
            const viewfinderWidth = viewfinderRect.width / videoRect.width * videoWidth;
            const viewfinderHeight = viewfinderRect.height / videoRect.height * videoHeight;

            barcodeDetector.detect(video)
                .then(barcodes => {
                    const viewfinderBarcodes = barcodes.filter(barcode => {
                        const { x, y, width, height } = barcode.boundingBox;
                        return (
                            x >= viewfinderX &&
                            y >= viewfinderY &&
                            x + width <= viewfinderX + viewfinderWidth &&
                            y + height <= viewfinderY + viewfinderHeight
                        );
                    });

                    if (viewfinderBarcodes.length > 0) {
                        resultSpan.textContent = viewfinderBarcodes[0].rawValue;
                    } else {
                        resultSpan.textContent = "None";
                    }
                    requestAnimationFrame(scanBarcodes);
                })
                .catch(err => {
                    console.error("Barcode detection error:", err);
                    requestAnimationFrame(scanBarcodes);
                });
        }
    } else {
        console.error('Barcode Detection API is not supported by this browser');
        resultSpan.textContent = "Barcode Detection not supported";
    }
});
With the viewfinder implemented, let’s try scanning some barcodes again!
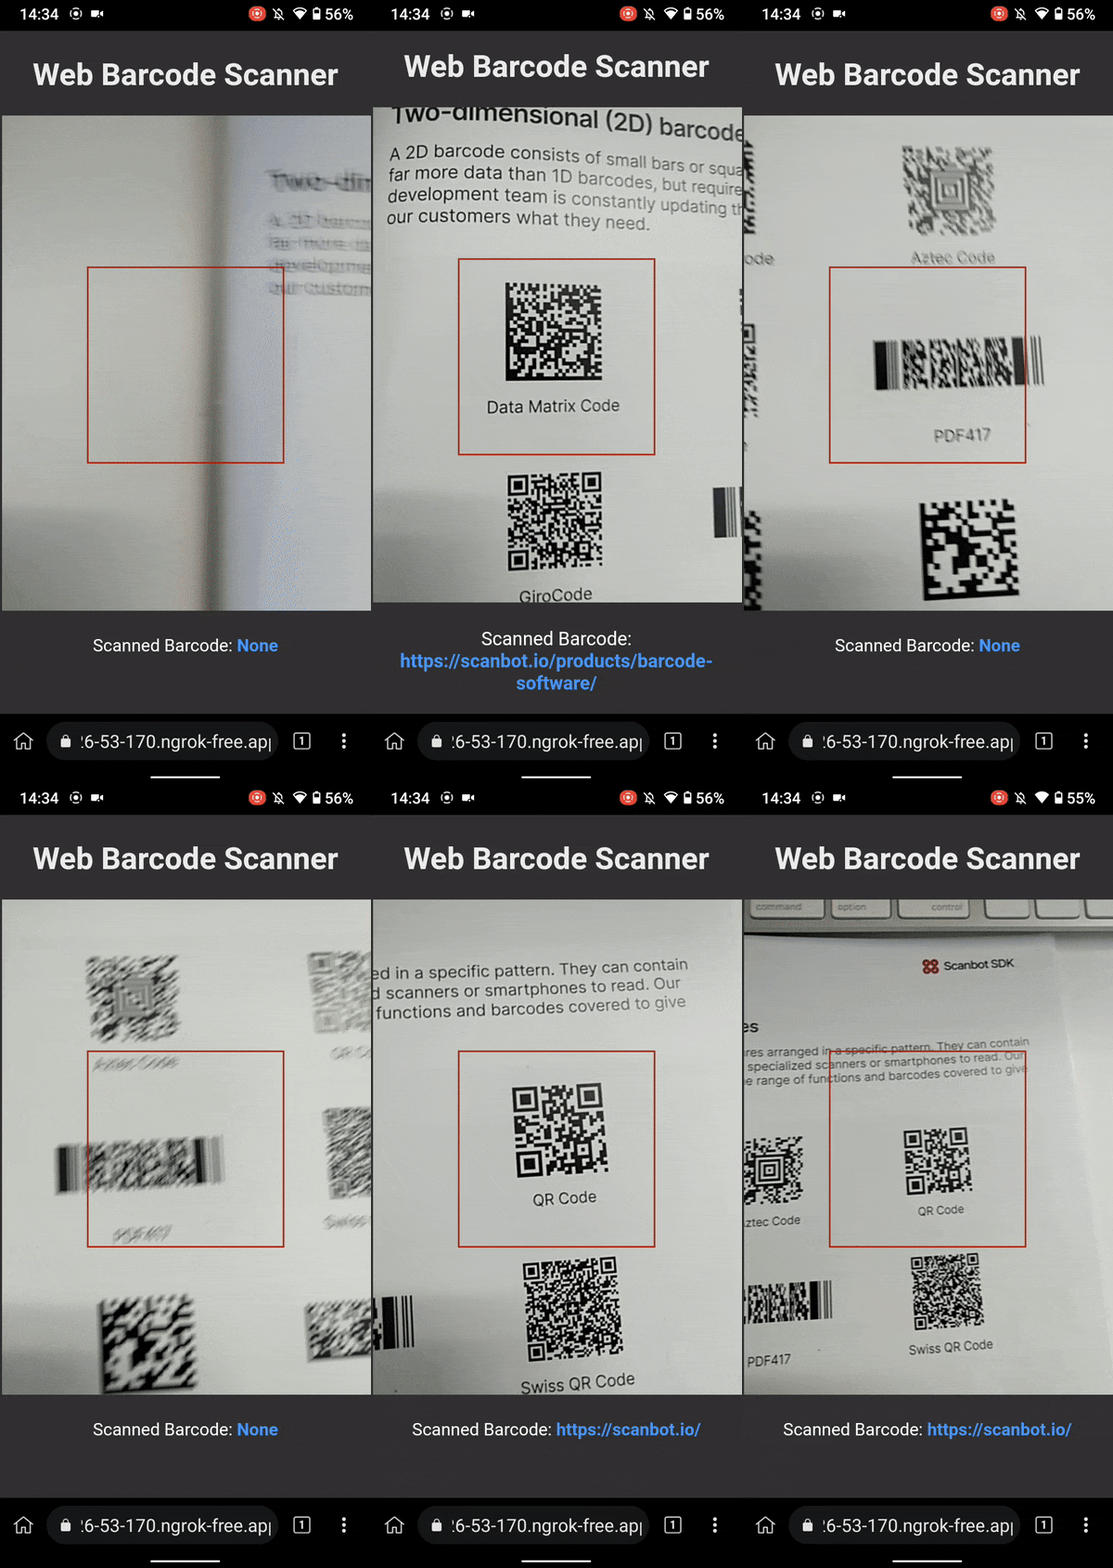
This setup makes it much easier to tell when a barcode was scanned successfully, which improves the app’s user experience. You could go even further and add a visual or auditory signal whenever a barcode is recognized and decoded.
This DIY approach to implementing a viewfinder might not always be necessary, depending on the barcode scanning library you’re using in your project. The Scanbot SDK, for example, includes a ready-to-use, customizable viewfinder component.
How the Scanbot SDK handles the viewfinder
The Scanbot Barcode Scanner SDK was designed for enterprise use and includes many quality-of-life features, including a viewfinder.
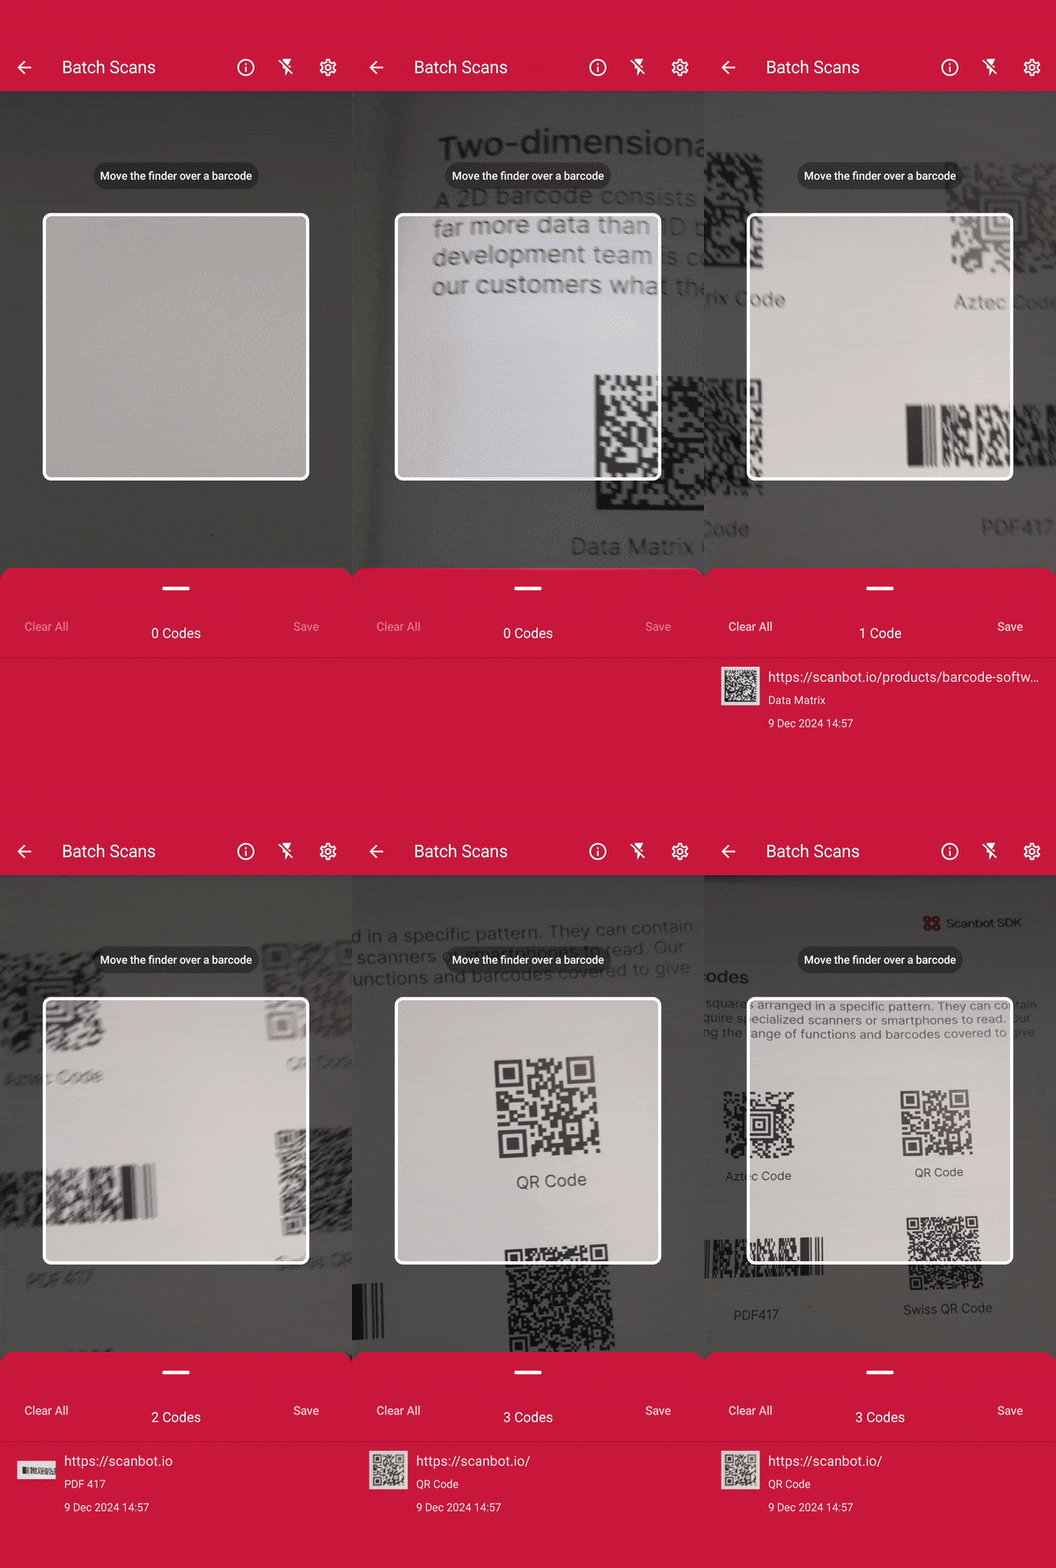
You can further customize the viewfinder component to suit your specific use case:
- Aspect ratio: Set the viewfinder’s width and height to mimic the shape of a 1D or 2D barcode.
- Overlay color: Change the color of the area surrounding the viewfinder.
- Frame style: Customize the frame border’s color, width, and corner radius.
When you build your barcode scanning UI with our SDK, the viewfinder is enabled by default. But there are also use cases in which it might be better to turn the viewfinder off entirely, e.g., when using our multi-barcode scanning feature and the AR overlay to quickly highlight and scan all barcodes from the camera feed.
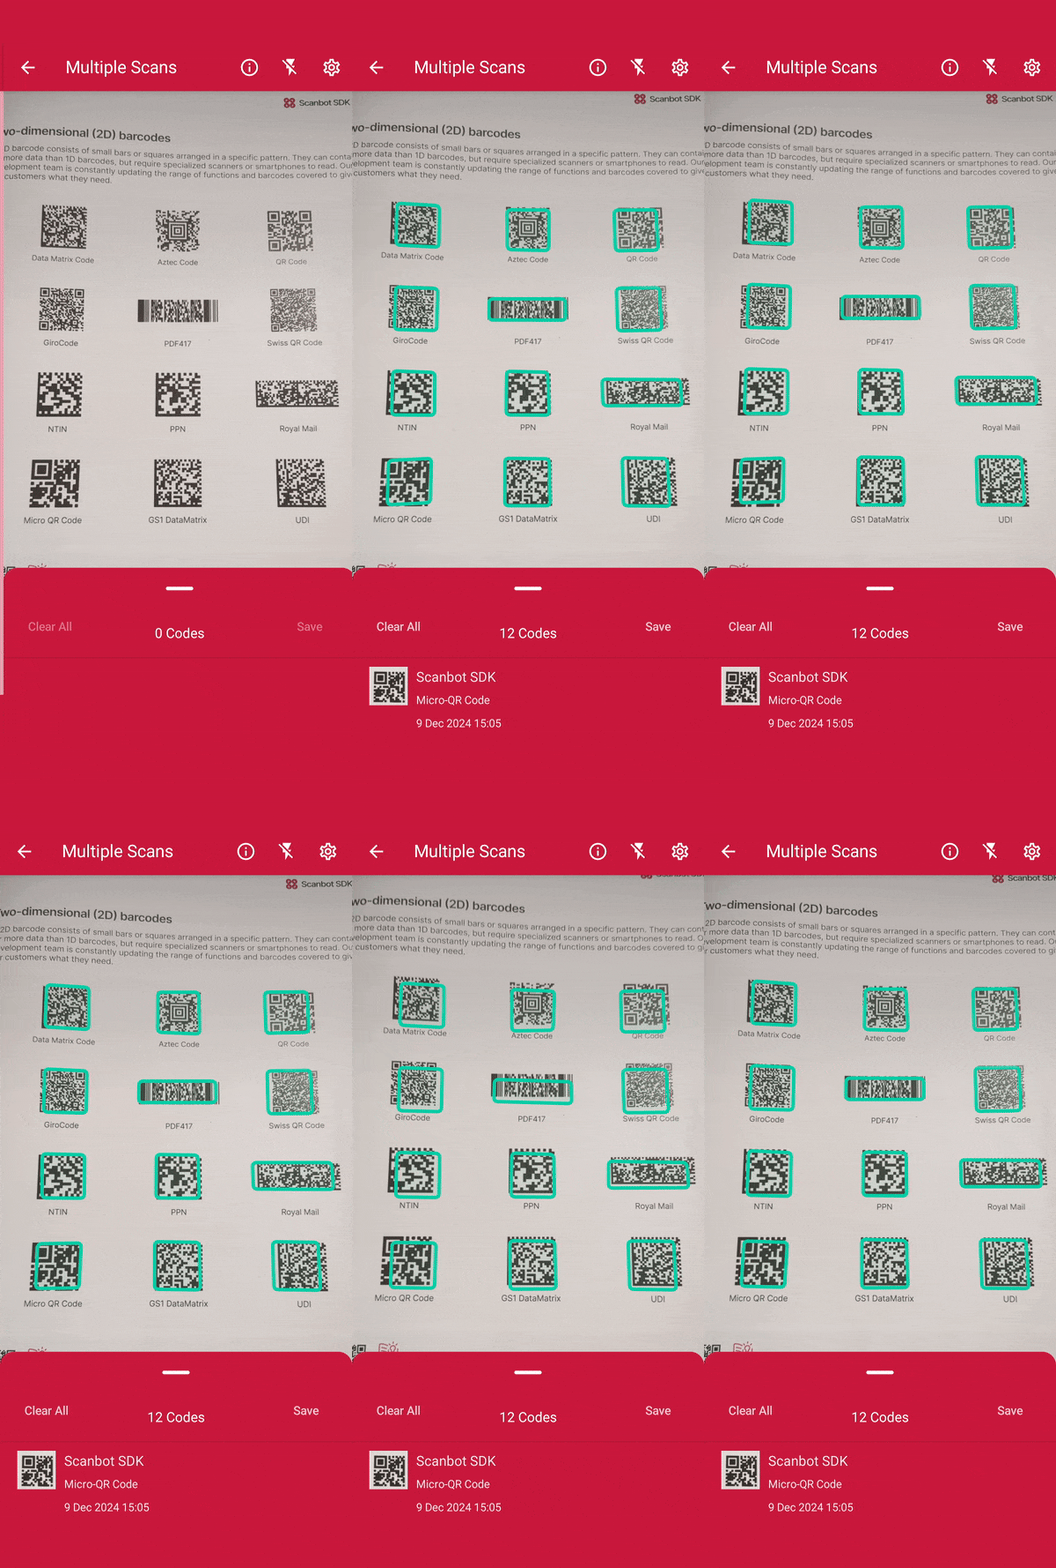
Thanks to the Scanbot SDK’s ready-to-use UI components, you can set up a barcode scanning interface like this in minutes while having complete control over its look and feel. Its in-depth documentation and technical support cater to the needs of developers and ensure a short time to roll-out.
The Scanbot Barcode Scanner SDK is available for Android, iOS, Web, Windows, and Linux and supports various cross-platform frameworks, including React Native, Flutter, and .NET MAUI.
Experience the SDK yourself by trying our free demo apps or running our example apps for various platforms. If you’d like to test the SDK in your app, generate a free 7-day trial license to start integration immediately.
