Support for the Cognex Mobile Barcode SDK and Manatee Works Barcode Scanner SDK will be discontinued on September 30, 2025.
In this guide, you’ll learn about what steps you need to take to remove the SDK from your mobile or web app and how to replace it with the Scanbot Barcode Scanner SDK.
If you’re interested in a particular platform, you can jump straight to it:
- Android
- iOS
- Web
- Cross-Platform (React Native, Flutter, Ionic etc.)
- Other platforms (contact us)
How to remove the Cognex Mobile Barcode SDK for Android from your app
To completely remove the Android cmbSDK from your Android app, follow these steps.
Remove the SDK library
If you added the SDK as an .aar or .jar file (such as cmbsdklib-release.aar) in your project’s libs folder, delete the file from the libs directory.
If you referenced the SDK in your build.gradle file (as a dependency), remove the corresponding dependency line.
Delete SDK imports and code references
Search your codebase for any Cognex SDK imports (e.g., import com.cognex.*;) and remove them.
Also delete all code that uses Cognex classes and methods, such as ReaderDevice, DataManSystem, event listeners, and barcode scanning logic.
Clean up AndroidManifest.xml
Remove the Cognex license key meta-data entry from AndroidManifest.xml:
<meta-data android:name="MX_MOBILE_LICENSE" android:value="YOUR_MX_MOBILE_LICENSE"/>If your app doesn’t require them otherwise, also remove any permissions or features that were added solely for Cognex scanning, such as:
<uses-permission android:name="android.permission.CAMERA" />
<uses-feature android:name="android.hardware.camera" />
Remove associated assets and resources
Delete any images, layouts, or other resources that were added specifically for Cognex barcode scanning functionality.
Final step: Test your application
Rebuild your app and verify that there are no errors or unresolved references related to the Cognex SDK.
How to add the Scanbot Android Barcode Scanner SDK to your Android app
To implement barcode scanning in your mobile app using the Scanbot Android Barcode Scanner SDK, follow these steps:
- Preparing the project
- Initializing the SDK
- Setting up the main screen
- Implementing the barcode scanning feature
All you need is the latest version of Android Studio and you’re good to go.
Step 1: Prepare the project
Create a new Empty View Activity and name the project (e.g., “Android Barcode Scanner”).
When your project is ready, go to settings.gradle.kts and add the Maven repositories for our SDK:
dependencyResolutionManagement {
    repositoriesMode.set(RepositoriesMode.FAIL_ON_PROJECT_REPOS)
    repositories {
        google()
        mavenCentral()

        // Add the repositories here:
        maven(url = "https://nexus.scanbot.io/nexus/content/repositories/releases/")
        maven(url = "https://nexus.scanbot.io/nexus/content/repositories/snapshots/")
    }
}
Now go to app/build.gradle.kts and add the dependencies for the Scanbot SDK and the RTU UI:
dependencies {
    implementation("io.scanbot:scanbot-barcode-scanner-sdk:7.0.0")
    implementation("io.scanbot:rtu-ui-v2-barcode:7.0.0")
Sync the project.
💡 We use Barcode Scanner SDK version 7.0.0 in this tutorial. You can find the latest version in the changelog.
Since we need to access the device camera to scan barcodes, let’s also add the necessary permissions in AndroidManifest.xml:
<?xml version="1.0" encoding="utf-8"?>
<manifest xmlns:android="http://schemas.android.com/apk/res/android"
    xmlns:tools="http://schemas.android.com/tools">

    <uses-permission android:name="android.permission.CAMERA" />
    <uses-feature android:name="android.hardware.camera" />

    <application
    ...
Step 2: Initialize the SDK
Before we can use the Scanbot Barcode Scanner SDK, we need to initialize it. The recommended approach is to do it in your Application implementation. This ensures the SDK is correctly initialized even when the app’s process is restored after being terminated in the background.
First, we need to create an Application subclass by right-clicking on the folder app/kotlin+java/com.example.androidbarcodescanner, selecting New > Kotlin Class/File, and naming it (e.g., “ExampleApplication”).
In the resulting ExampleApplication.kt, let’s first add the necessary imports:
import android.app.Application
import io.scanbot.sdk.barcode_scanner.ScanbotBarcodeScannerSDKInitializer
Then we make ExampleApplication extend the Application class by adding : Application() and add the code for initializing the SDK inside it:
class ExampleApplication : Application() {

    override fun onCreate() {
        super.onCreate()

        ScanbotBarcodeScannerSDKInitializer()
            // Optional: uncomment the next line if you have a license key.
            // .license(this, LICENSE_KEY)
            .initialize(this)
    }
}
💡 Without a license key, our SDK only runs for 60 seconds per session. This is more than enough for the purposes of our tutorial, but if you like, you can generate a license key. Just make sure to change your applicationId in app/build.gradle.kts to io.scanbot.androidbarcodescanner and use that ID for generating the license.
Finally, we need to register the Example Application class in AndroidManifest.xml:
<application
   android:name=".ExampleApplication"
   ...
Step 3: Set up the main screen
We’re going to build a rudimentary UI so we can quickly start the Barcode Scanner from the main screen.
For this tutorial, we’re going to go with a single-button layout, which you can copy and paste into app/res/layout/activity_main.xml:
<?xml version="1.0" encoding="utf-8"?>
<androidx.constraintlayout.widget.ConstraintLayout xmlns:android="http://schemas.android.com/apk/res/android"
    xmlns:app="http://schemas.android.com/apk/res-auto"
    xmlns:tools="http://schemas.android.com/tools"
    android:id="@+id/main"
    android:layout_width="match_parent"
    android:layout_height="match_parent"
    tools:context=".MainActivity">

    <Button
        android:id="@+id/btn_scan_barcodes"
        android:layout_width="0dp"
        android:layout_height="wrap_content"
        android:text="Scan Barcodes"
        app:layout_constraintTop_toTopOf="parent"
        app:layout_constraintBottom_toBottomOf="parent"
        app:layout_constraintStart_toStartOf="parent"
        app:layout_constraintEnd_toEndOf="parent"

</androidx.constraintlayout.widget.ConstraintLayout>
Next, we’ll connect the button to our RTU UI’s scanning screen.
Step 4: Implement the barcode scanning feature
Go to MainActivity.kt and add the necessary imports:
import android.widget.Button
import android.widget.Toast
import androidx.activity.result.ActivityResultLauncher
import io.scanbot.sdk.ui_v2.barcode.BarcodeScannerActivity
import io.scanbot.sdk.ui_v2.common.activity.registerForActivityResultOk
import io.scanbot.sdk.ui_v2.barcode.configuration.*
In the MainActivity class, add a private property that we’ll use to launch the barcode scanner. We’ll also display the scan result to the user in a Toast message.
private val barcodeResultLauncher: ActivityResultLauncher<BarcodeScannerScreenConfiguration> =
registerForActivityResultOk(BarcodeScannerActivity.ResultContract()) { resultEntity ->
// Barcode Scanner result callback:
// Get the first scanned barcode from the result object...
val barcodeItem = resultEntity.result?.items?.first()
// ... and process the result as needed. For example, display as a Toast:
Toast.makeText(
this,
"Scanned: ${barcodeItem?.barcode?.text} (${barcodeItem?.barcode?.format})",
Toast.LENGTH_LONG
).show()
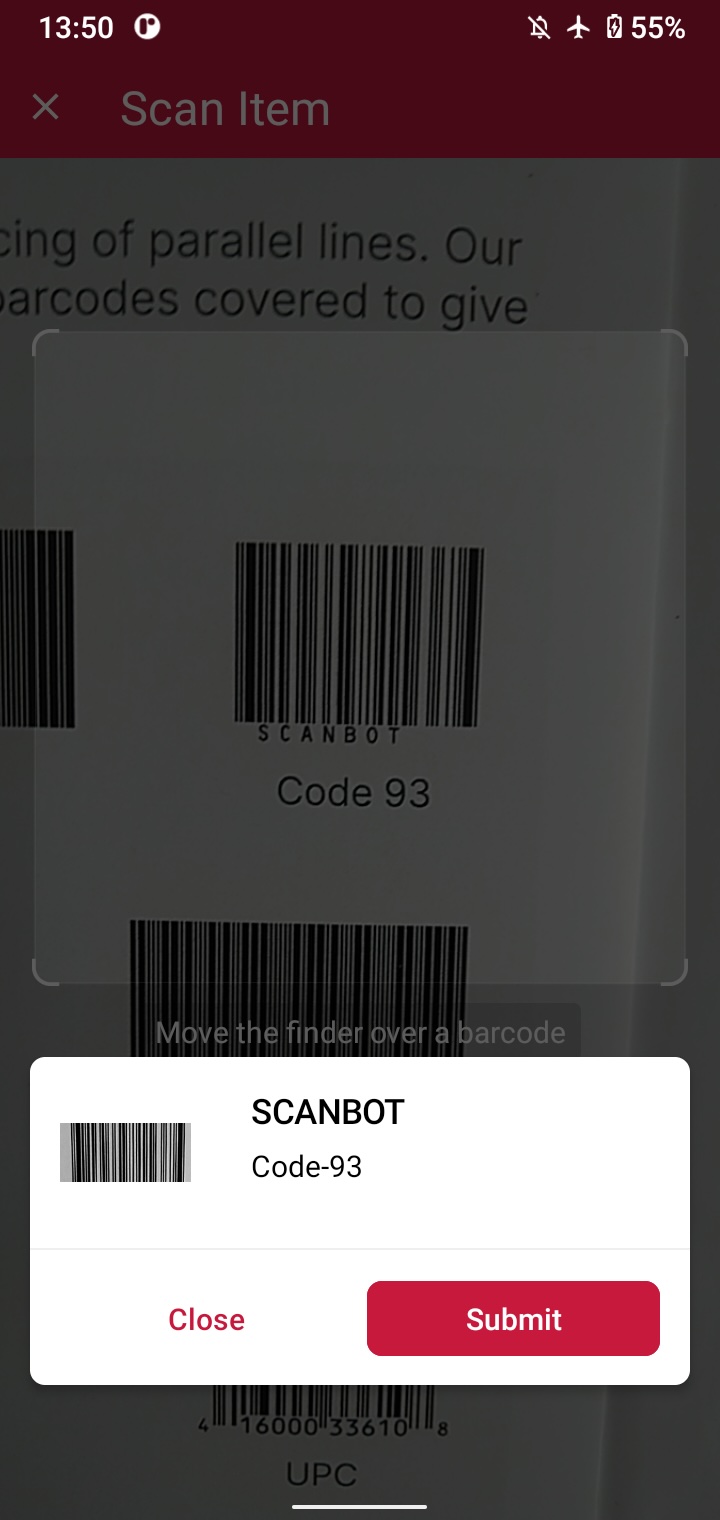
}In the onCreate() method, set up an OnClickListener for the Scan Barcodes button. When the button is clicked, it starts the barcodeResultLauncher using a configuration object. We’ll configure the scanner to read a single barcode and display a confirmation dialogue.
findViewById<Button>(R.id.btn_scan_barcodes).setOnClickListener {
    val config = BarcodeScannerScreenConfiguration().apply {
        // Initialize the use case for single scanning.
        this.useCase = SingleScanningMode().apply {
            // Enable and configure the confirmation sheet.
            this.confirmationSheetEnabled = true
        }
    }
    barcodeResultLauncher.launch(config)
}
Build and run the scanner to give it a try!
Optional: Implement multi-barcode scanning with an AR overlay
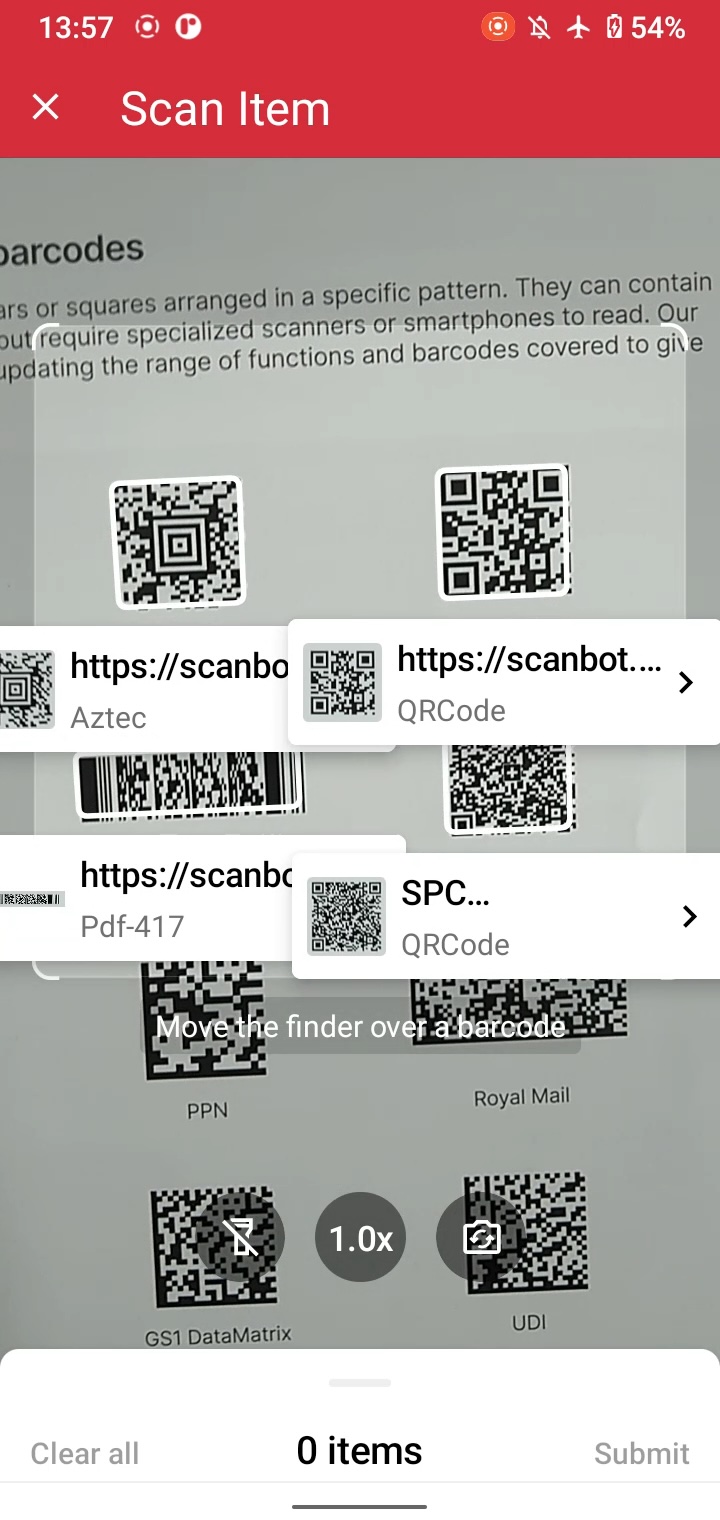
As it is now, our app outputs the value of a single barcode and closes the scanning interface. But we can also scan multiple barcodes at once. As an added bonus, we can also display the barcodes’ values right in the scanning screen while giving users the option to tap on any barcode to add it to a results sheet.
To achieve this, simply replace the single-barcode scanning configuration with the multi-scanning one and also enable the AR overlay:
findViewById<Button>(R.id.btn_scan_barcodes).setOnClickListener {
    val config = BarcodeScannerScreenConfiguration().apply {
        // Initialize the use case for multi-scanning.
        this.useCase = MultipleScanningMode().apply {
            // Enable the AR overlay and let users select barcodes.
            this.arOverlay.visible = true
            this.arOverlay.automaticSelectionEnabled = false
        }
    }
    barcodeResultLauncher.launch(config)
}
Your final MainActivity.kt will look like this:
package com.example.androidbarcodescanner

import android.os.Bundle
import androidx.activity.enableEdgeToEdge
import androidx.appcompat.app.AppCompatActivity
import androidx.core.view.ViewCompat
import androidx.core.view.WindowInsetsCompat
import android.widget.Button
import android.widget.Toast
import androidx.activity.result.ActivityResultLauncher
import io.scanbot.sdk.ui_v2.barcode.BarcodeScannerActivity
import io.scanbot.sdk.ui_v2.common.activity.registerForActivityResultOk
import io.scanbot.sdk.ui_v2.barcode.configuration.*

class MainActivity : AppCompatActivity() {

    private val barcodeResultLauncher: ActivityResultLauncher<BarcodeScannerScreenConfiguration> =
        registerForActivityResultOk(BarcodeScannerActivity.ResultContract()) { resultEntity ->
            // Barcode Scanner result callback:
            // Get the first scanned barcode from the result object...
            val barcodeItem = resultEntity.result?.items?.first()
            // ... and process the result as needed. For example, display as a Toast:
            Toast.makeText(
                this,
                "Scanned: ${barcodeItem?.barcode?.text} (${barcodeItem?.barcode?.format})",
                Toast.LENGTH_LONG
            ).show()
        }

    override fun onCreate(savedInstanceState: Bundle?) {
        super.onCreate(savedInstanceState)
        enableEdgeToEdge()
        setContentView(R.layout.activity_main)
        ViewCompat.setOnApplyWindowInsetsListener(findViewById(R.id.main)) { v, insets ->
            val systemBars = insets.getInsets(WindowInsetsCompat.Type.systemBars())
            v.setPadding(systemBars.left, systemBars.top, systemBars.right, systemBars.bottom)
            insets
        }
        findViewById<Button>(R.id.btn_scan_barcodes).setOnClickListener {
            val config = BarcodeScannerScreenConfiguration().apply {
                // Initialize the use case for multi-scanning.
                this.useCase = MultipleScanningMode().apply {
                    // Enable the AR overlay and let users select barcodes.
                    this.arOverlay.visible = true
                    this.arOverlay.automaticSelectionEnabled = false
                }
            }
            barcodeResultLauncher.launch(config)
        }
    }
}
Now build and run the app again to test your multi-barcode scanner.
How to remove the Cognex Mobile Barcode SDK for iOS from your app
To completely remove the iOS cmbSDK from your iOS app, follow these steps.
Remove SDK frameworks and libraries
Delete libDataManSDK.a and any other Cognex-provided static libraries from your Xcode project.
If you added CocoaAsyncSocket.framework (for device discovery), remove it from the “Embedded Binaries” and “Linked Frameworks and Libraries” sections.
Remove linked system frameworks (if only used for Cognex)
In your project’s settings, under “Linked Frameworks and Libraries,” remove any of the following frameworks if they were added solely for Cognex and are not required elsewhere in your app:
- SystemConfiguration.framework
- AVFoundation.framework
- CoreGraphics.framework
- CoreMedia.framework
- CoreVideo.framework
- MediaPlayer.framework
- Security.framework
- AudioToolbox.framework
Delete Cognex SDK code references
Search your codebase for any imports or usages of Cognex SDK classes (such as #import <cmbSDK/CMBReaderDevice.h> or import cmbSDK) and remove them.
Also remove all Cognex-related logic, including initialization, configuration, scanning, and event handling code.
Clean up Info.plist
Remove the Cognex license key entry (e.g., MX_MOBILE_LICENSE) from your Info.plist.
If you added a camera usage description (NSCameraUsageDescription) solely for Cognex, you can remove it, provided no other parts of your app require camera access.
Remove SDK assets
Delete any resources, images, or sample files included with the Cognex SDK.
Remove the SDK from dependency managers
If you integrated the SDK via CocoaPods, remove the relevant pod from your Podfile and run:
pod installIf you used another dependency manager, remove the SDK entry and update your dependencies.
Final step: Rebuild and test your app
Clean and rebuild your project to ensure there are no unresolved references or build errors related to the removed SDK.
How to add the Scanbot iOS Barcode Scanner SDK to your iOS app
To implement barcode scanning in your mobile app using the Scanbot iOS Barcode Scanner SDK, follow these steps:
- Preparing the project
- Setting up the app entry point
- Implementing the barcode scanner view
All you need is a Mac with the latest version of Xcode and a test device, since we’ll need to use the camera.
💡 This tutorial uses SwiftUI. You can also implement the iOS Barcode Scanner SDK using Storyboards.
Step 1: Prepare the project
Open Xcode and create a new iOS App project. Name the project (e.g., “SwiftUI Barcode Scanner”), choose SwiftUI as the interface, and Swift as the language.
After opening your project, go to File > Add Package Dependencies… and add the Scanbot Barcode Scanner SDK package for the Swift Package Manager.
Now open your Main App Target’s Info tab and add a Privacy – Camera Usage Description key with a value such as “Grant camera access to scan barcodes”.
Step 2: Set up the app entry point
Open SwiftUI_Barcode_ScannerApp.swift, import the Scanbot Barcode Scanner SDK, and implement the init() method to set the SDK’s license key.
import SwiftUI

// Import the SDK
import ScanbotBarcodeScannerSDK

@main
struct iOS_Swift_UI_Barcode_ScannerApp: App {

    // Set the license key
    init() {
        //Scanbot.setLicense("<YOUR_LICENSE_KEY_HERE>")
    }

    var body: some Scene {
        WindowGroup {
            ContentView()
        }
    }
}
If you have a license key, you can uncomment the code and replace <YOUR_LICENSE_KEY_HERE> with your actual key. Otherwise, leave the code as is. The SDK will then run in trial mode for 60 seconds per seconds.
Step 3: Implement the barcode scanner view
Open ContentView.swift and once again import the SDK.
import ScanbotBarcodeScannerSDKThen, inside struct ContentView: View {} and above var body: some View {}, add the configuration for single-barcode scanning.
let configuration: SBSDKUI2BarcodeScannerScreenConfiguration = {
    let config = SBSDKUI2BarcodeScannerScreenConfiguration()
    let usecase = SBSDKUI2SingleScanningMode()
    config.useCase = usecase
    return config
}()
Then replace the boilerplate code inside var body: some View {} with the barcode scanner view and pass the configuration.
var body: some View {
    SBSDKUI2BarcodeScannerView(
        configuration: configuration,
        onSubmit: { result in
            // Handle the scanned barcode results
        },
        onCancel: {
            // Handle the user tapping the 'Cancel' button
        },
        onError: { error in
            // Handle errors
        }
    )
}
In this tutorial, we’re going to print the format and value of the first barcode recognized in the camera stream to the console.
onSubmit: { (result: SBSDKUI2BarcodeScannerUIResult?) in
    if let result = result {
        guard let barcodeItem = result.items.first else {
            print("No barcode found")
            return
        }
        let format = barcodeItem.barcode.format.name
        let value = barcodeItem.barcode.textWithExtension
        print("\(format): \(value)")
    }
},
To make sure you only scan the barcode you want, you can make use of the confirmation dialogue included in the SDK’s RTU UI components. To use it, simply enable the required component in the usecase configuration.
    let configuration: SBSDKUI2BarcodeScannerScreenConfiguration = {
        let config = SBSDKUI2BarcodeScannerScreenConfiguration()
        let usecase = SBSDKUI2SingleScanningMode()

        // Enable the confirmation dialogue
        usecase.confirmationSheetEnabled = true

        config.useCase = usecase
        return config
    }()
Now our iOS Barcode Scanner app is ready. Build and run the app and give it a try!

Optional: Implement multi-barcode scanning with an AR overlay
As it is now, our app prints the value of the first scanned barcode to the console. But we can also scan multiple barcodes at once. As an added bonus, we can also display the barcodes’ values right in the scanning screen while giving users the option to tap on any barcode to add it to a results sheet.
To achieve this, simply replace the single-barcode scanning configuration in ContentView.swift with the multi-scanning one and also enable the AR overlay:
let configuration: SBSDKUI2BarcodeScannerScreenConfiguration = {
    let config = SBSDKUI2BarcodeScannerScreenConfiguration()
    let usecase = SBSDKUI2MultipleScanningMode()
    usecase.arOverlay.visible = true
    config.useCase = usecase
    return config
}()
You can change the results handling to reflect that multiple barcodes’ values should be printed to the console:
if let result = result {
    guard !result.items.isEmpty else {
        print("No barcode found")
        return
    }
    for barcodeItem in result.items {
        let format = barcodeItem.barcode.format.name
        let value = barcodeItem.barcode.textWithExtension
        print("\(format): \(value)")
    }
}
Your final ContentView.swift will then look something like this:
import SwiftUI
import ScanbotBarcodeScannerSDK

struct ContentView: View {
    let configuration: SBSDKUI2BarcodeScannerScreenConfiguration = {
        let config = SBSDKUI2BarcodeScannerScreenConfiguration()
        let usecase = SBSDKUI2MultipleScanningMode()
        usecase.arOverlay.visible = true
        config.useCase = usecase
        return config
    }()

    var body: some View {
        SBSDKUI2BarcodeScannerView(
            configuration: configuration,
            onSubmit: { (result: SBSDKUI2BarcodeScannerUIResult?) in
                if let result = result {
                    guard !result.items.isEmpty else {
                        print("No barcode found")
                        return
                    }
                    for barcodeItem in result.items {
                        let format = barcodeItem.barcode.format.name
                        let value = barcodeItem.barcode.textWithExtension
                        print("\(format): \(value)")
                    }
                }
            },
            onCancel: {
                // Handle the user tapping the 'Cancel' button
            },
            onError: { error in
                // Handle errors
            }
        )
    }
}

#Preview {
    ContentView()
}
Now build and run the app again to test your multi-barcode scanner.

How to remove the Cognex Mobile Barcode SDK for Web from your app
To completely remove the cmbWEB SDK from your web app, follow these steps (details may vary depending on your web development framework).
Uninstall the SDK package
If you installed the SDK via npm or another package manager, run the appropriate uninstall command in your project directory. For npm:
npm uninstall @cognex/barcode-sdk-webReplace @cognex/barcode-sdk-web with the actual package name you used during installation.
Remove SDK imports and references
Search your codebase for any imports, requires, or references to the Cognex SDK and its components (such as initialization code, configuration, and event handlers).
Also delete all Cognex-specific code blocks, including any UI elements or logic related to barcode scanning.
Clean up configuration files
Remove any Cognex-related configuration from your project files (such as environment variables, build scripts, or manifest entries).
If you added any meta-data or license keys specifically for Cognex, delete those as well.
Remove associated assets
Delete any SDK-related assets, such as images, icons, or sample files that were added as part of the integration.
Remove permissions
If you added permissions (e.g., camera access) solely for the Cognex SDK, you may remove those from your manifest or configuration files, provided they are not needed elsewhere in your app.
Test your application
Rebuild and run your app to ensure there are no unresolved references or errors related to the removed SDK.
How to add the Scanbot Web Barcode Scanner SDK to your web app
The Scanbot Web Barcode Scanner SDK supports all common web development frameworks. In this section, we’re going to look at the simplest implementation using just a single HTML file and a few lines of JavaScript codes. For more elaborate configurations, please refer to the following tutorials:
To implement barcode scanning in your web app using the Scanbot Web Barcode Scanner SDK, first create an index.html with some boilerplate code in your project folder.
<!DOCTYPE html>
<html lang="en">
    <head>
        <meta charset="UTF-8" />
        <meta
            name="viewport"
            content="width=device-width, initial-scale=1.0, maximum-scale=1.0, user-scalable=0"
        />
        <title>Web Barcode Scanner</title>
    </head>
    <body>
    </body>
</html>
To set up the barcode scanner, we’ll have to do the following:
- Create a button that calls up the scanning interface when clicked.
- Include a
<p>element on the page for displaying the scanning result. - Import the Scanbot Web SDK using a CDN.
- Process the scan result before displaying it on the page.
⚠️ In this tutorial, we’re importing the SDK via jsDelivr. However, you should only do this for quick prototyping. In your production environment, please download the Web SDK directly (or install it via npm) and include its files in your project.
Your index.html will look something like this:
<!DOCTYPE html>
<html lang="en">
    <head>
        <meta charset="UTF-8" />
        <meta
            name="viewport"
            content="width=device-width, initial-scale=1.0, maximum-scale=1.0, user-scalable=0"
        />
        <title>Web Barcode Scanner</title>
    </head>

    <body style="margin: 0">
        <button id="start-scanning">Start scanning</button>
        <p id="result"></p>
        <script type="module">
            import "https://cdn.jsdelivr.net/npm/scanbot-web-sdk@7.0.0/bundle/ScanbotSDK.ui2.min.js";
            const sdk = await ScanbotSDK.initialize({
                enginePath:
                    "https://cdn.jsdelivr.net/npm/scanbot-web-sdk@7.0.0/bundle/bin/barcode-scanner/",
            });
            document
                .getElementById("start-scanning")
                .addEventListener("click", async () => {

                    const config =
                        new ScanbotSDK.UI.Config.BarcodeScannerScreenConfiguration();

                    const scanResult = await ScanbotSDK.UI.createBarcodeScanner(config);
                    if (scanResult?.items?.length > 0) {
                        document.getElementById("result").innerText =
                            `Barcode type: ${scanResult.items[0].barcode.format} \n` +
                            `Barcode content: "${scanResult.items[0].barcode.text}" \n`;
                    } else {
                        document.getElementById("result").innerText = "Scanning aborted by the user";
                    }
                });
        </script>
    </body>
</html>
That’s all you need to set up a fully functional barcode scanner in a single HTML file!

💡 To test your web app on your phone, you have a few options. One option is to use a service like ngrok, which creates a tunnel to one of their SSL-certified domains. Their Quick Start guide will help you get up and running quickly.
How to replace the Cognex Mobile Barcode SDK for cross-platform frameworks
The steps to remove the cmbSDK for cross-platform frameworks like React Native, Flutter, or Ionic are different for each tool, but analogous to the steps for Android, iOS, and Web described above.
If you’d like to try the Scanbot Barcode Scanner SDK for your framework of choice, check out the following tutorials:
Reach out for individual support
Are you still unsure how exactly you should go about replacing the Cognex Mobile Barcode SDK from your app? We’re here to help.
👉 Contact us via sdksupport@scanbot.io.