In this tutorial, you will learn how to use the ZXing.Net.Maui.Controls library to integrate a barcode scanner into your Android app using .NET MAUI.
Prerequisites
Before you begin developing a .NET MAUI application, you have to ensure your development environment is configured correctly.
First, you have to install the .NET SDK on your machine. We recommend installing .NET 8.0. You can check all the available versions by accessing the official .NET website.
You will create the application using Visual Studio. If you don’t have Visual Studio on your computer, access the Microsoft portal and download the Visual Studio Community version, which is free for individuals.
⚠️ A note for Mac users: Microsoft has ended support for Visual Studio on Mac. We’ve covered several other options in our blog post about Visual Studio alternatives.
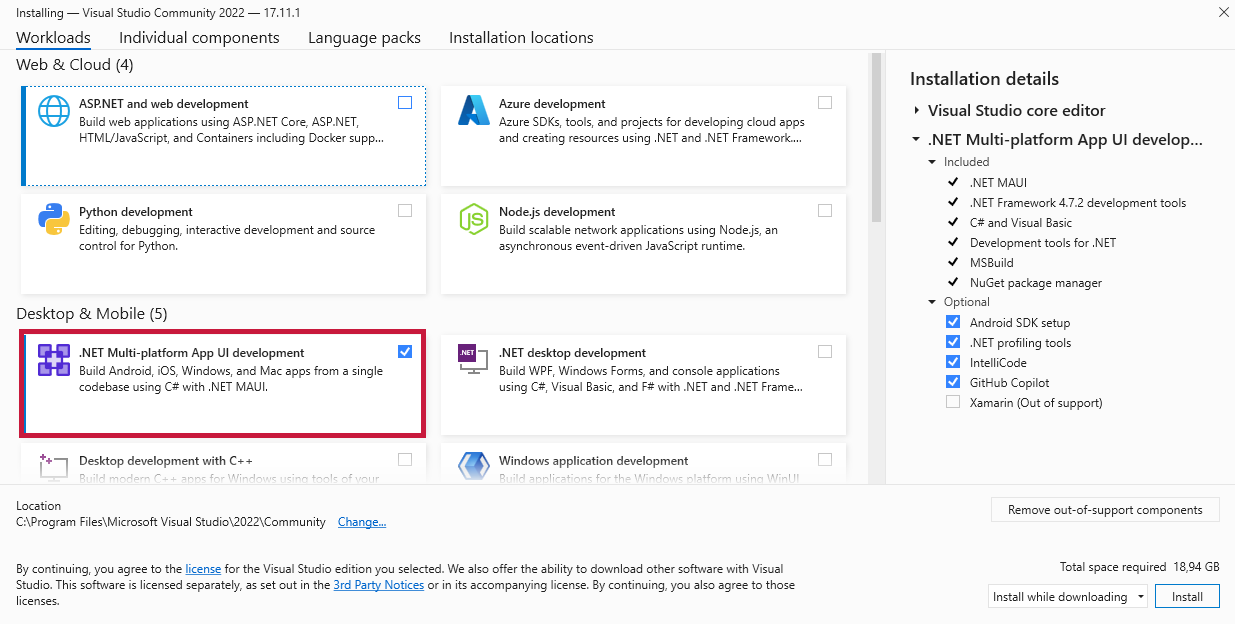
During the installation, select the following workloads:
- ASP.NET and web development
- Mobile development with .NET
- Universal Windows Platform (UWP) development
Create a project
To create a new project, launch Visual Studio and follow these steps:
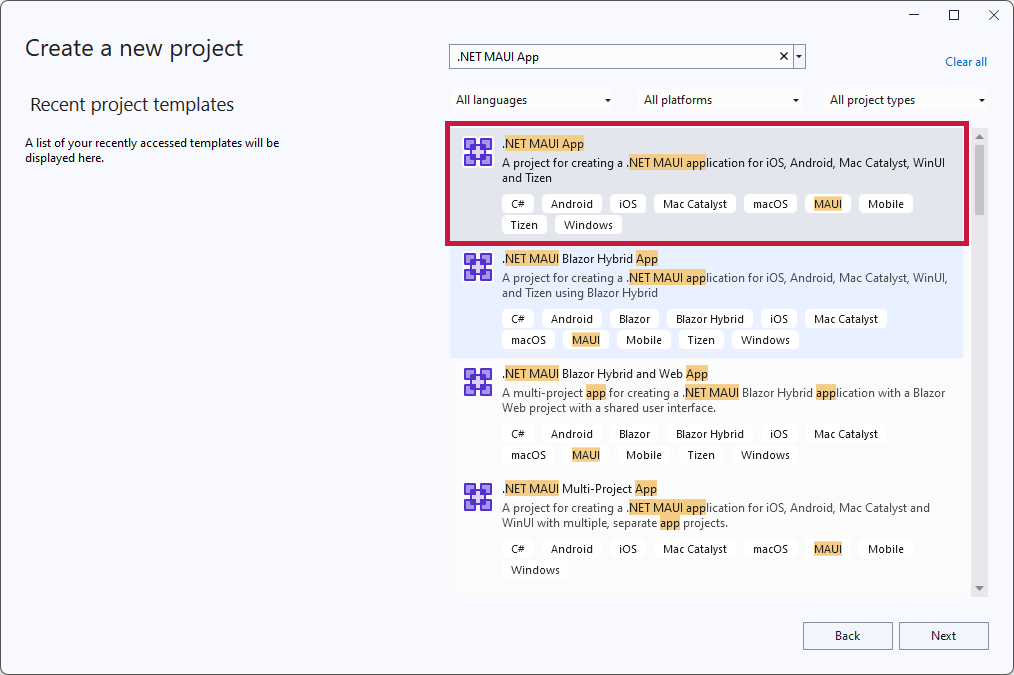
- Click on Create a new project.
- Search for .NET MAUI App using the search bar. Choose the .NET MAUI App template and click Next.
Visual Studio will generate the new project. If a Windows Security Alert regarding the firewall pops up, click Allow access to proceed.
Configure your MAUI app to scan barcodes
After creating the project, it’s time to add the ZXing.Net.Maui library to your project and configure it to add barcode scanning capabilities to your .NET MAUI app.
Step 1: Install ZXing.Net.Maui.Controls
Begin by installing the ZXing.Net.Maui.Controls NuGet package into your project. To add the package, run the following command:
dotnet add package ZXing.Net.Maui.Controls --version 0.4.0This package provides the necessary components to integrate barcode scanning functionality seamlessly into your app.
Step 2: Initialize the ZXing.Net.Maui plugin
Next, you need to initialize the ZXing.Net.Maui plugin within the MauiProgram.cs file. This will enable the barcode scanning feature across the application. First, add the following to the top of the file:
using ZXing.Net.Maui.Controls;After that, within the Create method, add the UseBarcodeReader() method to integrate the ZXing plugin into the app’s configuration:
public static MauiApp Create()
{
    var builder = MauiApp.CreateBuilder();

    builder
        .UseMauiApp<App>()
        .UseBarcodeReader(); // This line initializes the barcode reader plugin

    return builder.Build();
}
Step 3: Provide camera access permissions
To scan barcodes, your app needs permission to access the device’s camera. You’ll need to add the appropriate permissions to the app’s metadata, depending on the platform you’re using. For Android, add the following permission to your AndroidManifest.xml file:
<uses-permission android:name="android.permission.CAMERA" />If you’re using iOS, include the following entry in your info.plist file:
<key>NSCameraUsageDescription</key>
<string>This app uses the camera to scan barcodes.</string>
When adding permission for an iOS app, Ensure you enter a clear and valid reason for your app to access the camera. This message will be displayed to users when the app requests permission.
Step 4: Add the barcode reader
To start reading barcodes, you need to add the barcode reader control to your MainPage.xaml. This is done by including the appropriate XML namespace and adding the CameraBarcodeReaderView control. Your MainPage.xaml should look like this:
<?xml version="1.0" encoding="utf-8" ?>
<ContentPage xmlns="http://schemas.microsoft.com/dotnet/2021/maui"
             xmlns:x="http://schemas.microsoft.com/winfx/2009/xaml"
             x:Class="MauiApp.MainPage"
             xmlns:zxing="clr-namespace:ZXing.Net.Maui.Controls;assembly=ZXing.Net.Maui.Controls">

    <zxing:CameraBarcodeReaderView
          x:Name="cameraBarcodeReaderView"
          IsDetecting="True"
          BarcodesDetected="BarcodesDetected" />

</ContentPage>
The CameraBarcodeReaderView component provides live barcode detection through the camera. In addition, setting IsDetecting to True ensures that barcode detection starts as soon as the app runs.
Step 5: Configure the barcode reader options
After setting up the UI, you have to configure the barcode reader’s behavior in MainPage.xaml.cs. In this step, you’ll specify which barcode formats your app should recognize and whether it should handle multiple barcodes simultaneously.
To define the barcode reader, use the x:Name from the code snippet in step 4 for the zxing:CameraBarcodeReaderView view. If you used the code example, that’s x:Name = cameraBarcodeReaderView. To specify the options, use the BarcodeReaderOptions class. The following code block presents a configuration example where the scanner is configured to detect EAN-13 barcodes, which are standard in many retail environments. The AutoRotate option ensures that barcodes are detected regardless of orientation, while Multiple allows for scanning more than one barcode at a time.
public MainPage()
{
    InitializeComponent();
    cameraBarcodeReaderView.Options = new ZXing.Net.Maui.BarcodeReaderOptions
    {
        Formats = ZXing.Net.Maui.BarcodeFormat.Ean13, // Set to recognize EAN-13 barcodes
        AutoRotate = true, // Automatically rotate the image to detect barcodes from different angles
        Multiple = true // Allow the detection of multiple barcodes at once
    };
}
Step 6: Handle barcode detection events
As the last step, you need to handle the event triggered when a barcode is detected. To add this event handler, use the BarcodesDetected method in your MainPage.xaml.cs file.
For this tutorial, we’ll set the code to listen for barcode detection events and, upon detecting a barcode, display a message in a pop-up alert. The message will inform the barcode was detected and will also display the barcode. The pop-up will also contain a button, which the user can press to close the alert. The following code block presents a configuration example.
protected void BarcodesDetected(object sender, ZXing.Net.Maui.BarcodeDetectionEventArgs e)
{
    var first = e.Results?.FirstOrDefault();
    if (first is null) {
        return;
    }

    Dispatcher.DispatchAsync(async () =>
    {
        await DisplayAlert("Barcode Detected", first.Value, "OK");
    });
}
In the above example, the Dispatcher.DispatchAsync method ensures that the UI is updated on the main thread, which is necessary for displaying alerts.
Since steps 5 and 6 change the MainPage.xaml.cs file, the following code block presents the complete code for the MainPage.xaml.cs to ensure your app is configured correctly.
namespace MauiApp
{
    public partial class MainPage : ContentPage
    {
        string lastDetectedBarcode = string.Empty;
        DateTime lastDetectedTime = DateTime.MinValue;

        public MainPage()
        {
            InitializeComponent();
            cameraBarcodeReaderView.Options = new ZXing.Net.Maui.BarcodeReaderOptions
            {
               Formats = ZXing.Net.Maui.BarcodeFormat.Ean13, // Set to recognize EAN-13 barcodes
               AutoRotate = true, // Automatically rotate the image to detect barcodes from different angles
               Multiple = true // Allow the detection of multiple barcodes at once
            };
        }

        protected void BarcodesDetected(object sender, ZXing.Net.Maui.BarcodeDetectionEventArgs e)
        {
            var first = e.Results?.FirstOrDefault();
            if (first is null)
            {
                return;
            }

            // Check if the same barcode was detected within the last second
            if (first.Value == lastDetectedBarcode && (DateTime.Now - lastDetectedTime).TotalSeconds < 1)
            {
                return;
            }

            lastDetectedBarcode = first.Value;
            lastDetectedTime = DateTime.Now;

            Dispatcher.DispatchAsync(async () =>
            {
                await DisplayAlert("Barcode Detected", first.Value, "OK");
            });
        }
    }
}
Test the app
To test your finished app, you can connect your Android phone to your computer and enable Developer Options or use Virtual Devices (see Run on mobile device in the .NET MAUI docs to learn more).

⚠️ Not all Android devices work properly with Visual Studio when testing apps. We recommend trying the emulator if you face issues connecting your Android device.
Disadvantages of the ZXing library
ZXing provides decent performance for basic barcode scanning tasks but sometimes struggles with more challenging scenarios. Its most notable drawbacks as a barcode scanning solution include:
- Scanning accuracy and speed: ZXing struggles with scanning poorly lit or damaged barcodes. It often exhibits low recognition rates for smaller barcodes and can fail to decode them altogether.
- Compatibility issues: ZXing may not perform reliably across all devices, particularly newer models. This has led to frustration among developers who require consistent performance across different platforms.
- Lack of active development: As an open-source project, ZXing has seen limited updates and maintenance in recent years. This stagnation can lead to unresolved bugs and compatibility issues, making it less reliable for commercial applications.
- Integration complexity: Integrating ZXing into your app can be cumbersome, especially for developers who may not be familiar with its architecture. This can lead to longer development times and increased chances of bugs during implementation.
Try the Scanbot Barcode Scanner SDK for enhanced barcode scanning
While ZXing is a capable solution for basic barcode scanning, it may face limitations in terms of scanning accuracy and speed, especially in challenging environments. As an alternative, you can integrate the Scanbot Barcode Scanner SDK into your .NET MAUI app to enable enterprise-grade scanning performance with just a few lines of code – pre-built and configurable UI components included.
Step 1: Install the Scanbot Barcode Scanner SDK
To get started, add the Scanbot Barcode Scanner SDK to your project. Open your project’s .csproj file and add the following package references:
<ItemGroup>

    <PackageReference Include="ScanbotBarcodeSDK.MAUI" Version="5.1.0" />

</ItemGroup>
Run dotnet restore to install the SDK.
Step 2: Initialize the SDK
In your MauiProgram.cs, initialize the Scanbot SDK. Make sure to add the necessary initialization code:
using ScanbotSDK.MAUI;

namespace MauiApp;

public static class MauiProgram
{
    public const string LicenseKey = "";
// Without a license key, the Scanbot Barcode SDK will work for 1 minute.
  	// To scan longer, register for a trial license key here: https://docs.scanbot.io/trial/
    public static MauiApp CreateMauiApp()
    {
        var builder = MauiApp.CreateBuilder();
        builder
            .UseMauiApp<App>()
            .ConfigureFonts(fonts =>
            {
                fonts.AddFont("OpenSans-Regular.ttf", "OpenSansRegular");
            });

        ScanbotBarcodeSDK.Initialize(builder, new InitializationOptions
        {
            LicenseKey = LicenseKey,
            LoggingEnabled = true,
            ErrorHandler = (status, feature) =>
            {
                Console.WriteLine($"License error: {status}, {feature}");
            }
        });

        return builder.Build();
    }
}
This initializes the SDK. If you don’t have a license key, you can still try out the scanner. However, to test longer than 60 seconds, get a free trial license here: https://docs.scanbot.io/trial/
Step 3: Implement the barcode scanner
Now, let’s add single-barcode scanning functionality. Replace the content in your MainPage.xaml.cs with the following:
using ScanbotSDK.MAUI;
using ScanbotSDK.MAUI.Barcode;

namespace MauiApp;

public partial class MainPage : ContentPage
{
    public MainPage()
    {
        InitializeComponent();
    }

    private async void StartSingleScanning(object sender, EventArgs e)
    {
        try
        {
            if (!ScanbotBarcodeSDK.LicenseInfo.IsValid)
            {
                await DisplayAlert("License invalid", "Trial license expired.", "Dismiss");
                return;
            }

            var configuration = new BarcodeScannerConfiguration
            {
                UseCase = new SingleScanningMode
                {
                    ConfirmationSheetEnabled = true
                }
            };

            var result = await ScanbotBarcodeSDK.BarcodeScanner.OpenBarcodeScannerAsync(configuration);

            var barcode = result.Items.FirstOrDefault()?.Text ?? "No barcode found";
            await DisplayAlert("Barcode detected", barcode, "OK");
        }
        catch (TaskCanceledException)
        {
            // Handle the cancellation.
        }
        catch (Exception ex)
        {
            Console.WriteLine(ex.Message);
        }
    }
}
In your MainPage.xaml, add a button to trigger the Scanbot Barcode Scanner:
<Button
    x:Name="SingleScanningBtn"
    Text="Start single-barcode scanning"
    Clicked="StartSingleScanning"
    HorizontalOptions="Fill" />
Step 4: Test your app
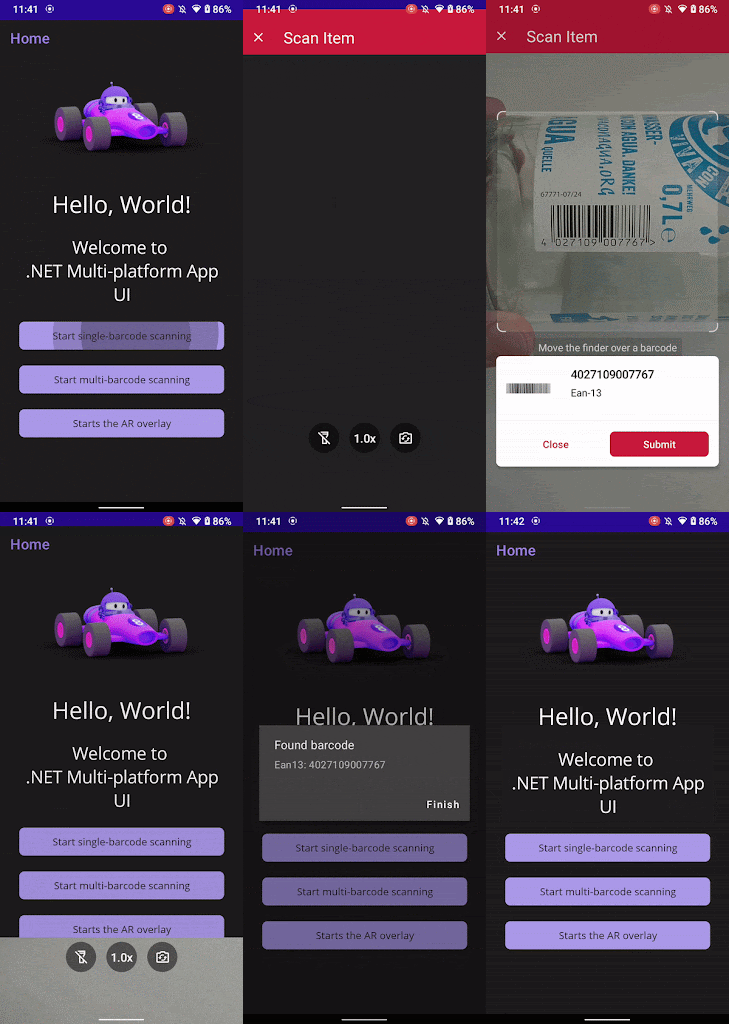
That’s it! You can now build and run your app to try out the Scanbot Barcode Scanner SDK. The single scanning mode you implemented is just one of many available in the Scanbot SDK. It also offers advanced features like multi-barcode scanning, augmented reality (AR) overlays, and customizable confirmation sheets, giving you more options to enhance your app’s barcode scanning workflows. All UI colors and texts can be easily adjusted to fit your app’s design and branding needs.
Conclusion
By integrating the Scanbot SDK, you can provide your users with an improved barcode scanning experience. Try it out and see how it compares to ZXing. If you have any questions, feel free to contact us at sdksupport@scanbot.io
Happy scanning!
How to improve barcode scanning performance in real-world conditions
Once your barcode scanning functionality is up and running in .NET MAUI, the next step is to ensure everything works as expected in real-world scenarios. Your users won’t always have great lighting, crisp codes, or a single symbology on a flat surface. Understanding these variables – and how .NET MAUI and its ecosystem of tools can help mitigate them – is essential if you’re aiming to build a robust, production-grade scanner. Let’s walk through the most critical challenges and advanced considerations developers face after the initial implementation.
Scanning in low-light environments
Barcode scanning is highly sensitive to lighting conditions. In low-light environments, mobile and desktop cameras often produce grainy, high-noise images, degrading the contrast that barcode decoders rely on. Detecting poor lighting and automatically activating the device’s torch feature can be implemented using native platform APIs via .NET MAUI’s dependency injection.
Additionally, you can preprocess the camera feed using simple brightness/contrast adjustments or more advanced image normalization techniques – some developers even apply adaptive histogram equalization for dynamic contrast boosting. While not always necessary, this can substantially improve the scanner’s performance in suboptimal lighting.
Scanning damaged or worn-out barcodes
Real-world barcodes are rarely pristine. They may be torn, scratched, faded, or printed on curved or textured surfaces. Non-commercial scanning libraries often fail to decode if enough visual fidelity is lost, especially in the case of 1D barcodes like Code 39 or EAN-13, which are more sensitive to bar and gap proportions.
To improve the scanning success rate, preprocessing steps such as binarization, morphological filters (like dilation or closing), and contour-based barcode isolation can help. These enhancements are particularly valuable when using static image capture instead of live scanning.
For use cases that demand higher resilience – such as logistics, manufacturing, or healthcare – consider integrating ML-based approaches trained to recognize degraded barcodes, or switch to more fault-tolerant symbologies like Data Matrix or PDF417.
Scanning multiple barcodes in one frame
Scanning multiple barcodes within a single camera frame introduces complexity in detection, decoding, and UI feedback. To solve this, you’ll need to isolate barcode regions using image segmentation. This often involves edge detection or trained object detection models running on the camera feed to identify multiple barcode bounding boxes. Each region can then be processed separately.
You should also define a strategy for handling simultaneous reads. Will your app return all codes at once? Let the user tap on a region to select one? Or prioritize a specific format? Designing this interaction flow carefully is key to preventing confusion and ensuring usability.
Supporting many different barcode symbologies
Depending on your application’s domain, your barcode scanning app may need to support Code 128, EAN-13, ITF, Aztec, PDF417, or proprietary formats. Most barcode scanning libraries support at least a handful of the most common symbologies, but they don’t do equally well with every format.
It’s wise to explicitly configure which symbologies your app is expecting. This not only improves scan accuracy but also reduces CPU usage. For example, if your app only ever expects QR codes and EAN-13, there’s no need to have the decoder look for Code 93 or MaxiCode. Also, understand the pros and cons of each format. QR codes are robust and versatile but visually bulky. Data Matrix codes are excellent for small surfaces but not widely recognized by older scanners.
In some industries, regulations dictate barcode format usage. Being format-aware ensures compliance, enhances interoperability, and helps you future-proof your application.
Providing zoom and focus control
A poorly focused barcode is as good as unreadable. While many modern smartphone cameras offer auto-focus and digital zoom, these features are not exposed consistently across platforms in .NET MAUI out of the box. For high-precision scanning tasks, especially with small barcodes or scanning at a distance (e.g., warehouse inventory), you should give your users manual control. This is particularly valuable when your scanner is targeting a moving barcode or a code that’s not centered in the frame.
Implementing augmented reality (AR) overlays
One underutilized but powerful enhancement is the use of AR overlays during scanning. Using AR-like feedback – such as highlighting detected barcode regions in real time, displaying decoded data inline, or guiding users to align the camera – drastically improves the user experience.
Keeping accessibility in mind
Designing your app for accessibility is critical – especially in public-facing or healthcare applications. At a minimum, your app should support screen reader announcements of scan results, text-to-speech for visually impaired users, and high-contrast modes for easier barcode alignment. Ensure that all visual cues have spoken equivalents and that dynamic barcode overlays don’t interfere with screen reader focus. For AR-style overlays or complex scan feedback, consider providing accessible fallback UI modes with large text, voice guidance, or guided scanning instructions.

