In this tutorial, you will learn how to build a web app for scanning PDF417 barcodes using JavaScript, HTML, and the Scanbot Web Barcode Scanner SDK.
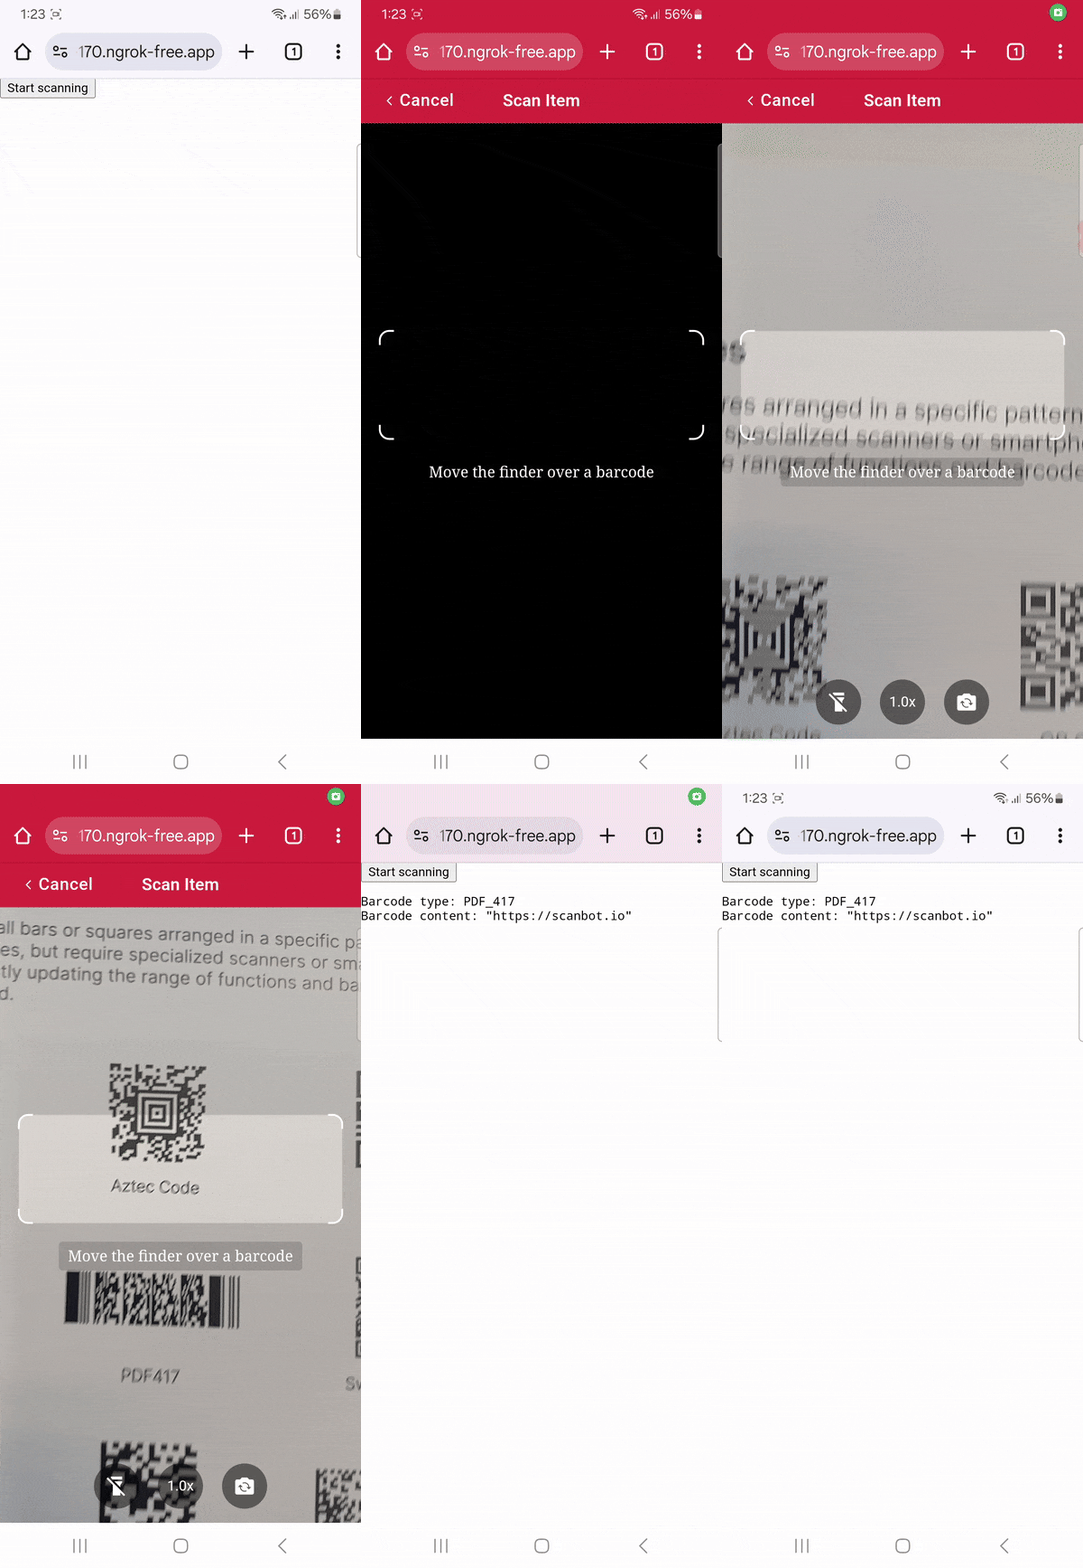
The app will initially display a single “Start scanning” button. When clicked, the interface will open, enabling the user to scan a PDF417 code. After reading the barcode, the scanner will close, and the scanned value will be displayed on the screen. In an optional step, we’ll enhance the user experience by implementing an AR overlay and a confirmation dialog.
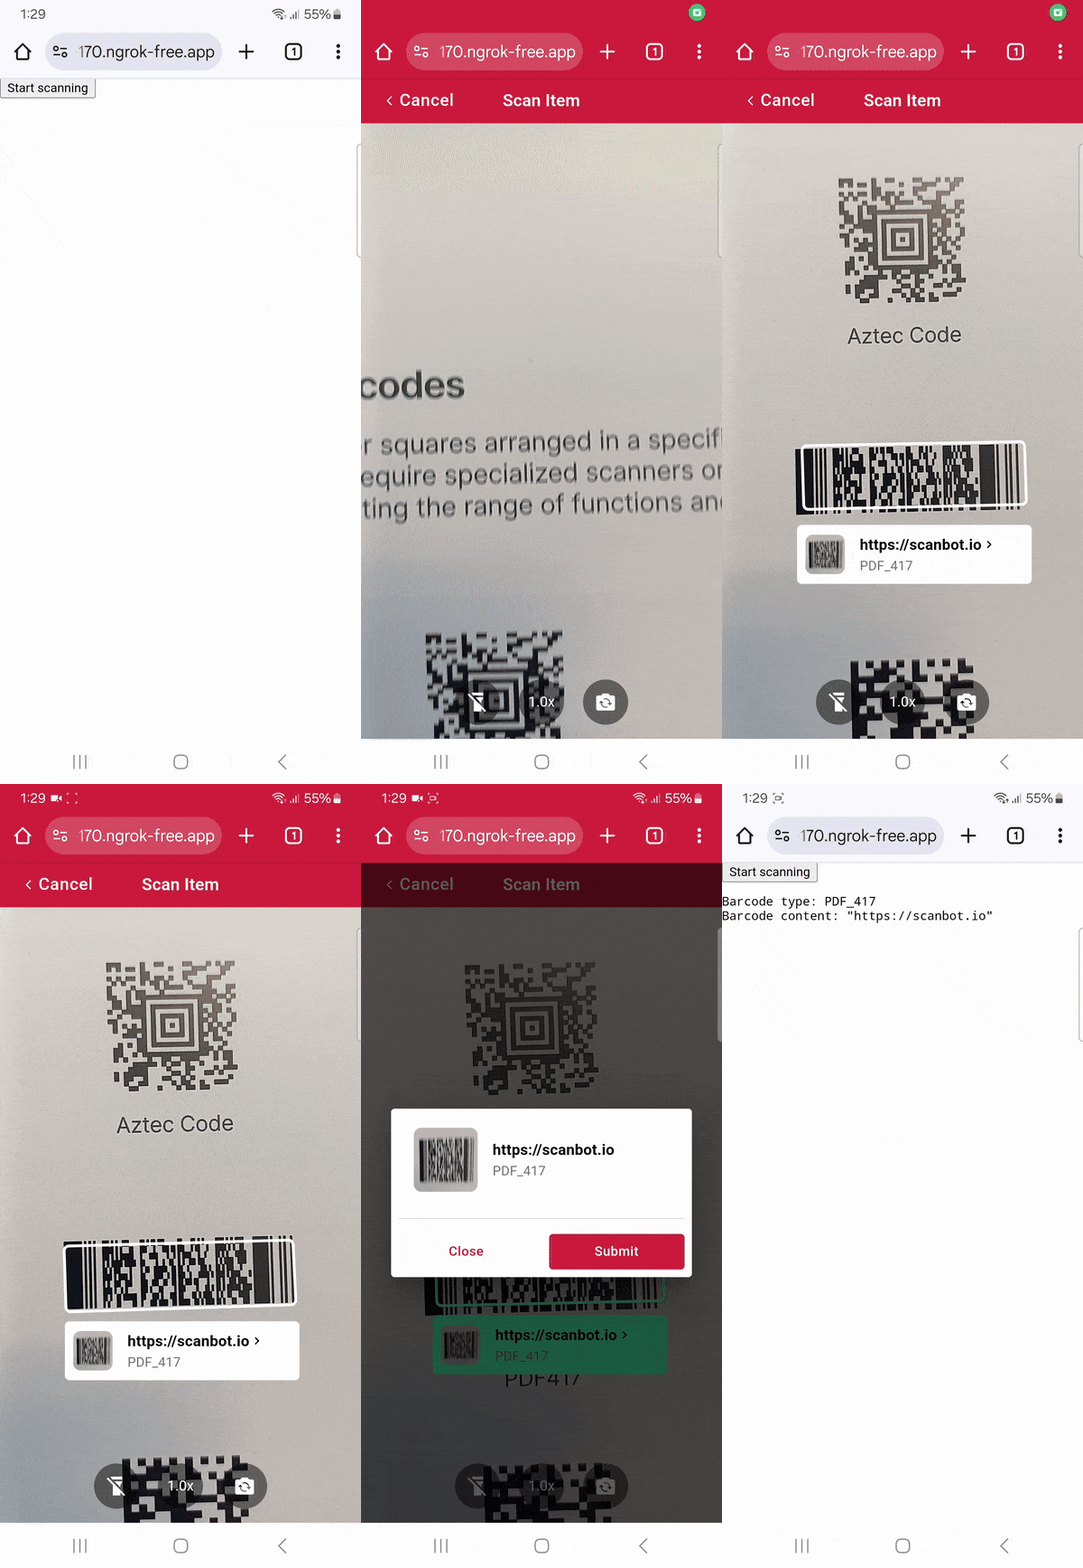
To achieve this, we’ll only need to:
- Download the Web SDK
- Create the HTML page and configure the Web SDK
- Implement PDF417 scanning
Let’s dive into more details for each step.
Want to see the final code right away? Click here.
index.html:
<!DOCTYPE html>
<html lang="en">
<head>
    <meta charset="UTF-8">
    <meta name="viewport" content="width=device-width, initial-scale=1.0, maximum-scale=1.0, user-scalable=0" />
    <title>My Scanner App</title>
</head>
<body style="margin: 0">
<button id="start-scanning">Start scanning</button>
<pre id="result"></pre>
<script type="module">
    import "./scanbot-web-sdk/bundle/ScanbotSDK.ui2.min.js";
    const sdk = await ScanbotSDK.initialize({
        enginePath: "scanbot-web-sdk/bundle/bin/barcode-scanner/"
    });
    document.getElementById("start-scanning").addEventListener("click", async () => {
        const config = new ScanbotSDK.UI.Config.BarcodeScannerScreenConfiguration();
        config.scannerConfiguration.barcodeFormats = ["PDF_417"];

        // We disable the viewfinder to scan every PDF417 barcode in the camera view.
        config.viewFinder.visible = false;

        // We enable the AR Overlay and turn off automatic selection so the barcode's value is overlayed on the screen.
        config.useCase.arOverlay.visible = true;
        config.useCase.arOverlay.automaticSelectionEnabled = false;

        // After the user taps on a barcode value, a confirmation dialog appears.
        config.useCase.confirmationSheetEnabled = true;

        const scanResult = await ScanbotSDK.UI.createBarcodeScanner(config);
        if (scanResult?.items?.length > 0) {
            document.getElementById("result").innerText =
                `Barcode type: ${scanResult.items[0].barcode.format} \n` +
                `Barcode content: "${scanResult.items[0].barcode.text}" \n`;
        } else {
            document.getElementById("result").innerText = "Scanning aborted by the user";
        }
    });
</script>
</body>
</html>
Step 1: Download the Web SDK
First, create a new empty directory for your app and name it, e.g., pdf417-scanner.
Then, download the Scanbot SDK npm package directly from here.
💡 As specified in our documentation, you can also use npm install to download and install the package, but for this tutorial, we suggest manually downloading it and installing it from the link provided.
Unzip the downloaded files into pdf417-scanner. Your folder structure should look like this:
pdf417-scanner/
  |- scanbot-web-sdk/
   |- webpack/
   |- bundle/
   |- @types/
   |- index.js
   |- ui.js
   ... (and some other files)
⚠️ Make sure the folder containing the package files is called scanbot-web-sdk, not “package” or similar.
Step 2: Create the HTML page and configure the Web SDK
First, create an index.html file in the pdf417-scanner folder. Then, add the following code to the file.
<!DOCTYPE html>
<html lang="en">
<head>
    <meta charset="UTF-8">
    <!-- We prevent the user from zooming on mobile device -->
    <meta name="viewport" content="width=device-width, initial-scale=1.0, maximum-scale=1.0, user-scalable=0" />
    <title>My Scanner App</title>
</head>
<body style="margin: 0">
<button id="start-scanning">Start scanning</button>
<pre id="result"></pre>
<script type="module">
    // We import the necessary ScanbotSDK module
    import "./scanbot-web-sdk/bundle/ScanbotSDK.ui2.min.js";
    // When initializing the SDK, we specify the path to the barcode scanner engine
    const sdk = await ScanbotSDK.initialize({
        enginePath: "scanbot-web-sdk/bundle/bin/barcode-scanner/"
    });
    document.getElementById("start-scanning").addEventListener("click", async () => {
        // We create a new default configuration for the barcode scanner
        const config = new ScanbotSDK.UI.Config.BarcodeScannerScreenConfiguration();
        // We create a barcode scanner UI component
        const scanResult = await ScanbotSDK.UI.createBarcodeScanner(config);
        // Once the scanning is done, we display the result
        if (scanResult?.items?.length > 0) {
            document.getElementById("result").innerText =
                `Barcode type: ${scanResult.items[0].barcode.format} \n` +
                `Barcode content: "${scanResult.items[0].barcode.text}" \n`;
        } else {
            document.getElementById("result").innerText = "Scanning aborted by the user";
        }
    });
</script>
</body>
</html>
The code block above:
- Adds the “Start scanning” button.
- Imports and initializes the Scanbot SDK.
- Executes the user interface from the Scanbot SDK when the user clicks the “Start scanning” button.
- If a barcode is identified, it will present the barcode type and its content to the user.
💡 Without a license key, our SDK only runs for 60 seconds per session. This is more than enough for the purposes of our tutorial, but if you like, you can generate a license key on our website.
Step 3: Implement PDF417 scanning
As it is now, our scanner will read any barcode type. Restricting it to scanning only PDF417 codes prevents unintended scans and improves the scanner’s performance, as it doesn’t need to check each supported symbology. So let’s implement this in our code.
config.scannerConfiguration.barcodeFormats = ["PDF_417"];Let’s also change the viewfinder’s aspect ratio. It’s square by default, but since PDF417 barcodes come in a horizontal format, it makes sense to also convey this in our scanning interface. This is mainly a cosmetic change, but do keep in mind that only barcodes located inside the viewfinder will be scanned.
config.viewFinder.aspectRatio.height = 1;
config.viewFinder.aspectRatio.width = 3;
Our code now looks like this:
<!DOCTYPE html>
<html lang="en">
<head>
    <meta charset="UTF-8">
    <meta name="viewport" content="width=device-width, initial-scale=1.0, maximum-scale=1.0, user-scalable=0" />
    <title>My Scanner App</title>
</head>
<body style="margin: 0">
<button id="start-scanning">Start scanning</button>
<pre id="result"></pre>
<script type="module">
    import "./scanbot-web-sdk/bundle/ScanbotSDK.ui2.min.js";
    const sdk = await ScanbotSDK.initialize({
        enginePath: "scanbot-web-sdk/bundle/bin/barcode-scanner/"
    });
    document.getElementById("start-scanning").addEventListener("click", async () => {
        const config = new ScanbotSDK.UI.Config.BarcodeScannerScreenConfiguration();
        // We restrict scanning to PDF417 codes
        config.scannerConfiguration.barcodeFormats = ["PDF_417"];
        // We change the viewfinder dimensions to match a typical PDF417 barcode
        config.viewFinder.aspectRatio.height = 1;
        config.viewFinder.aspectRatio.width = 3;
        const scanResult = await ScanbotSDK.UI.createBarcodeScanner(config);
        if (scanResult?.items?.length > 0) {
            document.getElementById("result").innerText =
                `Barcode type: ${scanResult.items[0].barcode.format} \n` +
                `Barcode content: "${scanResult.items[0].barcode.text}" \n`;
        } else {
            document.getElementById("result").innerText = "Scanning aborted by the user";
        }
    });
</script>
</body>
</html>
Now run your web app and scan a PDF417 code …

… to test your scanner!

💡 To test your web app on your phone, you have a few options. One option is to use a service like ngrok, which creates a tunnel to one of their SSL-certified domains. Their Quick Start guide will help you get up and running quickly.
Optional: Adjust the scanning behavior
The way we set up our PDF417 barcode scanner is one way to do it, but with the Scanbot SDK, you can create all kinds of scanning experiences.
For example, you can remove the viewfinder entirely and display each PDF417 barcode’s value directly on the screen in real time.
config.viewFinder.visible = false;
config.useCase.arOverlay.visible = true;
config.useCase.arOverlay.automaticSelectionEnabled = false;
The user can then tap on the displayed barcode values and submit them. We can also display a confirmation dialog for each tapped barcode.
config.useCase.confirmationSheetEnabled = true;Your code will now look something like this:
<!DOCTYPE html>
<html lang="en">
<head>
    <meta charset="UTF-8">
    <meta name="viewport" content="width=device-width, initial-scale=1.0, maximum-scale=1.0, user-scalable=0" />
    <title>My Scanner App</title>
</head>
<body style="margin: 0">
<button id="start-scanning">Start scanning</button>
<pre id="result"></pre>
<script type="module">
    import "./scanbot-web-sdk/bundle/ScanbotSDK.ui2.min.js";
    const sdk = await ScanbotSDK.initialize({
        enginePath: "scanbot-web-sdk/bundle/bin/barcode-scanner/"
    });
    document.getElementById("start-scanning").addEventListener("click", async () => {
        const config = new ScanbotSDK.UI.Config.BarcodeScannerScreenConfiguration();
        config.scannerConfiguration.barcodeFormats = ["PDF_417"];

        // We don't need to specify the viewfinder's aspect ration anymore.
        // config.viewFinder.aspectRatio.height = 1;
        // config.viewFinder.aspectRatio.width = 3;

        // We disable the viewfinder to scan every PDF417 barcode in the camera view.
        config.viewFinder.visible = false;

        // We enable the AR Overlay and turn off automatic selection so the barcode's value is overlayed on the screen.
        config.useCase.arOverlay.visible = true;
        config.useCase.arOverlay.automaticSelectionEnabled = false;

        // After the user taps on a barcode value, a confirmation dialog appears.
        config.useCase.confirmationSheetEnabled = true;

        const scanResult = await ScanbotSDK.UI.createBarcodeScanner(config);
        if (scanResult?.items?.length > 0) {
            document.getElementById("result").innerText =
                `Barcode type: ${scanResult.items[0].barcode.format} \n` +
                `Barcode content: "${scanResult.items[0].barcode.text}" \n`;
        } else {
            document.getElementById("result").innerText = "Scanning aborted by the user";
        }
    });
</script>
</body>
</html>
Now run your scanner again to test out its new behavior.

Conclusion
🎉 With this, you now have a fully functional web app for scanning PDF417 barcodes!
There are many more scanner configurations for you to try – take a look at the SDK’s RTU UI documentation and the API reference to learn more.
💡 The Scanbot SDK also comes with built-in data parsers for various barcode formats, including PDF417 codes on ID cards, driver’s licenses, boarding passes, and German medical certificates.
Should you have questions about this tutorial or run into any issues, we’re happy to help! Just shoot us an email via tutorial-support@scanbot.io.
Happy scanning! 🤳
