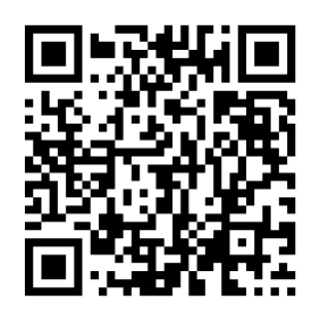
If you want to scan QR codes from your browser, you have several options, including zxing-js, html5-qrcode, and the browser-native barcode detection API.
Another popular choice is jsQR. Although it’s no longer being actively maintained, it still works well for basic use cases.
In this tutorial, you’ll learn how to build a simple QR code scanner in two different ways:
- Using the jsQR library directly.
- Using qr-scanner, which is a wrapper around jsQR with some convenient features.
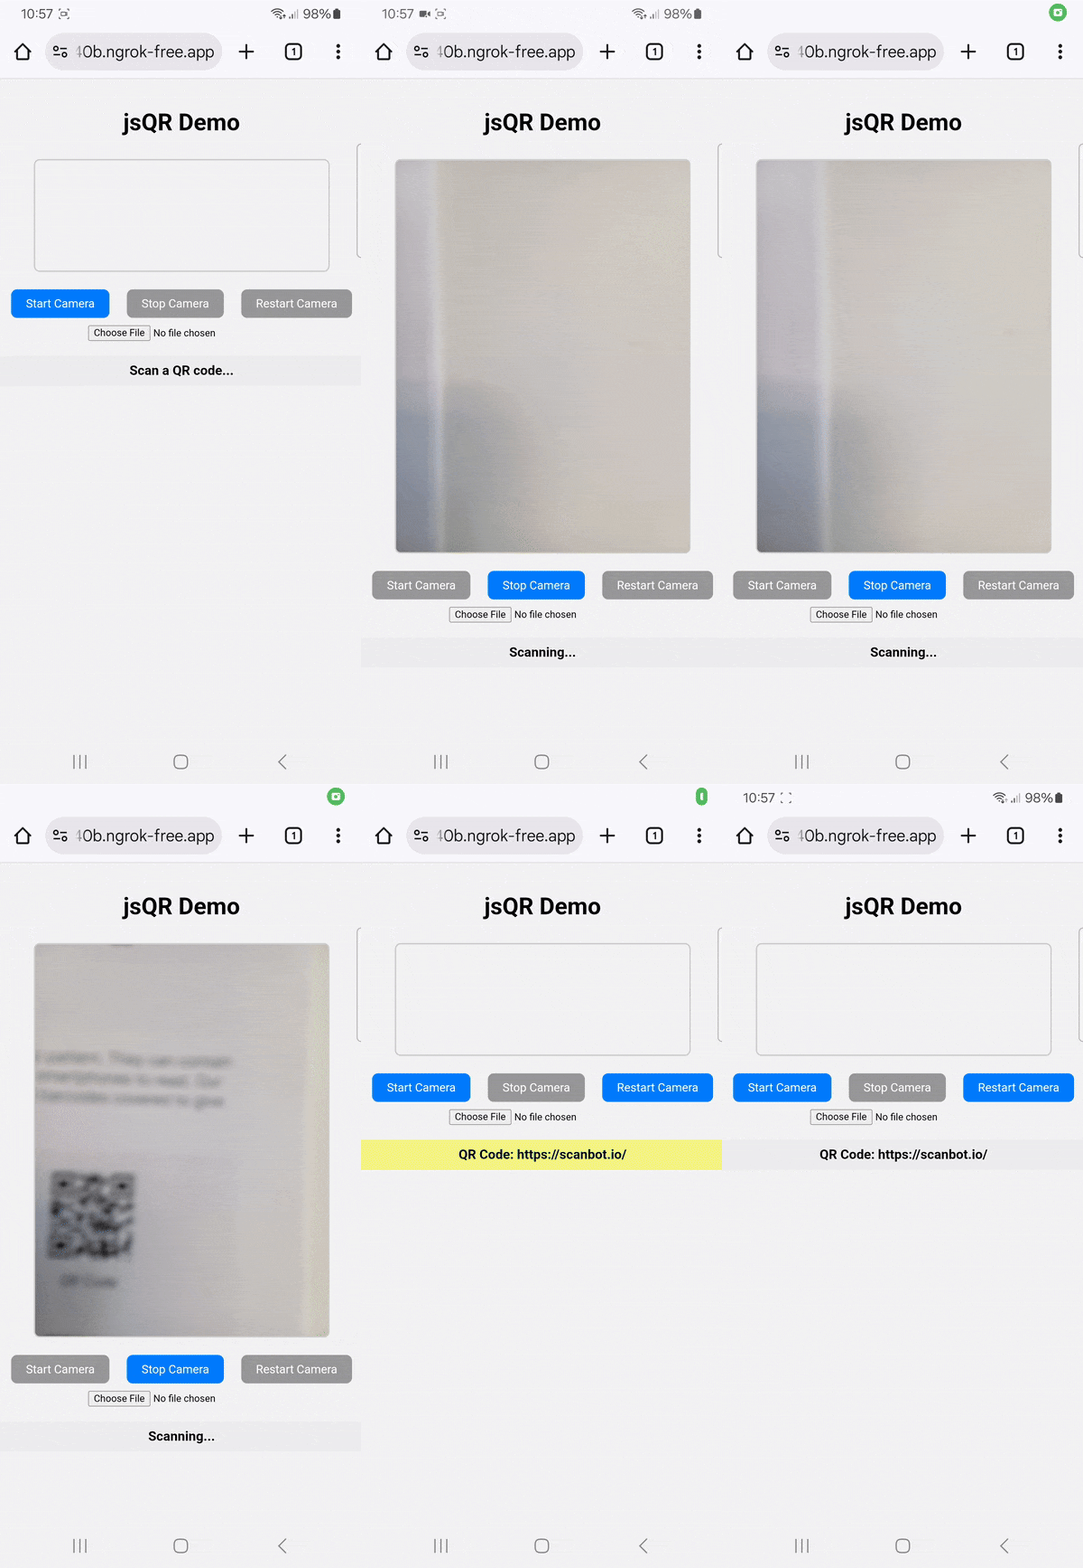
Approach A: Using the jsQR library
First, we’ll create a QR code scanner web app with jsQR by following these steps:
- Defining the HTML structure
- Adding basic CSS styling
- Implementing the scanner logic in JavaScript
Let’s get started!
Step 1: Define the HTML structure
In your project folder, create your index.html and paste the following code:
<!DOCTYPE html>
<html lang="en">
<head>
  <meta charset="UTF-8">
  <title>jsQR Demo</title>
  <link rel="stylesheet" href="style.css">
</head>
<body>
  <h1>jsQR Demo</h1>

  <video id="video" autoplay playsinline></video>
  <canvas id="canvas" hidden></canvas>

  <div>
    <button id="startBtn">Start Camera</button>
    <button id="stopBtn" disabled>Stop Camera</button>
    <button id="restartBtn" disabled>Restart Camera</button>
  </div>

  <div>
    <input type="file" id="fileInput" accept="image/*">
  </div>

  <div id="result">Scan a QR code...</div>

  <script src="https://cdn.jsdelivr.net/npm/jsqr/dist/jsQR.js"></script>
  <script src="app.js"></script>
</body>
</html>
Let’s take a closer look at the code:
<video>displays the live camera feed.<canvas>captures each frame from the video and analyzes it for QR codes.- There are buttons for starting, stopping, and restarting the camera and uploading a file.
jsQRis loaded from a CDN before the code from app.js is run.
Step 2: Add basic CSS styling
Now create a style.css file with the following contents:
body {
  font-family: Arial, sans-serif;
  text-align: center;
  background: #f4f4f4;
  margin: 0;
  padding: 20px;
}

video, canvas {
  max-width: 100%;
  width: 400px;
  height: auto;
  margin: 10px 0;
  border: 2px solid #ccc;
  border-radius: 8px;
}

#result {
  margin-top: 20px;
  padding: 10px;
  font-size: 18px;
  font-weight: bold;
  color: black;
  background: #eee;
  border-radius: 8px;
}

button {
  margin: 10px;
  padding: 10px 20px;
  font-size: 16px;
  border: none;
  border-radius: 8px;
  background: #007bff;
  color: white;
  cursor: pointer;
}

button:disabled {
  background: #999;
  cursor: not-allowed;
}

.flash {
  animation: flash-bg 0.8s ease;
}

@keyframes flash-bg {
  0% { background: yellow; }
  100% { background: #eee; }
}
To visualize when a QR code has been detected, we’ll let the result box flash yellow briefly when a QR is detected (.flash).
Step 3: Implement the scanner logic in JavaScript
Finally, create an app.js file that will contain the camera and QR detection logic:
const video = document.getElementById("video");
const canvas = document.getElementById("canvas");
const ctx = canvas.getContext("2d");

const startBtn = document.getElementById("startBtn");
const stopBtn = document.getElementById("stopBtn");
const restartBtn = document.getElementById("restartBtn");
const fileInput = document.getElementById("fileInput");
const resultEl = document.getElementById("result");

let stream = null;
let scanning = false;
let rafId = null;

async function startCamera() {
  try {
    stream = await navigator.mediaDevices.getUserMedia({ video: { facingMode: "environment" } });
    video.srcObject = stream;
    scanning = true;
    resultEl.textContent = "Scanning...";
    startBtn.disabled = true;
    stopBtn.disabled = false;
    restartBtn.disabled = true;
    scanLoop();
  } catch (err) {
    alert("Error accessing camera: " + err.message);
  }
}

function stopCamera() {
  scanning = false;
  if (rafId) {
    cancelAnimationFrame(rafId);
    rafId = null;
  }
  if (stream) {
    video.srcObject = null;
    stream.getTracks().forEach(track => track.stop());
    stream = null;
  }
  video.pause();
  startBtn.disabled = false;
  stopBtn.disabled = true;
  restartBtn.disabled = false;
}

function restartCamera() {
  stopCamera();
  startCamera();
}

function scanLoop() {
  if (!scanning) return;

  if (video.readyState === video.HAVE_ENOUGH_DATA) {
    canvas.width = video.videoWidth;
    canvas.height = video.videoHeight;
    ctx.drawImage(video, 0, 0, canvas.width, canvas.height);

    const imageData = ctx.getImageData(0, 0, canvas.width, canvas.height);
    const code = jsQR(imageData.data, imageData.width, imageData.height);

    if (code) {
      resultEl.textContent = "QR Code: " + code.data;
      resultEl.classList.add("flash");

      stopCamera(); // auto stop after detection

      setTimeout(() => resultEl.classList.remove("flash"), 1000);
      return;
    }
  }
  rafId = requestAnimationFrame(scanLoop);
}

function scanImageFile(file) {
  const img = new Image();
  img.onload = () => {
    canvas.width = img.width;
    canvas.height = img.height;
    ctx.drawImage(img, 0, 0, canvas.width, canvas.height);

    const imageData = ctx.getImageData(0, 0, canvas.width, canvas.height);
    const code = jsQR(imageData.data, imageData.width, imageData.height);

    if (code) {
      resultEl.textContent = "QR Code (from file): " + code.data;
      resultEl.classList.add("flash");
      setTimeout(() => resultEl.classList.remove("flash"), 1000);
    } else {
      resultEl.textContent = "No QR code found in image.";
    }
  };
  img.src = URL.createObjectURL(file);
}

startBtn.addEventListener("click", startCamera);
stopBtn.addEventListener("click", stopCamera);
restartBtn.addEventListener("click", restartCamera);
fileInput.addEventListener("change", e => {
  if (e.target.files.length > 0) {
    scanImageFile(e.target.files[0]);
  }
});
Let’s take a closer look at the code:
streamstores the camera stream.scanningtracks if scanning is active.rafIdallows us to stop the loop when needed.{ facingMode: "environment" }prefers the rear camera on phones.- The loop using
requestAnimationFramecaptures each video frame, passes it tojsQR, and checks for a QR code. If it detects one, it displays the result and automatically stops the camera. - The event listeners hook up the UI buttons and file input to the respective functions.
Now run your app and test its scanning functionalities.

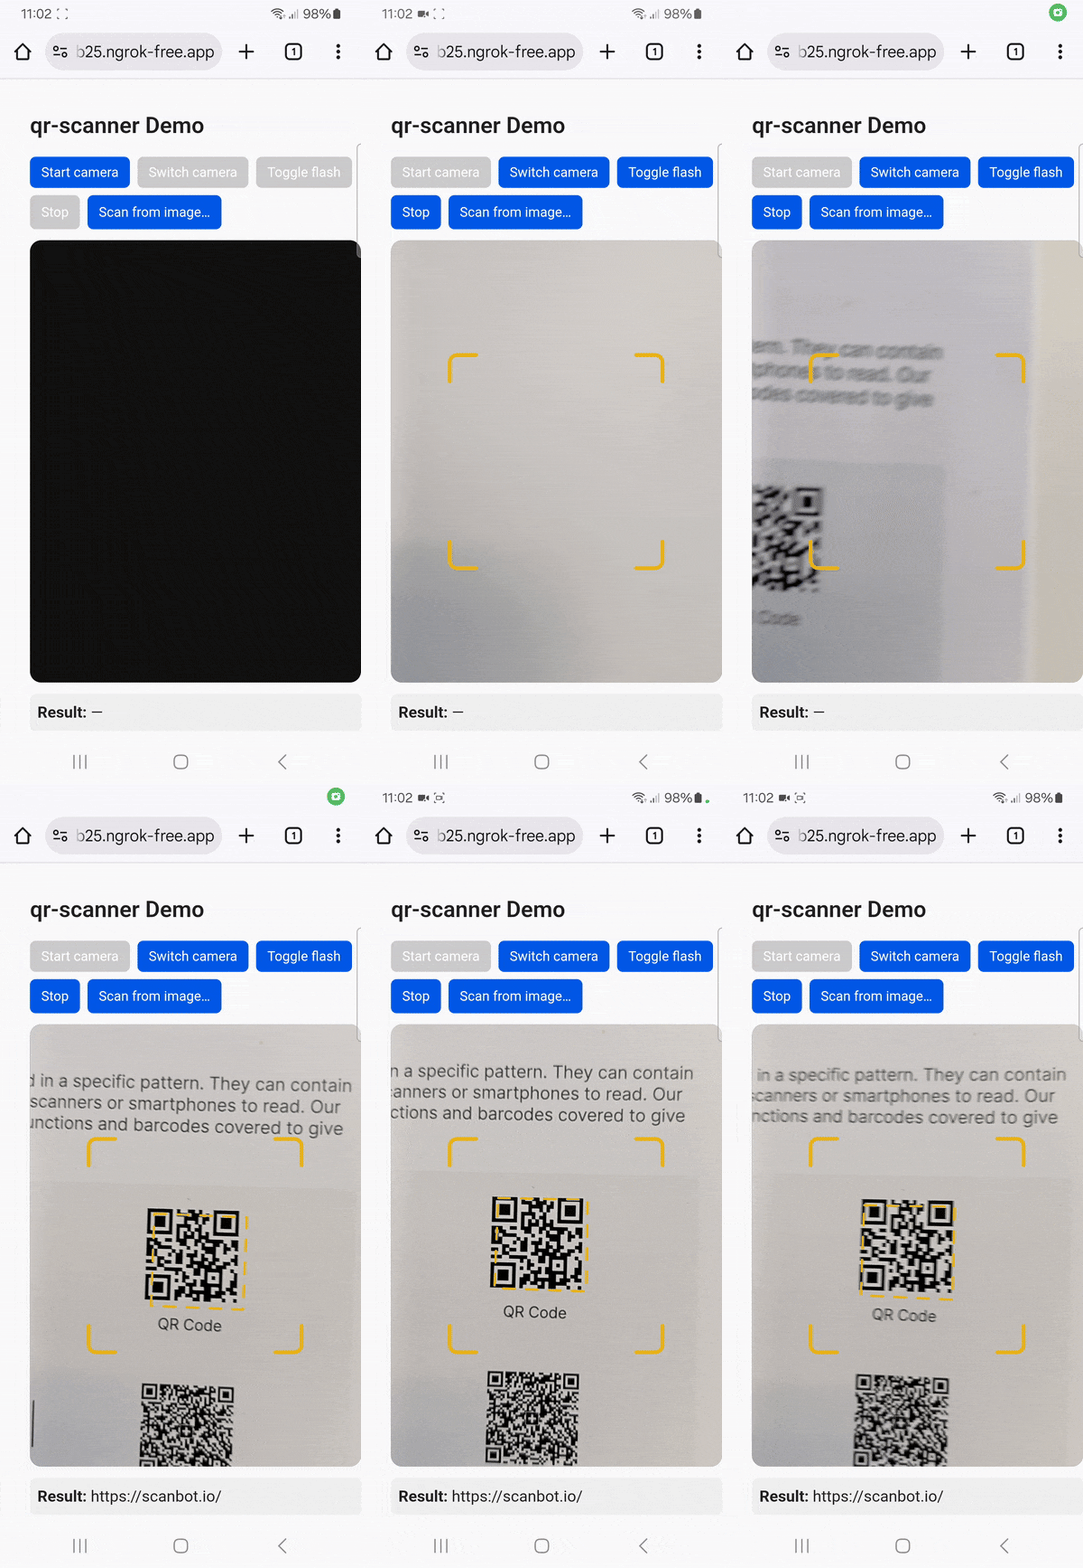
Approach B: Using the qr-scanner library
The qr-scanner library comes with overlays, worker offloading, flash support, and easy image scanning integration – which means less manual coding.
We’ll create our QR code scanner app in two steps:
- Defining the HTML structure and implementing the JavaScript scanner logic
- Adding basic CSS styling
Let’s get started!
Step 1: Define the HTML structure and implement the JavaScript scanner logic
In your project folder, create your index.html file. This time, we’ll use it to implement the JavaScript logic as well:
<!doctype html>
<html lang="en">
<head>
  <meta charset="utf-8" />
  <meta name="viewport" content="width=device-width, initial-scale=1" />
  <title>qr-scanner Demo</title>
  <link rel="stylesheet" href="./style.css">
</head>
<body>
  <main class="wrap">
    <h2>qr-scanner Demo</h2>

    <div class="controls">
      <button id="startBtn">Start camera</button>
      <button id="switchBtn" disabled>Switch camera</button>
      <button id="flashBtn" disabled>Toggle flash</button>
      <button id="stopBtn" disabled>Stop</button>
      <label class="file">
        <input id="fileInput" type="file" accept="image/*" />
        <span>Scan from image…</span>
      </label>
    </div>

    <div class="stage">
      <video id="video" playsinline muted></video>
      <!-- qr-scanner can render its own overlays if enabled -->
      <div id="overlayContainer"></div>
    </div>

    <p class="result"><strong>Result:</strong> <span id="result">—</span></p>
  </main>

  <script type="module">
    import QrScanner from 'https://unpkg.com/qr-scanner@1.4.2/qr-scanner.min.js';

    const video = document.getElementById('video');
    const overlayContainer = document.getElementById('overlayContainer');
    const resultEl = document.getElementById('result');

    const startBtn = document.getElementById('startBtn');
    const switchBtn = document.getElementById('switchBtn');
    const flashBtn = document.getElementById('flashBtn');
    const stopBtn = document.getElementById('stopBtn');
    const fileInput = document.getElementById('fileInput');

    let facingMode = 'environment'; // 'user'
    let qrScanner = null;

    function setButtons(state) {
      const running = state === 'running';
      startBtn.disabled = running;
      switchBtn.disabled = !running;
      stopBtn.disabled = !running;
      // flashBtn gets enabled dynamically after start() if supported
    }

    function makeScanner() {
      if (qrScanner) {
        qrScanner.stop();
      }
      qrScanner = new QrScanner(
        video,
        (result) => {
          // If options are provided, result is an object with { data, cornerPoints }
          resultEl.textContent = typeof result === 'string' ? result : result.data;
        },
        {
          preferredCamera: facingMode,           // 'environment' or 'user'
          highlightScanRegion: true,             // draw the scan region
          highlightCodeOutline: true,            // draw outline on detected code
          returnDetailedScanResult: true,        // ensure { data, cornerPoints }
        }
      );
    }

    async function start() {
      try {
        if (!qrScanner) makeScanner();
        await qrScanner.start(); // prompts for permission if needed

        // Enable/disable flash button depending on support
        const hasFlash = await qrScanner.hasFlash();
        flashBtn.disabled = !hasFlash;

        setButtons('running');
      } catch (e) {
        console.error(e);
        alert('Could not start the camera. Ensure https:// or http://localhost and grant camera access.');
      }
    }

    async function stop() {
      if (qrScanner) await qrScanner.stop();
      setButtons('idle');
      flashBtn.disabled = true;
    }

    async function switchCamera() {
      facingMode = (facingMode === 'environment') ? 'user' : 'environment';
      makeScanner();
      await start();
    }

    async function toggleFlash() {
      try {
        const on = await qrScanner.isFlashOn();
        await qrScanner.turnFlash(!on);
      } catch {
        // Ignore if not supported
      }
    }

    // Scan a still image
    fileInput.addEventListener('change', async (e) => {
      const file = e.target.files?.[0];
      if (!file) return;
      try {
        const res = await QrScanner.scanImage(file, { returnDetailedScanResult: true });
        resultEl.textContent = res.data;
      } catch {
        resultEl.textContent = 'No QR found in image';
      }
    });

    // Wire up UI
    startBtn.addEventListener('click', start);
    stopBtn.addEventListener('click', stop);
    switchBtn.addEventListener('click', switchCamera);
    flashBtn.addEventListener('click', toggleFlash);

    // Initialize UI
    setButtons('idle');
  </script>
</body>
</html>
This code does the following:
- It imports the ES module build from a CDN. According to the library’s README, this module auto-loads its web worker via dynamic import (no manual worker path needed) and supports HTTPS-only camera scanning.
new QrScanner(video, onDecode, options)constructs the scanner. The key options used are:preferredCamera: 'environment' | 'user'to choose the rear/front camera.highlightScanRegion+highlightCodeOutlineto add nice overlays.returnDetailedScanResult: trueto ensure the callback gets{ data, cornerPoints }.qrScanner.start()/stop()controls the camera.qrScanner.hasFlash(),turnFlash(true/false), andisFlashOn()allow toggling the flash on supported devices.- Switching cameras is implemented by recreating the scanner with the opposite
preferredCameraand starting it again. QrScanner.scanImage(file)decodes still images without the camera.
Step 2: Add basic CSS styling
To make our app look nice, let’s also create a style.css with the following contents:
:root { --w: min(92vw, 720px); }

body {
  font: 16px/1.4 system-ui, -apple-system, Segoe UI, Roboto, sans-serif;
  margin: 0;
  padding: 2rem;
  background: #fafafa;
  color: #222;
}

.wrap {
  margin: 0 auto;
  width: var(--w);
}

h2 {
  margin-bottom: 1rem;
  font-size: 1.5rem;
  font-weight: 600;
}

.controls {
  display: flex;
  gap: .5rem;
  flex-wrap: wrap;
  margin-bottom: .75rem;
}

button, .file {
  padding: .5rem .75rem;
  border: none;
  border-radius: 6px;
  background: #0057e7;
  color: white;
  cursor: pointer;
  font-size: .9rem;
  transition: background .2s;
}

button:disabled {
  background: #ccc;
  cursor: not-allowed;
}

button:hover:enabled,
.file:hover {
  background: #003f9e;
}

.file {
  display: inline-flex;
  align-items: center;
  gap: .5rem;
}

.file input {
  display: none;
}

.stage {
  position: relative;
  width: 100%;
  aspect-ratio: 3 / 4;
  background: #111;
  border-radius: 12px;
  overflow: hidden;
}

video {
  position: absolute;
  inset: 0;
  width: 100%;
  height: 100%;
  object-fit: cover;
}

#overlayContainer {
  position: absolute;
  inset: 0;
  pointer-events: none;
}

.result {
  margin-top: .75rem;
  font-size: 1.05rem;
  padding: .5rem;
  background: #f0f0f0;
  border-radius: 6px;
}
This achieves the following:
.filealigns label text and icon side by side.input[type=file]is hidden (only the styled label shows).aspect-ratio: 3/4keeps it proportional on all screens.overflow: hiddenclips the video/overlay to the rounded shape.pointer-events: nonemeans that clicks go through to the video area.
Now run your app and scan a QR code.

Conclusion
This concludes our tutorial on how to set up a simple QR code scanning web app using jsQR and qr-scanner.
Using open-source libraries like these can be great for prototyping and personal projects. However, this approach is rarely viable for developing business solutions, since the work involved in maintaining an app without dedicated support is unpredictable.
We developed the Scanbot Web Barcode Scanner SDK to help enterprises overcome the hurdles presented by community-driven scanning software. Our goal was to provide a developer-friendly solution for a wide range of platforms that consistently delivers high-quality results – even in challenging circumstances.
In the following tutorial, we’ll show you how to set up a fully functional QR code scanning web app in a single HTML file using the Scanbot SDK.
Building a JavaScript QR code scanner with the Scanbot Web Barcode Scanner SDK
We’ll create our QR code scanner app in two steps:
- Setting up the barcode scanner
- Optimizing the scanner for QR codes
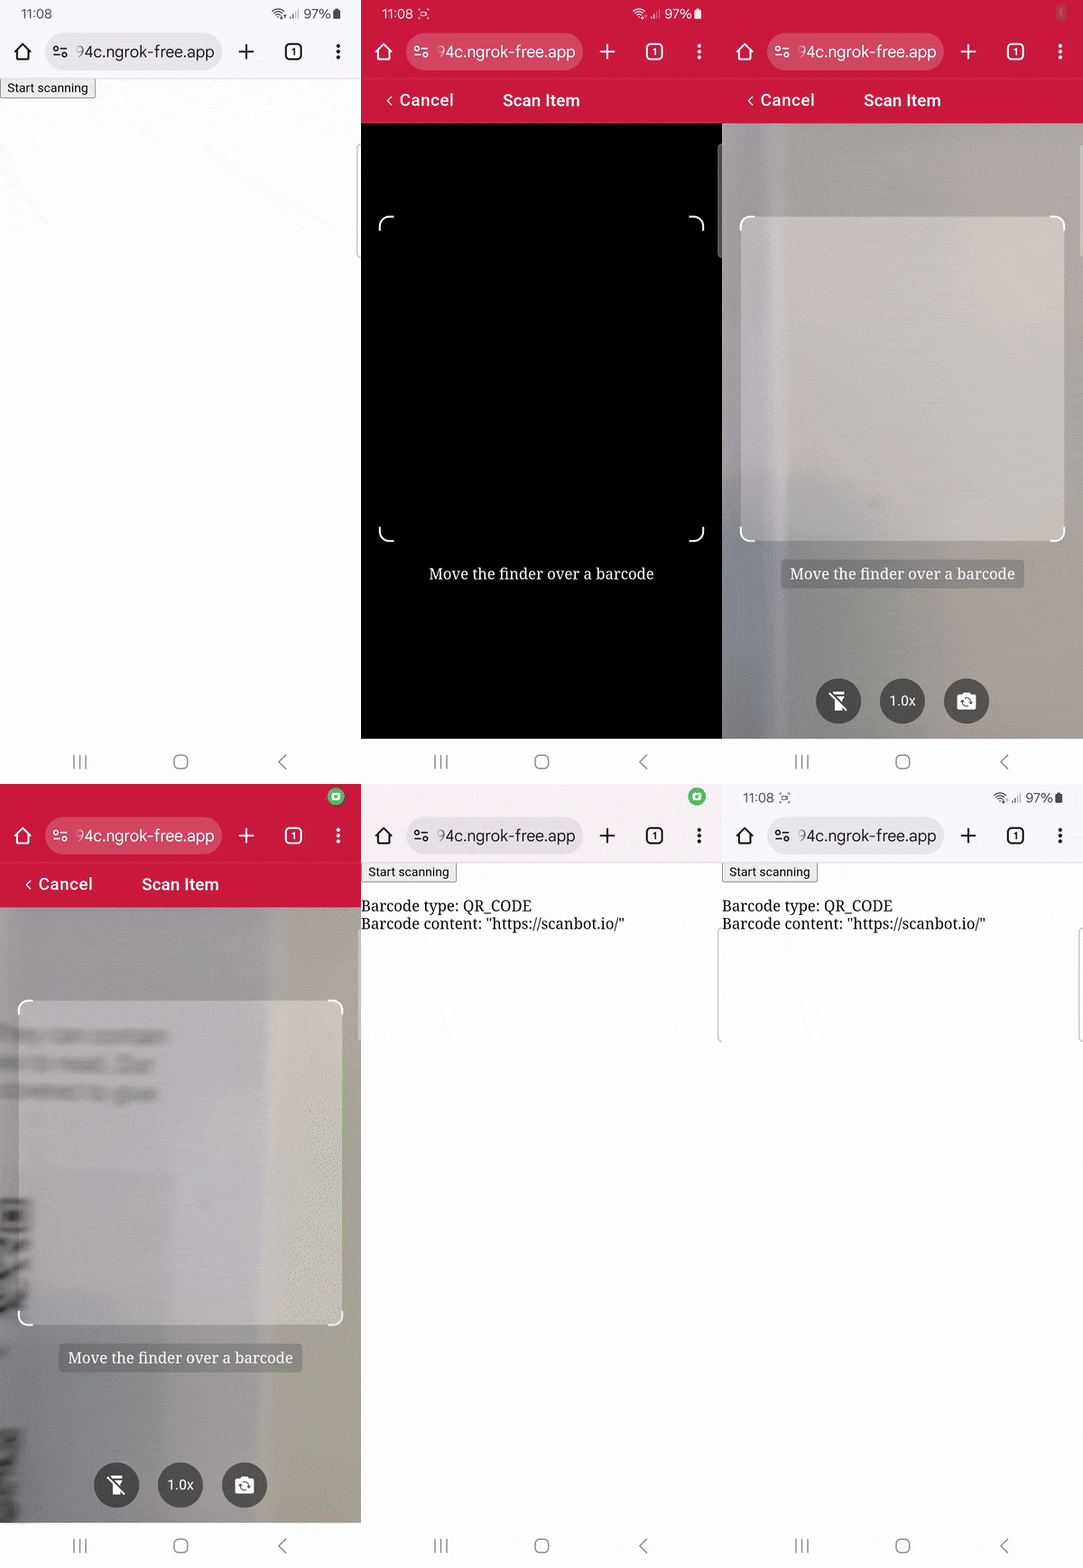
There’s no need to manually code any UI elements, since the SDK comes with Ready-to-Use UI Components.
Step 1: Set up the barcode scanner
In your project folder, create an index.html with some boilerplate code.
<!DOCTYPE html>
<html lang="en">
    <head>
        <meta charset="UTF-8" />
        <meta
            name="viewport"
            content="width=device-width, initial-scale=1.0, maximum-scale=1.0, user-scalable=0"
        />
        <title>QR Code Scanner</title>
    </head>
    <body>
    </body>
</html>
Now we’ll need to do the following:
- Create a button that calls up the scanning interface when clicked.
- Include a
<p>element on the page for displaying the scanning result. - Import the Scanbot Web SDK using a CDN.
- Process the scan result before displaying it on the page.
⚠️ In this tutorial, we’re importing the SDK via jsDelivr. However, you should only do this for quick prototyping. In your production environment, please download the Web SDK directly (or install it via npm) and include its files in your project.
Your index.html will look something like this:
<!DOCTYPE html>
<html lang="en">
    <head>
        <meta charset="UTF-8" />
        <meta
            name="viewport"
            content="width=device-width, initial-scale=1.0, maximum-scale=1.0, user-scalable=0"
        />
        <title>QR Code Scanner</title>
    </head>

    <body style="margin: 0">
        <button id="start-scanning">Start scanning</button>
        <p id="result"></p>
        <script type="module">
            import "https://cdn.jsdelivr.net/npm/scanbot-web-sdk@7.0.0/bundle/ScanbotSDK.ui2.min.js";
            const sdk = await ScanbotSDK.initialize({
                enginePath:
                    "https://cdn.jsdelivr.net/npm/scanbot-web-sdk@7.0.0/bundle/bin/barcode-scanner/",
            });
            document
                .getElementById("start-scanning")
                .addEventListener("click", async () => {

                    const config =
                        new ScanbotSDK.UI.Config.BarcodeScannerScreenConfiguration();

                    const scanResult = await ScanbotSDK.UI.createBarcodeScanner(config);
                    if (scanResult?.items?.length > 0) {
                        document.getElementById("result").innerText =
                            `Barcode type: ${scanResult.items[0].barcode.format} \n` +
                            `Barcode content: "${scanResult.items[0].barcode.text}" \n`;
                    } else {
                        document.getElementById("result").innerText = "Scanning aborted by the user";
                    }
                });
        </script>
    </body>
</html>
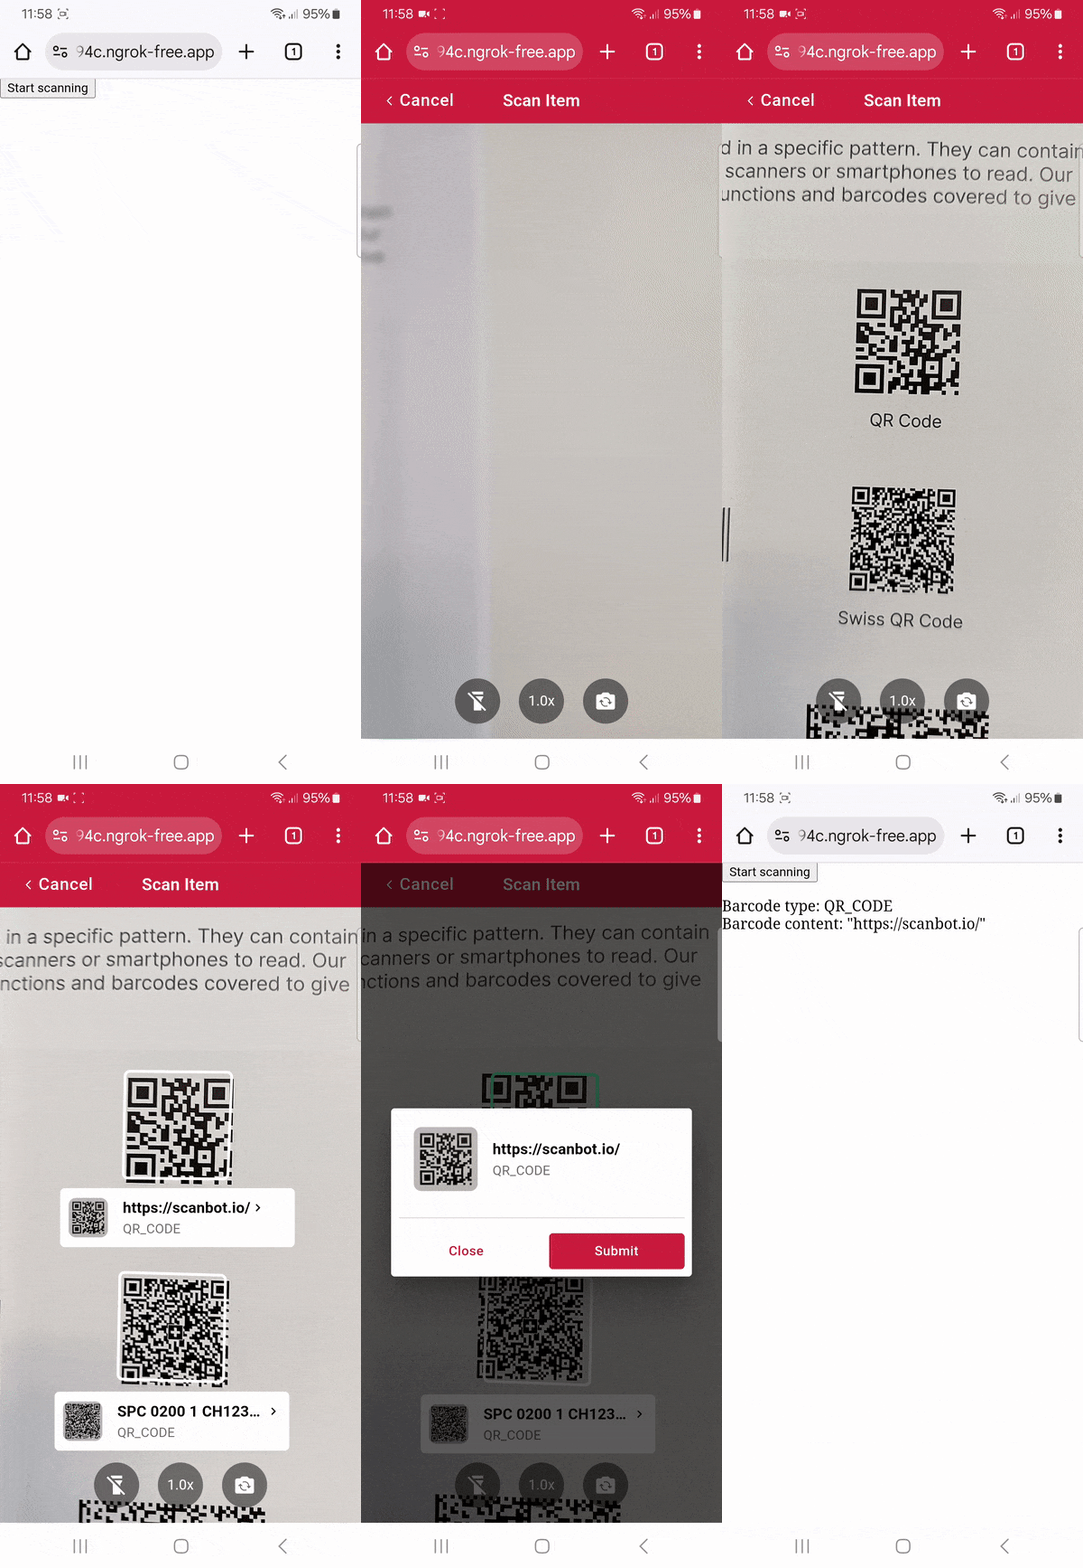
This already provides us with a fully functional barcode scanner – but we can slightly adjust its configuration to make it even better suited for QR codes. Feel free to run the app and test its functionalities.

Step 2: Optimize the scanner for QR codes
As it is now, our scanner will read any barcode type. Restricting it to scanning only QR codes prevents unintended scans and improves the scanner’s performance, as it doesn’t need to check each supported symbology.
So let’s implement this by modifying the BarcodeScannerScreenConfiguration we assigned to the config constant in the previous step.
config.scannerConfiguration.barcodeFormats = ["QR_CODE"];We can also add additional quality-of-life features. In this example, we’ll replace the viewfinder with an AR overlay that users can tap on to select which code they would like to scan. The value is then presented in a confirmation dialog.
// Disable the viewfinder
config.viewFinder.visible = false;

// Enable the AR overlay
config.useCase.arOverlay.visible = true;

// Let users tap on the QR code they would like to scan
config.useCase.arOverlay.automaticSelectionEnabled = false;

// Show the scanned code's value in a confirmation dialog
config.useCase.confirmationSheetEnabled = true;
Your final index.html will look like this:
<!DOCTYPE html>
<html lang="en">
    <head>
        <meta charset="UTF-8" />
        <meta
            name="viewport"
            content="width=device-width, initial-scale=1.0, maximum-scale=1.0, user-scalable=0"
        />
        <title>QR Code Scanner</title>
    </head>

    <body style="margin: 0">
        <button id="start-scanning">Start scanning</button>
        <p id="result"></p>
        <script type="module">
            import "https://cdn.jsdelivr.net/npm/scanbot-web-sdk@7.0.0/bundle/ScanbotSDK.ui2.min.js";
            const sdk = await ScanbotSDK.initialize({
                enginePath:
                    "https://cdn.jsdelivr.net/npm/scanbot-web-sdk@7.0.0/bundle/bin/barcode-scanner/",
            });
            document
                .getElementById("start-scanning")
                .addEventListener("click", async () => {

                    const config =
                        new ScanbotSDK.UI.Config.BarcodeScannerScreenConfiguration();
                        config.scannerConfiguration.barcodeFormats = ["QR_CODE"];
                        config.viewFinder.visible = false;
                        config.useCase.arOverlay.visible = true;
                        config.useCase.arOverlay.automaticSelectionEnabled = false;
                        config.useCase.confirmationSheetEnabled = true;

                    const scanResult = await ScanbotSDK.UI.createBarcodeScanner(config);
                    if (scanResult?.items?.length > 0) {
                        document.getElementById("result").innerText =
                            `Barcode type: ${scanResult.items[0].barcode.format} \n` +
                            `Barcode content: "${scanResult.items[0].barcode.text}" \n`;
                    } else {
                        document.getElementById("result").innerText = "Scanning aborted by the user";
                    }
                });
        </script>
    </body>
</html>
Now run the app again and scan a QR code …

… to test your scanner!

💡 To test your web app on your phone, you have a few options. One option is to use a service like ngrok, which creates a tunnel to one of their SSL-certified domains. Their Quick Start guide will help you get up and running quickly.
Conclusion
This is just one of the many scanner configurations the Scanbot SDK has to offer – take a look at the RTU UI documentation and API reference to learn more.
Integration guides are also available for the following Web frameworks:
Should you have questions about this tutorial or run into any issues, we’re happy to help! Just shoot us an email via tutorial-support@scanbot.io.
Happy scanning! 🤳

