This tutorial continues in part 2.
Introduction
First things first: What is dart::ffi? It’s a technology that allows Flutter to call C and C++ code without using platform-specific bridges.
Pros:
- dart::ffi works faster than Platform Channels since the platform layer is skipped and we can directly interact with C code.
- Native memory becomes manageable through pointers.
- We can use existing C/C++ libraries.
- dart::ffi is more memory efficient.
- Its code generation tool creates Dart wrapper code for the selected headers.
Cons:
- Out of the box, the code generation tool works only for the C language. Using a C++ library requires writing a lot of wrapper code.
- The C++ code has to be wrapped with an
extern Cinterface, so we need to write quite a lot of boilerplate code. - There is a limited number of data types you can map between dart::ffi and C:
pointer,int,float,Uint8,Uint16, andfunction. Everything else can be only represented as a NativeType type.
Requirements
- We are assuming that you are already familiar with the Flutter framework.
- We use macOS in this tutorial. Windows or Linux can also be used with corresponding adjustments.
- The following tools must be installed on macOS:
- HomeBrew as package manager.
- Python2 for some build scripts.
- For Android: latest Android Studio with Android NDK (v23.0.75+) installed.
- For iOS: latest Xcode.
- And, of course, Flutter.
Once you’ve set all that up, we can start our project. Let’s go!
Preparations
1) Create a template project for a Flutter plugin
Use the following Flutter command to create the project flutter_ffi_demo. This will contain a template for a Flutter plugin as well as an example app:
$ flutter create --org com.example --template=plugin
--platforms=android,ios -a kotlin flutter_ffi_demo
2) Prepare OpenCV
Next we need to prepare the OpenCV sources for iOS and Android as well as the build scripts. For that, we will need the tool CMake. Make sure you have CMake version 3.21 or newer installed ($ cmake --version). If you don’t, use the following HomeBrew commands to install and link it:
$ brew install cmake$ brew unlink cmake && brew link cmakeFor the Android SDK and NDK, define the following paths as environment variables. Typically, you add them to your shell config file, e.g., ~/.bashrc or ~/.zshrc. Make sure your NDK version is newer than 23.0.75.
export ANDROID_HOME=/$HOME/Library/Android/sdk
export ANDROID_NDK_HOME=$ANDROID_HOME/ndk-bundle
export ANDROID_NDK=$ANDROID_NDK_HOME
export NDK=$ANDROID_HOME/ndk/23.0.7599858
It’s not easy to build OpenCV for all architectures. Therefore, we have put together the following GitHub repository, which contains all the build scripts and other project files for this tutorial: https://github.com/doo/flutter_ffi_demo
Copy the whole src directory from this repository into your Flutter project directory flutter_ffi_demo. You can find our build scripts for OpenCV in the corresponding platform directories:
src/android/opencv-build/build.shsrc/ios/opencv-build/build.sh
Those scripts will download the OpenCV sources from GitHub and build them.
3) Build OpenCV
After we have prepared the build scripts for both platforms, we can run them from the terminal. The script prebuild.sh will launch them both:
cd src/
sh prebuild.sh
This will take quite a while, but you only have to do it once. The builds of our actual plugin project will run much faster.
4) C++ code
Now that we have successfully built the OpenCV binaries, let’s write some C++ code that uses them. We will then create a dart::ffi native layer that wraps C++ logic.
Note: All C++ code should be placed in the directory src/umbrella, as it’s not platform-specific.
First, we will implement a ShapeDetector class. This class processes image frames using OpenCV, then returns all circles found on it. We will not dive into the details of using OpenCV, so you can just use the final code already present in our demo app’s src/umbrella folder.
Once we have implemented our frame processing class, we need to write a wrapper for it that will map the results between C++ and Dart. The general convention for all foreign function interfaces is to expose a clear C language public interface. For that, we are adding an extern C protocol with the initialization of our C++ frame processor implementation and a method that takes in image bytes in NV21 format. NV21 is a common format used by OpenCV.
#ifdef __cplusplus
extern "C" {
#endif
flutter::Shape *processFrame(ShapeDetector *scanner, flutter::ImageForDetect *image) {
    auto img = flutter::prepareMat(image);
    auto shapes = scanner->detectShapes(img);
    // We need to map result as a linked list of items to return multiple results
    flutter::Shape *first = mapShapesFFiResultStruct(shapes);
    return first;
}
// We are returning a pointer to the instance of scanner to call it in the future
ShapeDetector *initDetector() {
    auto *scanner = new ShapeDetector();
    return scanner;
}
...
#ifdef __cplusplus
}
#endif
ShapeDetector *scanner is a pointer to the instance of ShapeDetector on which we should call the frame processing. flutter::ImageForDetect *image is a custom structure that describes the image metadata.
The full details of flutter::ImageForDetect will be covered in Part 2 of this tutorial. At this point, we only need to know that this struct needs to cover two different formats of image frames, one each for Android and iOS.
To preprocess the image frames before running our ShapeDetector on them, we will need a few additional tools and methods. We have already placed these in src/umbrella/Utils.
There are two small drawbacks to this method:
- We need to preprocess the image because the
flutter_cameraplugin produces images in YUV422 format (multiple planes). For OpenCV, however, we needcv::Matobjects in NV21 format (only two planes). We have implemented this conversion functionality in theprepareMat - dart::ffi does not support C arrays properly. To return multiple items, we need to store them as a linked list instead, and return a pointer to the first value in the list. An example of the result mapping can be found here in the
mapShapesFFiResultStructmethod.
5) Dart code
Now we need to implement our dart::ffi interface from the Dart side. All Dart code should be inside the lib folder. The main steps here are:
- Loading the library into memory for each platform. iOS will automatically look for the flutter plugin with the project name
flutter_ffi_demoas defined in thepubspec.yamlfile.
On Android, we are looking for a library by the name of the library file inside the Android project.
See the complete filelib/src/ffi/ffi_lookup.dartin our GitHub repo:
final sdkNative = Platform.isAndroid
    ? ffi.DynamicLibrary.open('libflutter_ffi.so')
    : ffi.DynamicLibrary.process();
Now we need to declare all the bridge methods which already exist in C++. In Dart, they are called lookup functions. The code snippet below is part of the lib/shape_detector/shape_detector.dart file. The full implementation can be found here.
final _processFrame = sdkNative
    .lookupFunction<_ProcessFrameNative, _ProcessFrame>('processFrame');

typedef _ProcessFrameNative = ffi.Pointer<_ShapeNative> Function(
    ffi.Pointer<ffi.NativeType>, ffi.Pointer<SdkImage>);
typedef _ProcessFrame = ffi.Pointer<_ShapeNative> Function(
    ffi.Pointer<ffi.NativeType>, ffi.Pointer<SdkImage>);
Let’s have a look at the main dart::ffi part for our scanner. Here we declare a method _processFramewhich implements two typedefs. One is a Flutter signature – _ProcessFrame – and another is _ProcessFrameNative, its native representation.
- Now we can call it just like any other Flutter function:
_processFrame(pointerToTheNativeScanner, SdkImage);SdkImage is a native struct that we use to handle the image byte data separated into planes. It covers the same structure as flutter::ImageForDetect in C++ code (details of which will be described in Part 2).
pointerToTheNativeScanner is a pointer into the native memory where our shape detector is stored. This is how we get pointerToTheNativeScanner during the scanner initialization:
final _init = sdkNative
   .lookupFunction<_InitDetectorNative, _InitDetector>('initDetector');

typedef _InitDetectorNative = ffi.Pointer<ffi.NativeType> Function();
typedef _InitDetector = ffi.Pointer<ffi.NativeType> Function();

ffi.Pointer<ffi.NativeType> scanner = ffi.nullptr;

OpenCvShapeDetector();

Future<void> init() async {
 dispose(); //dispose if there was any native scanner initialized
scanner = _init();
 return;
}
We call the native method that returns a pointer to the internal scanner object:
// We are returning a pointer to the instance of scanner to call it in the future
ShapeDetector *initDetector() {
    auto *scanner = new ShapeDetector();
    return scanner;
}
Those were the basic steps that we needed to implement for dart::ffi bridging.
But we also need to write some code on top of that. For example:
- Mappers from native objects to the objects supported by dart::ffi – and vice versa.
- Cleaning the objects from memory after each detection.
- We need to add some threading functionality. That’s because Flutter itself processes everything on the main thread, and so heavy computation would freeze our UI completely.
- We need to wrap the
camera_pluginfunctionality or write a custom camera implementation. - Also, we need to add a graphical overlay for the detection results.
So far, we have been concentrating on building the native part. Now it’s time to link everything together. We will use the platform tools as well as the library building functionality.
Android NDK and the build process
We need to write a build script for our C++ sources. While it’s possible to use the Android NDK build script Android.mk, another way is to use the CMake tool and CMakeLists.txt. We decided to go with the second approach for two reasons: It’s more common for building native code, and we can cover more platforms.
So, let’s make some magic happen with CMake! The complete script for Android can be found in src/android/CMakeLists.txt.
First, define the OpenCV linking with all its dependencies in CMakeLists.txt:
include(ExternalProject)
find_library(log-lib log) # Add Android logging
# GLESv2 look for OpenG Android
find_path(GLES2_INCLUDE_DIR GLES2/gl2.h
    HINTS ${ANDROID_NDK})
find_library(GLES2_LIBRARY libGLESv2.so
    HINTS ${GLES2_INCLUDE_DIR}/../lib)

# Open SSL
add_library(OpenSSL INTERFACE)
add_dependencies(OpenSSL ${openssl})
set_property(TARGET OpenSSL PROPERTY INTERFACE_INCLUDE_DIRECTORIES "${openssl}/include")
set_property(TARGET OpenSSL PROPERTY INTERFACE_LINK_DIRECTORIES "${openssl}/lib/${ANDROID_ABI}")
set_property(TARGET OpenSSL PROPERTY INTERFACE_LINK_LIBRARIES crypto ssl)

message("open-jpeg ${open_jpeg}")
# OpenCV
set(OpenCV_DIR ${opencv})
set(OpenJPEG_DIR ${open_jpeg})
find_package(OpenJPEG REQUIRED HINTS ${open_jpeg})
find_package(OpenCV REQUIRED HINTS ${opencv})
Next, we declare the paths to our native code sources:
set(FLUTTER_UMBRELLA
   ${umbrella}/OpenCV/OpenCvFFI.cpp
   ${umbrella}/FaceDetector/FaceDetector.cpp
   ${umbrella}/ShapeDetector/ShapeDetector.cpp
)
# Build a shared library with our umbrella classes
add_library(${CMAKE_PROJECT_NAME} SHARED
   ${FLUTTER_UMBRELLA}
)
target_include_directories(${CMAKE_PROJECT_NAME} PUBLIC
    ${umbrella}
)
Now, we need to link OpenCV with all its external dependencies (which are already precompiled):
target_link_libraries(${CMAKE_PROJECT_NAME} PUBLIC
   ${OPENJPEG_LIBRARIES}
   ${OpenCV_LIBS}
    OpenSSL
   ${log-lib}
   ${GLES2_LIBRARY}
)
Now we have a CMake script that contains our shared library build description. Finally, we link it to the Android Gradle system, which will handle the actual build. Here is the relevant content of android/build.gradle:
defaultConfig {
    minSdkVersion 21
    //for debug
    externalNativeBuild {
        cmake {
            arguments "-DANDROID_STL=c++_shared",
                    "-DANDROID_TOOLCHAIN=clang",
                    "-DCMAKE_BUILD_TYPE:=Release" //Use Debug for proper debugging of native code
        }
    }
}

externalNativeBuild {
    cmake {
        path file('../src/android/CMakeLists.txt')
        version '3.21.2'
    }
}
ndkVersion "23.0.7599858"
Some issues that can occur here:
- We need to use CMake 3.21+ under the hood, or it won’t compile. From version 3.21 on, CMake can handle some additional flags and properties that are required for a proper build of our shared library with OpenCV. To ensure that, we have declared the NDK and CMake versions in the Gradle config.
- If it’s not compiling, try deleting all Android NDK versions except the one declared in Gradle. Version 23.0.75 or higher is required.
This is all we need to set up our build system for native code. We can now use it for developing and debugging.
For the release build, we need to precompile the native libraries manually, because we won’t ship our sources with the plugin. In this case, libraries should be stored in the Android plugin’s own src/lib folder and added to Gradle as shown below.
Since we have already precompiled all those libraries, the previous code snippet should be ignored.
sourceSets {
    main.java.srcDirs += 'src/main/kotlin'
    main.jniLibs.srcDirs = ['src/lib'] //for release
}
A note on debugging and developing
As developers, we want to debug our code in IDE, for example, in Android Studio. For Flutter, debugging non-Flutter code is a bit tricky. We need a separate instance of the Android Studio that will be able to debug Kotlin and C++ code.
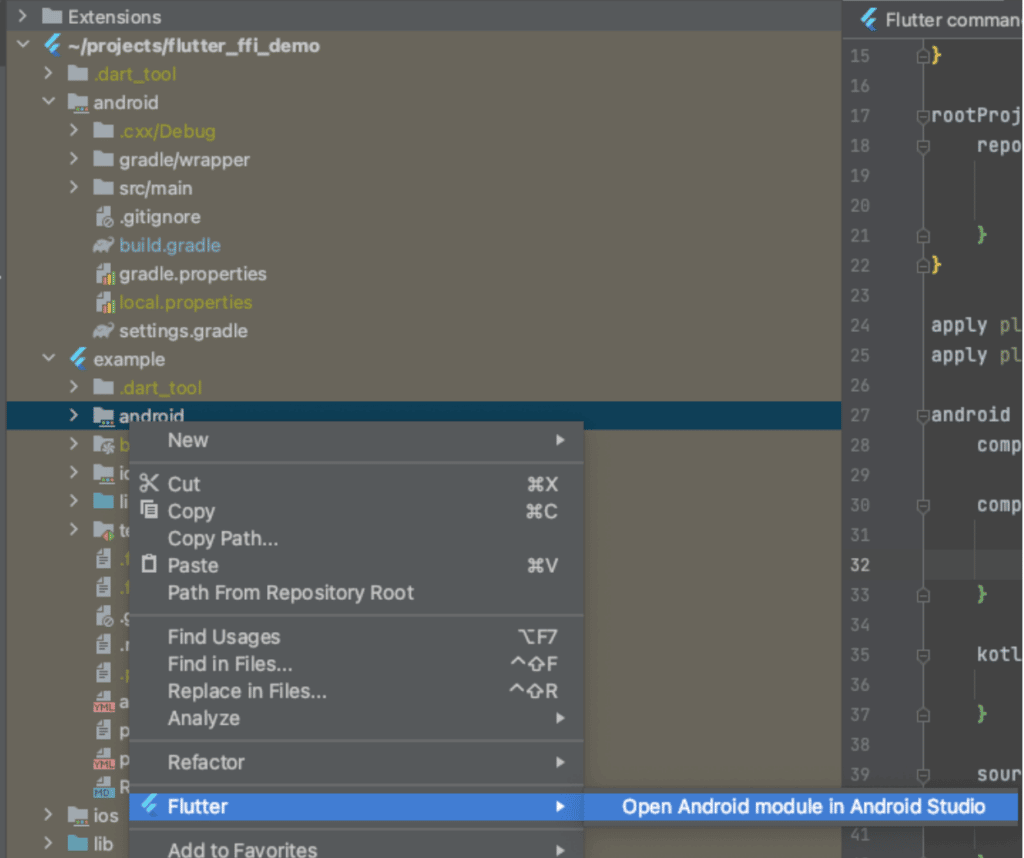
For that, we need to open the Android part of the Flutter app like this:
- Right-click android in our app.
- In the menu, go to Flutter.
- Select Open Android module in Android Studio.

Now that we are done with the Android part, let’s move on to iOS.
iOS build system and process
To unify the build process and make it similar to the Android configuration, we will use CMake’s functionality for building Xcode frameworks.
The iOS CMake configuration is generally the same as the one for Android, but there are a few major differences. Here is the CMake configuration for building the .framework file from the sources. The complete example can be found here src/ios/CMakeLists.txt.
set_target_properties(${CMAKE_PROJECT_NAME} PROPERTIES
  FRAMEWORK TRUE
  MACOSX_FRAMEWORK_IDENTIFIER com.scanbot.flutterffi
  PUBLIC_HEADER "${FLUTTER_UMBRELLA_PUBLIC}"
  VERSION 1.0.0
  SOVERSION 1.0.0
#For release build
  #XCODE_ATTRIBUTE_CODE_SIGN_IDENTITY ""
  #XCODE_ATTRIBUTE_DEVELOPMENT_TEAM ""
  #XCODE_ATTRIBUTE_CODE_SIGNING_REQUIRED "YES"
)
The following Xcode flag needs to be added for the bitcode optimizations:
## compile option necessary to build proper framework
target_compile_options(${CMAKE_PROJECT_NAME}
 PUBLIC
   "-fembed-bitcode"
 )
Also, we need to select different paths for OpenSSL and OpenCV builds. See src/ios/CMakeLists.txt for details.
After the creation of our CMakeLists.txt, we have to deal with another problematic part. We can’t connect our CMake build directly to the iOS module because its build system does not support that. So instead, we will precompile the framework file and put it in the proper place.To do so, create the folder src/ios/build and run the following cmake command in it:
$ cd src/ios/build/
$ cmake ../ \
-DCMAKE_TOOLCHAIN_FILE=$HOME/projects/flutter_ffi_demo/src/ios/opencv-build/opencv-4.5.0/platforms/ios/cmake/Toolchains/Toolchain-iPhoneOS_Xcode.cmake \
-DIOS_ARCH=arm64 \
-DIPHONEOS_DEPLOYMENT_TARGET=11.0 \
-DCMAKE_OSX_SYSROOT=iphoneos \
-DCMAKE_CONFIGURATION_TYPES:=Debug \
-GXcode
After CMake finishes successfully, use the following Xcode command to prebuild the generated project named flutter_ffi.xcodeproj:
$ xcodebuild -project flutter_ffi.xcodeproj -target flutter_ffiNow we can go to the folder named Debug-iphoneos and copy the .framework file from there into the iOS plugin folder.
To simplify this process, we provide the build script build.sh in the repository folder src/ios. After a successful run, you should get the file flutter_ffi.framework inside the main ios folder. This framework will be used for further iOS builds.
Finally, we need to get our application to see the generated framework file. Because the iOS part of the Flutter plugin is provided only as a pod, we have to register our framework as a “vendor framework”. This is the only way to make the Xcode pod include a prebuilt framework.
To do that, we simply add the following line in the ios/flutter_ffi_demo.podspec file:
s.vendored_frameworks = 'flutter_ffi.framework'That’s it! Now we can run our application both on Android and iOS.
Summary
In this first part of the article, we implemented an empty Flutter plugin with native code support via dart::ffi. There are still quite a few things left to do to make a complete camera plugin with all the basic functionality. In the second part we will go through how to deal with the camera in Flutter, to stream, convert, and process the image frames with OpenCV, and to display the results.
You can continue here with part 2.
Would you like to start? Try our Flutter Document or Flutter Barcode Scanner SDKs today.


