Dioxus is a Rust-based UI framework for building fast, cross-platform apps targeting Web, Desktop, and Mobile, using a React-like component model while leveraging Rust’s safety and performance. It aims to provide Rust developers with a productive UI development experience with hot reload, live updates, and seamless state management, filling the gap in the Rust ecosystem for building user interfaces.
In this tutorial, we’ll create a web app for scanning barcodes using the Dioxus framework and a combination of Rust and JavaScript. To implement the scanning functionalities, we’ll use the Scanbot Web Barcode Scanner SDK.
To achieve this, we’ll follow these steps:
- Creating our Dioxus project
- Adding the Scanbot SDK package to the assets directory
- Implementing the JavaScript integration layer
- Binding the JavaScript functions in Rust
- Loading the SDK dynamically and initializing it
- Adding the UI for scanning barcodes and displaying the results
- Running your Dioxus app and scanning some barcodes
Want to see the final code right away? Click here.
main.rs:
use dioxus::prelude::*;
use js_sys::Promise;
use wasm_bindgen::prelude::wasm_bindgen;
use wasm_bindgen_futures::JsFuture;

fn main() {
    dioxus::launch(App);
}

#[component]
fn App() -> Element {
    const SCANBOT_SDK_JS: Asset = asset!("assets/scanbot-web-sdk/bundle/ScanbotSDK.min.js");
    const SCANBOT_UI2_JS: Asset = asset!("assets/scanbot-web-sdk/bundle/ScanbotSDK.ui2.min.js");

    let mut sdk_bundles_loaded = use_signal(|| 0);
    let mut sdk_ready = use_signal(|| false);
    use_effect(move || {
        if sdk_bundles_loaded() == 2 && !sdk_ready() {
            init_scanbot_sdk("");
            sdk_ready.set(true);
        }
    });

    rsx! {
        script { src: SCANBOT_SDK_JS, onload: move |_| { sdk_bundles_loaded += 1 } }
        script { src: SCANBOT_UI2_JS, onload: move |_| { sdk_bundles_loaded += 1 } }
        if sdk_ready() {
            Demo {}
        }
    }
}

#[wasm_bindgen(module = "/assets/demo.js")]
extern "C" {
    #[wasm_bindgen(js_name = initScanbotSDK)]
    fn init_scanbot_sdk(license_key: &str);

    #[wasm_bindgen(js_name = startSingleBarcodeScan)]
    fn start_single_barcode_scan() -> Promise;

    #[wasm_bindgen(js_name = startMultiBarcodeScan)]
    fn start_multi_barcode_scan() -> Promise;
}

#[component]
fn Demo() -> Element {
    let result = use_signal(|| String::new());

    let on_single_scan = move |_| {
        spawn({
            let mut result = result.clone();
            async move {
                match JsFuture::from(start_single_barcode_scan()).await {
                    Ok(js_val) => {
                        result.set(js_val.as_string().unwrap_or("No barcode found".into()));
                    }
                    Err(_) => {
                        result.set("Error during single scan".into());
                    }
                }
            }
        });
    };

    let on_multi_scan = move |_| {
        spawn({
            let mut result = result.clone();
            async move {
                match JsFuture::from(start_multi_barcode_scan()).await {
                    Ok(js_val) => {
                        result.set(js_val.as_string().unwrap_or("No barcodes found".into()));
                    }
                    Err(_) => {
                        result.set("Error during multi-scan".into());
                    }
                }
            }
        });
    };

    rsx! {
        div {
            style: "display: flex; flex-direction: column; align-items: center; gap: 1rem; padding: 1rem; max-width: 600px; margin: auto;",

            button {
                style: "background: #c8193c; color: white; border: none; padding: 0.75rem 1.5rem; font-size: 1rem; border-radius: 6px; cursor: pointer;",
                onclick: on_single_scan,
                "Scan Single Barcode"
            }

            button {
                style: "background: #c8193c; color: white; border: none; padding: 0.75rem 1.5rem; font-size: 1rem; border-radius: 6px; cursor: pointer;",
                onclick: on_multi_scan,
                "Scan Multiple Barcodes"
            }

            if !result().is_empty() {
                pre {
                    style: "background: #1a1a1a; color: #00ff88; font-family: monospace; padding: 1rem; border-radius: 6px; width: 100%; max-width: 600px; max-height: 300px; overflow-y: auto; white-space: pre-wrap; word-break: break-word;",
                    "{result()}"
                }
            }
        }
    }
}

#[component]
pub fn Hero() -> Element {
    rsx! {}
}
Prerequisites
- The latest version of the Rust toolchain
- The Dioxus CLI for building and running your app
- Optional: Visual Studio Code with the rust-analyzer extension for a better development experience
Step 1: Create your Dioxus project
Open your terminal and initialize a new project.
dx new dioxus_barcode_scannerYou will be presented with several options for setting up the project. For this tutorial, you can answer as follows:
- Which sub-template should be expanded? –> Bare-Bones
- Do you want to use Dioxus Fullstack? –> false
- Do you want to use Dioxus Router? –> false
- Do you want to use Tailwind CSS? –> false
- Which platform do you want DX to serve by default? –> Web
Afterwards, navigate into your project directory.
cd dioxus_barcode_scannerStep 2: Add the Scanbot SDK package to the assets directory
Next, you need to manually add the Scanbot Web SDK to your project, for which you can use the following commands:
# Download the SDK package as a tarball
npm pack scanbot-web-sdk

# Extract the tarball
tar -xf scanbot-web-sdk-*.tgz

# Move the package to the assets folder
mv package assets/scanbot-web-sdk

# Remove the tarball, as it is no longer needed
rm scanbot-web-sdk-*.tgz
💡 We use Scanbot SDK version 7.2.0 in this tutorial. You can find the latest version in the changelog.
Now configure Dioxus.toml to ensure that the assets directory (including the SDK) is included in your build and served correctly.
[application]
asset_dir = "assets"
This configuration ensures that all subfolders within assets/, including the SDK, are automatically bundled and served with your application during development and in production builds.
💡 For quick prototyping, you can also reference the SDK directly via a CDN instead of downloading and hosting the Scanbot Web SDK manually.
const SCANBOT_SDK_JS: Asset = asset!("https://cdn.jsdelivr.net/npm/scanbot-web-sdk@latest/bundle/ScanbotSDK.min.js");
const SCANBOT_UI2_JS: Asset = asset!("https://cdn.jsdelivr.net/npm/scanbot-web-sdk@latest/bundle/ScanbotSDK.ui2.min.js");
export async function initScanbotSDK(licenseKey) {
await window.ScanbotSDK.initialize({
licenseKey,
enginePath: "https://cdn.jsdelivr.net/npm/scanbot-web-sdk@latest/bundle/bin/barcode-scanner/",
});
}However, we advise against using jsDelivr or other CDNs in production due to reliability, security, and licensing concerns.
Add the required Rust dependencies
To enable asynchronous JavaScript interop within your Dioxus application, add the following dependencies to Cargo.toml:
wasm-bindgen = "0.2.100"
wasm-bindgen-futures = "0.4"
js-sys = "0.3"wasm-bindgenenables Rust to call JavaScript functions and handle value conversions across the WebAssembly boundary.wasm-bindgen-futuresprovides seamlessasync/awaitsupport, allowing Rust to work with JavaScriptPromiseobjects natively.js-syssupplies bindings for standard JavaScript types (such asPromise) for direct interoperation.
Step 3: Implement the JavaScript integration layer
To bridge the Scanbot Web SDK with your Dioxus application, create a new file assets/demo.js with the following code containing the core functionality of our app:
let scanbotSDKInstance = null;

/**
 * Initialize the Scanbot SDK with your license key.
 */
export async function initScanbotSDK(licenseKey) {
    if (scanbotSDKInstance) return;

    scanbotSDKInstance = await window.ScanbotSDK.initialize({
        licenseKey,
        enginePath: "/assets/scanbot-web-sdk/bundle/bin/barcode-scanner/",
    });
}

/**
 * Start the single-barcode scanning mode.
 */
export async function startSingleBarcodeScan() {
    try {
        const result = await window.ScanbotSDK.UI.createBarcodeScanner(
            new window.ScanbotSDK.UI.Config.BarcodeScannerScreenConfiguration()
        );

        if (result && result.items && result.items.length > 0) {
            const barcode = result.items[0].barcode;
            return `${barcode.format}: "${barcode.text}"`;
        } else {
            return "No barcode scanned or scan cancelled.";
        }
    } catch (error) {
        console.error("Error during single barcode scan:", error);
        return Promise.reject(error);
    }
}

/**
 * Start the multi-barcode scanning mode with an AR overlay.
 */
export async function startMultiBarcodeScan() {
    try {
        const config = new window.ScanbotSDK.UI.Config.BarcodeScannerScreenConfiguration();
        const useCase = new window.ScanbotSDK.UI.Config.MultipleScanningMode();
        useCase.arOverlay.visible = true;
        config.useCase = useCase;
        const result = await window.ScanbotSDK.UI.createBarcodeScanner(config);

        if (result && result.items && result.items.length > 0) {
            const formattedBarcodes = result.items.map((item) => {
                return `${item.barcode.format} (x${item.count}): "${item.barcode.text}"\n\n`;
            });
            return formattedBarcodes.join("\n");
        } else {
            return "No barcodes scanned or scan cancelled.";
        }
    } catch (error) {
        console.error("Error during multi-scan:", error);
        return Promise.reject(error);
    }
}
In the next step, we will make the scanning functionalities available to our Rust code.
Step 4: Bind the JavaScript functions in Rust
Open src/main.rs and import the Promise type from the js-sys crate, as well as the wasm_bindgen macro, which is used to expose JavaScript functions and types to Rust (and vice versa) when compiling Rust code to WebAssembly.
use js_sys::Promise;
use wasm_bindgen::prelude::wasm_bindgen;
Then add the following code to the file:
#[wasm_bindgen(module = "/assets/demo.js")]
extern "C" {
    #[wasm_bindgen(js_name = initScanbotSDK)]
    fn init_scanbot_sdk(license_key: &str);

    #[wasm_bindgen(js_name = startSingleBarcodeScan)]
    fn start_single_barcode_scan() -> Promise;

    #[wasm_bindgen(js_name = startMultiBarcodeScan)]
    fn start_multi_barcode_scan() -> Promise;
}
This allows your Rust code to call the specified JavaScript functions from demo.js.
Step 5: Load the SDK dynamically and initialize it
Before we can use the Scanbot SDK, we need to initialize it, e.g., in the App component in main.rs.
#[component]
fn App() -> Element {
    const SCANBOT_SDK_JS: Asset = asset!("assets/scanbot-web-sdk/bundle/ScanbotSDK.min.js");
    const SCANBOT_UI2_JS: Asset = asset!("assets/scanbot-web-sdk/bundle/ScanbotSDK.ui2.min.js");

    use_effect(move || {
        init_scanbot_sdk("");
    });

    rsx! {
        script { src: SCANBOT_SDK_JS }
        script { src: SCANBOT_UI2_JS }
    }
}
However, at the time of writing, if you try to call init_scanbot_sdk("") immediately, it may fail due to the following reasons:
- The JavaScript SDK bundles are loaded and executed independently of the order in which they are added.
wasm_bindgenexpects the functions it binds to exist globally when called.- If the SDK scripts are not loaded in time, your call to
init_scanbot_sdk("")will fail.
Still, we can ensure the initialization will succeed by including some checks in our code:
#[component]
fn App() -> Element {
    const SCANBOT_SDK_JS: Asset = asset!("assets/scanbot-web-sdk/bundle/ScanbotSDK.min.js");
    const SCANBOT_UI2_JS: Asset = asset!("assets/scanbot-web-sdk/bundle/ScanbotSDK.ui2.min.js");

    // Tracks how many SDK scripts have loaded
    let mut sdk_bundles_loaded = use_signal(|| 0);

    // Indicates that the SDK has been fully initialized
    let mut sdk_ready = use_signal(|| false);

    // Initialize Scanbot SDK after both scripts are loaded
    use_effect(move || {
        if sdk_bundles_loaded() == 2 && !sdk_ready() {
            init_scanbot_sdk("");
            sdk_ready.set(true);
        }
    });

    rsx! {
        // Dynamically inject SDK scripts and track when they load
        script { src: SCANBOT_SDK_JS, onload: move |_| { sdk_bundles_loaded += 1 } }
        script { src: SCANBOT_UI2_JS, onload: move |_| { sdk_bundles_loaded += 1 } }
    }
}
This way, you ensure init_scanbot_sdk is called only after all necessary scripts have been loaded.
💡 Without a license key, our SDK only runs for 60 seconds per session. This is more than enough for the purposes of our tutorial, but if you like, you can generate a free trial license.
Alternative method: Use a custom index.html
If you need fine-grained control (for example, to include SDK scripts statically or add additional meta tags), you can provide your own index.html. The Dioxus CLI will automatically use your custom file instead of the default template while still injecting the necessary code to load your WASM bundle and enabling hot reloading during development.
Note that Dioxus expects an index.html containing a <div id="main"></div>, which is required for mounting your Rust/WASM app into the DOM (as mentioned in this GitHub issue).
<!DOCTYPE html>
<html lang="en">
<head>
    <meta charset="UTF-8">
    <title>Dioxus Barcode Scanner</title>
</head>
<body>
    <div id="main"></div> <!-- Required for Dioxus to mount your app -->
    <script src="/assets/scanbot-web-sdk/bundle/ScanbotSDK.min.js"></script>
    <script src="/assets/scanbot-web-sdk/bundle/ScanbotSDK.ui2.min.js"></script>
</body>
</html>
Step 6: Add the UI for scanning barcodes and displaying the results
Now it’s time to build a simple user interface for our Rust-based barcode scanning web app.
At the top of main.rs, import JsFuture from the wasm-bindgen-futures crate to work with JavaScript promises as Rust futures.
use wasm_bindgen_futures::JsFuture;Then create a Demo component with buttons for triggering single- and multi-barcode scans, as well as displaying the results.
#[component]
fn Demo() -> Element {
    let result = use_signal(|| String::new());

    // Single-barcode scan handler
    let on_single_scan = move |_| {
        spawn({
            let mut result = result.clone();
            async move {
                match JsFuture::from(start_single_barcode_scan()).await {
                    Ok(js_val) => {
                        result.set(js_val.as_string().unwrap_or("No barcode found".into()));
                    }
                    Err(_) => {
                        result.set("Error during single scan".into());
                    }
                }
            }
        });
    };

    // Multi-barcode scan handler
    let on_multi_scan = move |_| {
        spawn({
            let mut result = result.clone();
            async move {
                match JsFuture::from(start_multi_barcode_scan()).await {
                    Ok(js_val) => {
                        result.set(js_val.as_string().unwrap_or("No barcodes found".into()));
                    }
                    Err(_) => {
                        result.set("Error during multi-scan".into());
                    }
                }
            }
        });
    };

    rsx! {
        div {
            style: "display: flex; flex-direction: column; align-items: center; gap: 1rem; padding: 1rem; max-width: 600px; margin: auto;",

            button {
                style: "background: #c8193c; color: white; border: none; padding: 0.75rem 1.5rem; font-size: 1rem; border-radius: 6px; cursor: pointer;",
                onclick: on_single_scan,
                "Scan Single Barcode"
            }

            button {
                style: "background: #c8193c; color: white; border: none; padding: 0.75rem 1.5rem; font-size: 1rem; border-radius: 6px; cursor: pointer;",
                onclick: on_multi_scan,
                "Scan Multiple Barcodes"
            }

            if !result().is_empty() {
                pre {
                    style: "background: #1a1a1a; color: #00ff88; font-family: monospace; padding: 1rem; border-radius: 6px; width: 100%; max-width: 600px; max-height: 300px; overflow-y: auto; white-space: pre-wrap; word-break: break-word;",
                    "{result()}"
                }
            }
        }
    }
}
Finally, we need to call the Demo component inside our App component while ensuring that the SDK has been initialized.
#[component]
fn App() -> Element {
    // ...
    rsx! {
        script { src: SCANBOT_SDK_JS, onload: move |_| { sdk_bundles_loaded += 1 } }
        script { src: SCANBOT_UI2_JS, onload: move |_| { sdk_bundles_loaded += 1 } }

        // Call the Demo component after the SDK has been initialized
        if sdk_ready() {
            Demo {}
        }
    }
}
Your main.rs will then look like this:
use dioxus::prelude::*;
use js_sys::Promise;
use wasm_bindgen::prelude::wasm_bindgen;
use wasm_bindgen_futures::JsFuture;

fn main() {
    dioxus::launch(App);
}

#[component]
fn App() -> Element {
    const SCANBOT_SDK_JS: Asset = asset!("assets/scanbot-web-sdk/bundle/ScanbotSDK.min.js");
    const SCANBOT_UI2_JS: Asset = asset!("assets/scanbot-web-sdk/bundle/ScanbotSDK.ui2.min.js");

    let mut sdk_bundles_loaded = use_signal(|| 0);
    let mut sdk_ready = use_signal(|| false);
    use_effect(move || {
        if sdk_bundles_loaded() == 2 && !sdk_ready() {
            init_scanbot_sdk("");
            sdk_ready.set(true);
        }
    });

    rsx! {
        script { src: SCANBOT_SDK_JS, onload: move |_| { sdk_bundles_loaded += 1 } }
        script { src: SCANBOT_UI2_JS, onload: move |_| { sdk_bundles_loaded += 1 } }
        if sdk_ready() {
            Demo {}
        }
    }
}

#[wasm_bindgen(module = "/assets/demo.js")]
extern "C" {
    #[wasm_bindgen(js_name = initScanbotSDK)]
    fn init_scanbot_sdk(license_key: &str);

    #[wasm_bindgen(js_name = startSingleBarcodeScan)]
    fn start_single_barcode_scan() -> Promise;

    #[wasm_bindgen(js_name = startMultiBarcodeScan)]
    fn start_multi_barcode_scan() -> Promise;
}

#[component]
fn Demo() -> Element {
    let result = use_signal(|| String::new());

    let on_single_scan = move |_| {
        spawn({
            let mut result = result.clone();
            async move {
                match JsFuture::from(start_single_barcode_scan()).await {
                    Ok(js_val) => {
                        result.set(js_val.as_string().unwrap_or("No barcode found".into()));
                    }
                    Err(_) => {
                        result.set("Error during single scan".into());
                    }
                }
            }
        });
    };

    let on_multi_scan = move |_| {
        spawn({
            let mut result = result.clone();
            async move {
                match JsFuture::from(start_multi_barcode_scan()).await {
                    Ok(js_val) => {
                        result.set(js_val.as_string().unwrap_or("No barcodes found".into()));
                    }
                    Err(_) => {
                        result.set("Error during multi-scan".into());
                    }
                }
            }
        });
    };

    rsx! {
        div {
            style: "display: flex; flex-direction: column; align-items: center; gap: 1rem; padding: 1rem; max-width: 600px; margin: auto;",

            button {
                style: "background: #c8193c; color: white; border: none; padding: 0.75rem 1.5rem; font-size: 1rem; border-radius: 6px; cursor: pointer;",
                onclick: on_single_scan,
                "Scan Single Barcode"
            }

            button {
                style: "background: #c8193c; color: white; border: none; padding: 0.75rem 1.5rem; font-size: 1rem; border-radius: 6px; cursor: pointer;",
                onclick: on_multi_scan,
                "Scan Multiple Barcodes"
            }

            if !result().is_empty() {
                pre {
                    style: "background: #1a1a1a; color: #00ff88; font-family: monospace; padding: 1rem; border-radius: 6px; width: 100%; max-width: 600px; max-height: 300px; overflow-y: auto; white-space: pre-wrap; word-break: break-word;",
                    "{result()}"
                }
            }
        }
    }
}

#[component]
pub fn Hero() -> Element {
    rsx! {}
}
Step 7: Run your Dioxus app and scan some barcodes
To test your barcode scanning app locally, run:
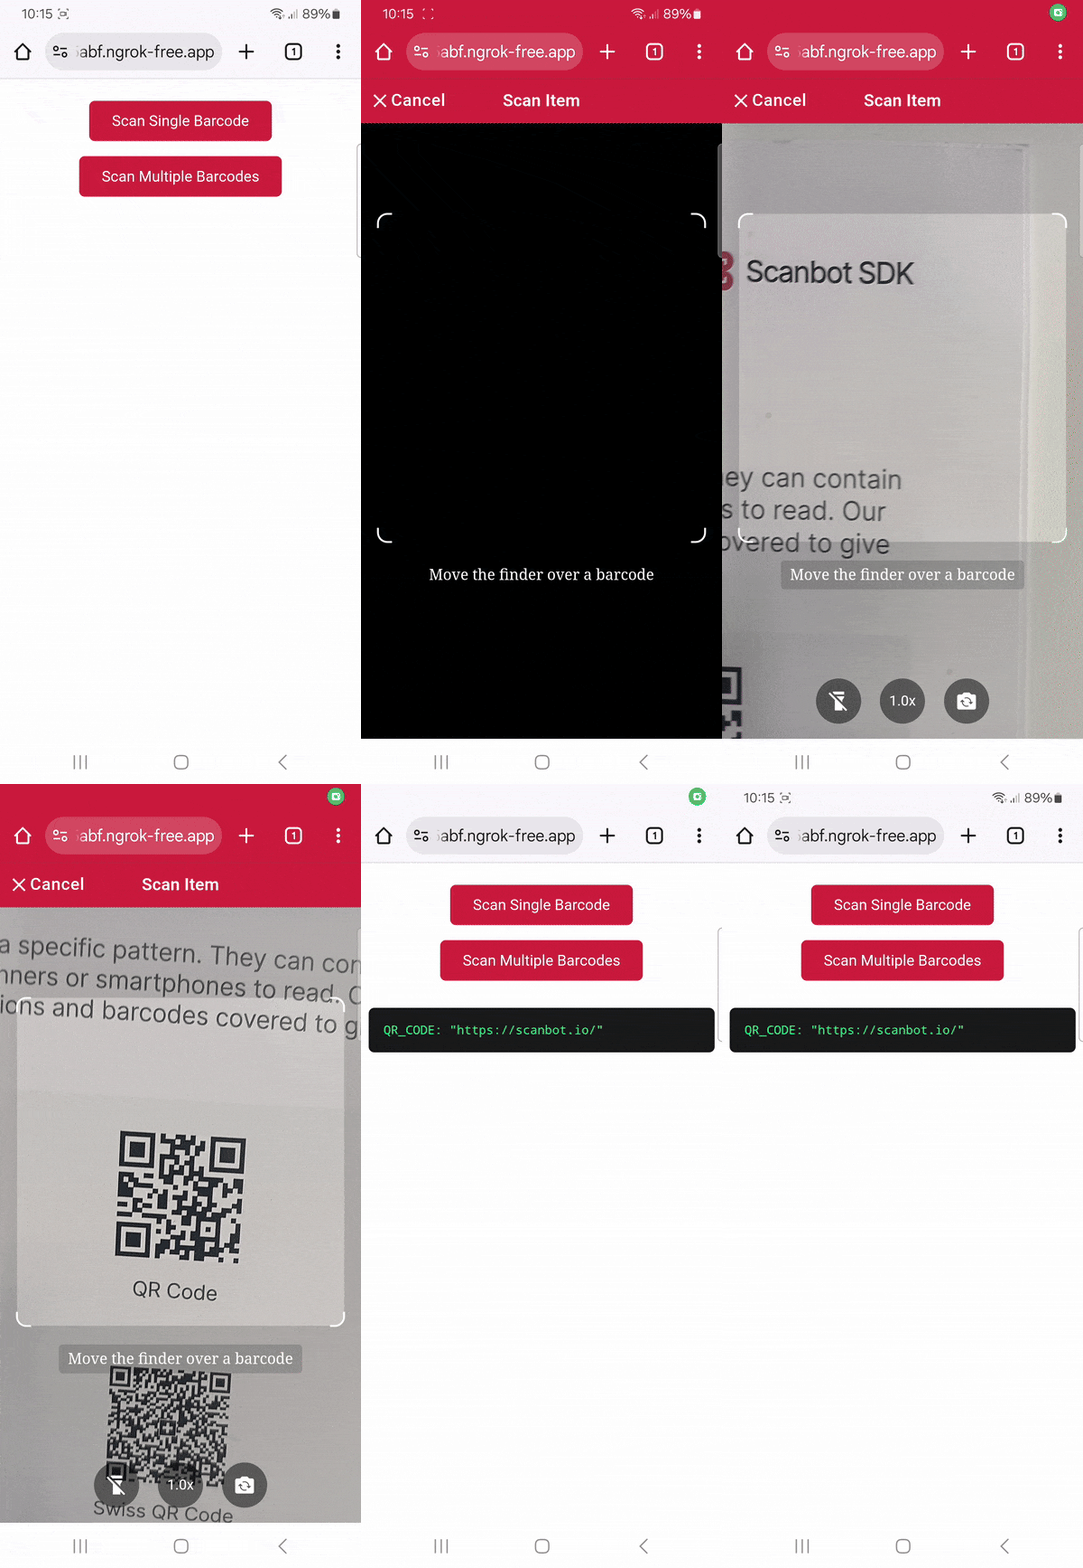
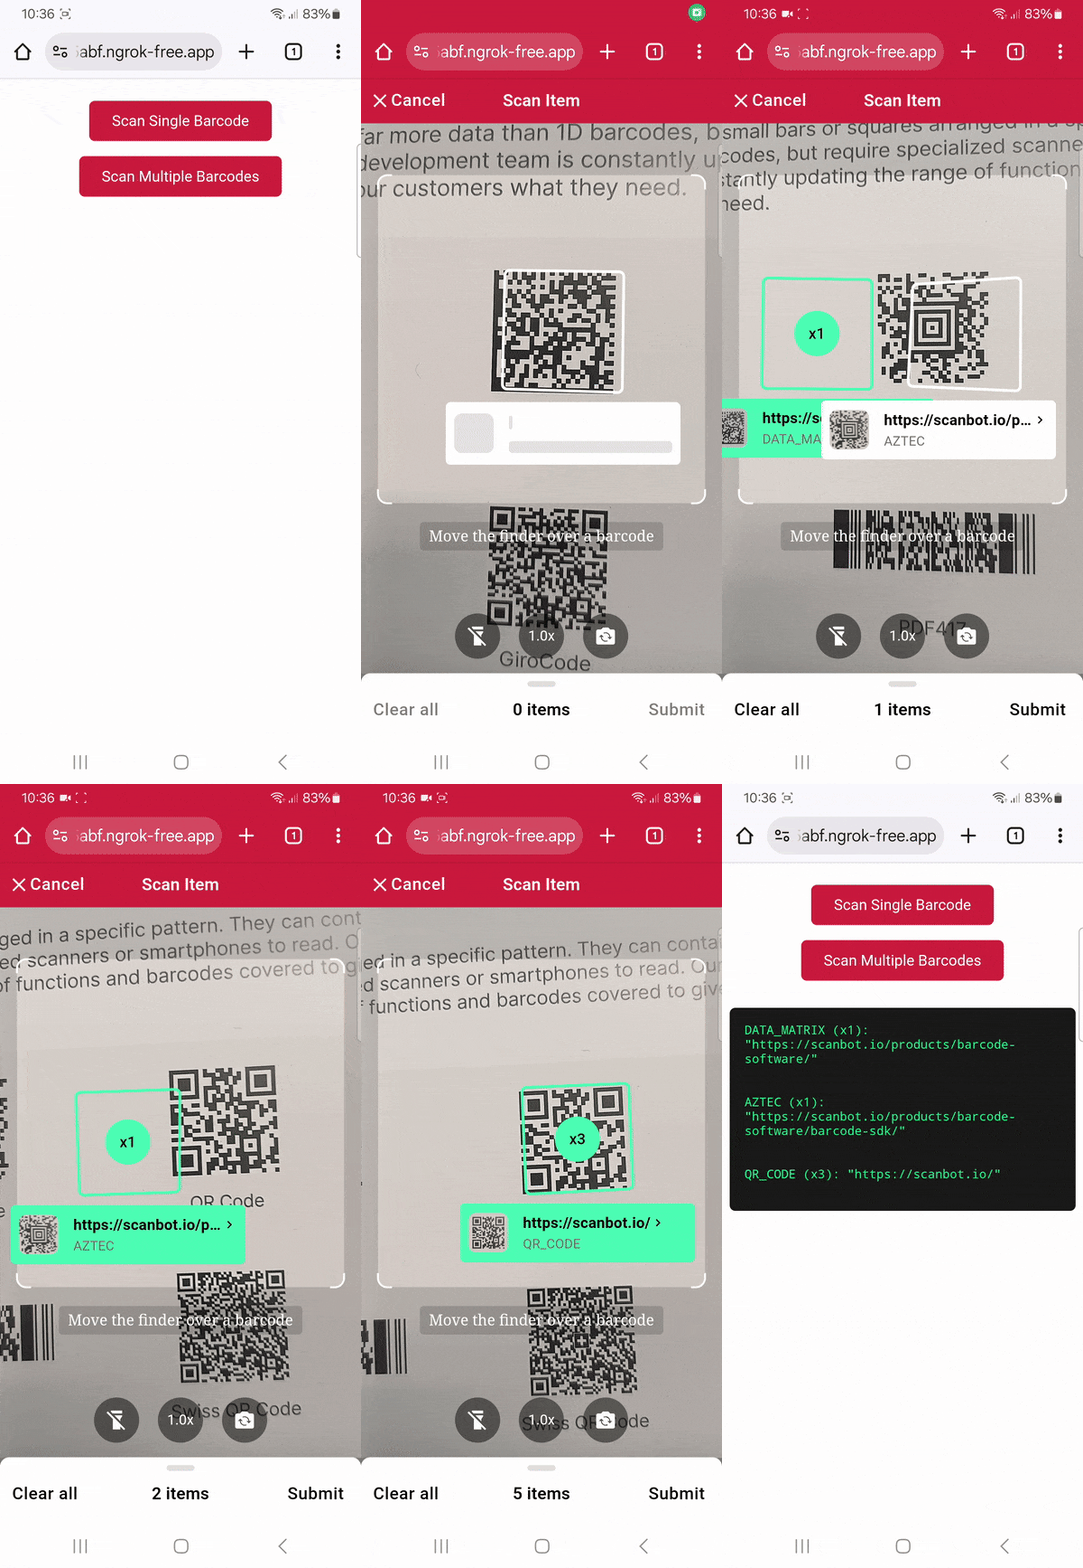
dx serve💡 To test your web app on your phone, you have a few options. One option is to use a service like ngrok, which creates a tunnel to one of their SSL-certified domains. Their Quick Start guide will help you get up and running quickly.
You have the option to scan a single barcode as soon as it’s detected or use the SDK’s multi-scanning feature with the built-in AR overlay to select as many barcodes as you’d like before returning the results.


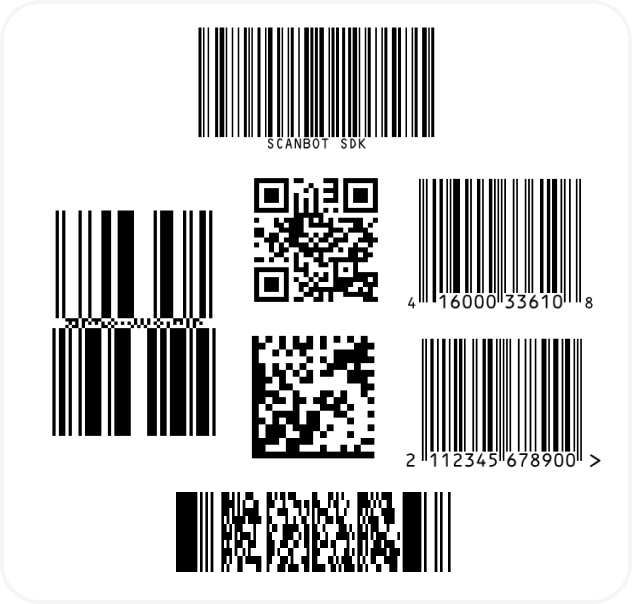
And if you’re in need of some barcodes, we’ve got you covered:
Conclusion
🎉 Congratulations! You’ve successfully built a browser-based barcode scanning app using Rust, JavaScript, and the Dioxus framework!
These are just two of the many scanner configurations the Scanbot SDK has to offer – take a look at the RTU UI documentation and API reference to learn more.
Integration guides are also available for the following Web frameworks:
Should you have questions about this tutorial or run into any issues, we’re happy to help! Just shoot us an email via tutorial-support@scanbot.io.
Happy scanning! 🤳
