In this tutorial, we’ll build a cross-platform .NET MAUI app for Android and iOS that scans documents and exports them as PDF files using the .NET 9 SDK.
To implement the document scanning functionalities and PDF generation, we’ll use the Scanbot .NET MAUI Document Scanner SDK.

We’ll achieve this in five steps:
- Preparing the project
- Installing the SDK
- Initializing the SDK
- Implementing the scanning feature
- Implementing the PDF export feature
Prerequisites
Before starting app development with .NET MAUI, you need to set up your local development environment. You’ll also need a real device for testing to get the most out of the Scanbot SDK.
Developer tools
There are several options for developing .NET MAUI applications:
- Visual Studio for Windows (v17.3 or higher)
- Visual Studio Code on Mac (using the .NET MAUI extension)
- JetBrains Rider (v2023.1 or higher)
You’ll also need:
- .NET SDK 9 with the latest workloads (Note: The Scanbot SDK also supports .NET SDK 8)
- For iOS development: macOS with latest Xcode and Command Line Tools
- For Android development: Android SDK and Java SDK version 17+
If you prefer the command line over IDEs, you can also build and launch projects from the .NET CLI.
Mobile devices
- Rear-facing camera with autofocus
- Supported CPUs and Architectures:
- Android:
armeabi-v7a,arm64-v8a,x86,x86_64 - iOS:
arm64,x86_64
- Android:
Mobile platforms
- Android 5.0 (API Level 21) or higher
- iOS 13 or higher
Step 1: Prepare the project
First, let’s create our .NET MAUI app using the .NET CLI, which will walk us through the setup process. If you’re working on a Mac, you can also use IDE tools like JetBrains Rider for a better experience.
In a directory of your choice, run the following command:
dotnet new maui -n MauiDocScannerDemoThen navigate into the project directory.
cd MauiDocScannerDemo💡 By default, the .NET MAUI template includes support for multiple platforms beyond mobile. However, the ScanbotSDK.MAUI package only supports iOS and Android.
Step 2: Install the SDK
In this tutorial, we’re using ScanbotSDK.MAUI version 7.1.0. To check for the latest version, please refer to the SDK’s changelog.
To install the Scanbot SDK and the Microsoft.Maui.Essentials package (for sharing our generated PDF files), first add the following code to MauiDocScannerDemo.csproj:
<ItemGroup>
    <PackageReference Include="ScanbotSDK.MAUI" Version="7.1.0" />
    <PackageReference Include="Microsoft.Maui.Essentials" Version="9.0.82" />
</ItemGroup>
Then run:
dotnet restore💡 If there are package conflicts, add the appropriate <PackageReference> tags to the project and make sure <PackageReference> has NoWarn="NU1605" added to it to suppress the related build error for that particular package.
Since we need access to the device camera to scan the documents, let’s add the necessary camera permissions for Android and iOS.
For Android, add the following to Platforms/Android/AndroidManifest.xml inside the <manifest> element:
<uses-permission android:name="android.permission.CAMERA" />
<uses-feature android:name="android.hardware.camera" />
For iOS, we need to include a description for the camera permission in Platforms/iOS/Info.plist, anywhere inside the <dict> element:
<key>NSCameraUsageDescription</key>
<string>Grant camera access to scan documents.</string>
Now that the project is set up, we can start integrating the document scanning functionalities.
Step 3: Initialize the SDK
Before using any feature of the Scanbot SDK, we need to initialize it. Ideally, initialization should be done as soon as the app is launched, e.g., in MauiProgram.cs:
using ScanbotSDK.MAUI;
using ScanbotSDK.MAUI.Common;
using ScanbotSDK.MAUI.Core.Document;

namespace MauiDocScannerDemo;
public static partial class MauiProgram
{
    private const string LicenseKey = "";

    public static MauiApp CreateMauiApp()
    {
        var builder = MauiApp.CreateBuilder();
        builder
            .UseMauiApp<App>()
            .ConfigureFonts(fonts =>
            {
                fonts.AddFont("OpenSans-Regular.ttf", "OpenSansRegular");
                fonts.AddFont("OpenSans-Semibold.ttf", "OpenSansSemibold");
            });

        SBSDKInitializer.Initialize(builder, LicenseKey, new SBSDKConfiguration
        {
            EnableLogging = true,
            StorageImageFormat = CameraImageFormat.Jpg,
            StorageImageQuality = 80,
            EngineMode = DocumentScannerEngineMode.Ml,
        });

        return builder.Build();
    }
}
💡 Without a license key, our SDK only runs for 60 seconds per session. This is more than enough for the purposes of our tutorial, but if you like, you can generate a license key using the bundle and application identifiers.
Step 4: Implement the scanning feature
The SDK’s RTU UI Components make it easy to deploy a document scanner in your app.
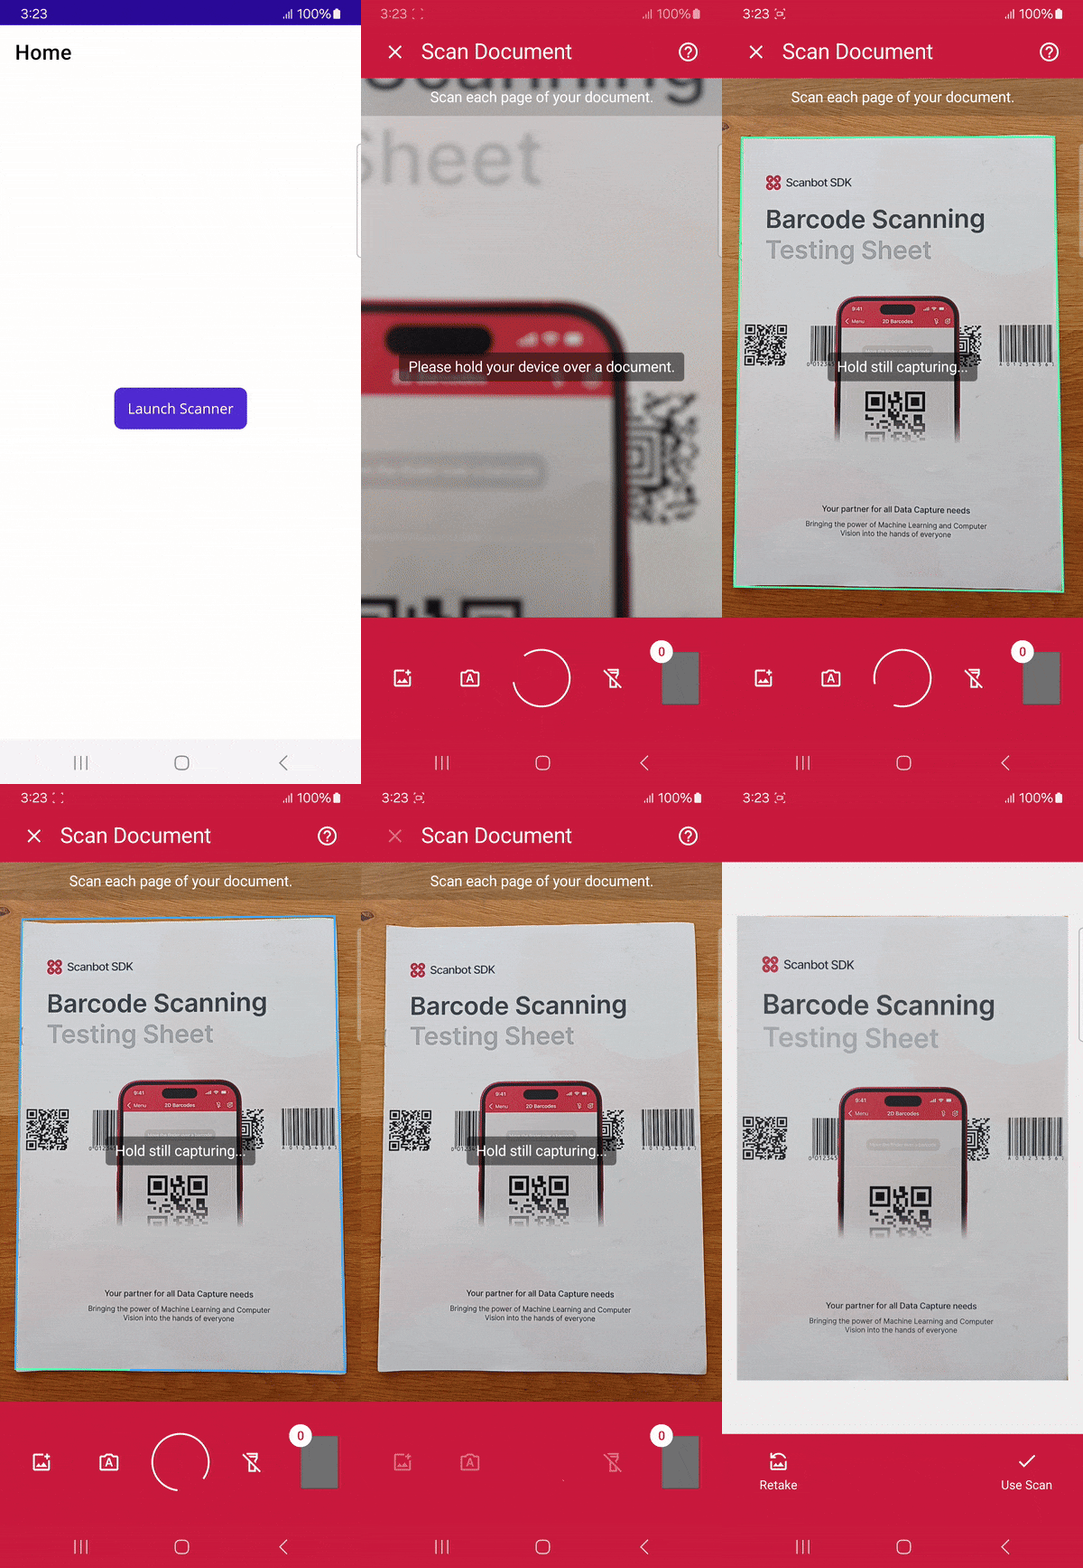
In MainPage.xaml (or a new page, if you prefer that), add a button to start the scanning process. The layout would be as follows:
<?xml version="1.0" encoding="utf-8"?>
<ContentPage
    xmlns="http://schemas.microsoft.com/dotnet/2021/maui"
    xmlns:x="http://schemas.microsoft.com/winfx/2009/xaml"
    x:Class="MauiDocScannerDemo.MainPage" >

    <Grid>
        <Button
            Text="Launch Scanner"
            Clicked="OnLaunchScannerTapped"
            HorizontalOptions="Center"
            VerticalOptions="Center" />
    </Grid>
</ContentPage>
Now we need to define OnLaunchScannerTapped in MainPage.xaml.cs, which will start the document scanner.
using ScanbotSDK.MAUI;
using ScanbotSDK.MAUI.Document;

namespace MauiDocScannerDemo;

public partial class MainPage
{
    public MainPage()
    {
        InitializeComponent();
    }

    private async void OnLaunchScannerTapped(object sender, EventArgs e)
    {
       // Check license status and return early if the license is not valid
        if (!ScanbotSDKMain.IsLicenseValid)
        {
            // License invalid
            return;
        }

        // Create the document configuration object and
        // start the document scanner with the default configuration
        var configuration = new DocumentScanningFlow();

        // Launch the document scanner RTU UI
        var scannerOutput = await ScanbotSDKMain.Rtu.DocumentScanner.LaunchAsync(configuration);

        // Handle the result if the result status is Ok
        if (scannerOutput.Status == OperationResult.Ok)
        {
            // handle the ScannedDocument object result.
            var scannedDocument = scannerOutput.Result;

            // Check more APIs available in the ScannedDocument e.g., Pages, DocumentImage, Filters, Polygons, OriginalImage, ImageUris, etc.
            var documentImage = scannedDocument.Pages.First().DocumentImage;
        }
    }
}
💡 In this tutorial, we use a default configuration object. It will start the document scanner UI with the default settings: in multi-page scanning mode with an acknowledge screen after scanning each page. You can customize the UI and behavior of the document scanner by modifying the configuration object. For further details, please refer to the RTU UI documentation.
If you want, you can now run the app to try out the scanner without the PDF export feature.
Step 5: Implement the PDF export feature
In the final step, we’ll add the code to generate a PDF file from the scanned documents and share the file.
For this, we’ll need to modify the OnLaunchScannerTapped method so it first launches the document scanner, then processes the scanned documents to generate a PDF, and finally prompts the user to share the file (using the feature from the Microsoft.Maui.Essentials package).
using ScanbotSDK.MAUI;
using ScanbotSDK.MAUI.Document;

namespace MauiDocScannerDemo;

public partial class MainPage
{
    public MainPage()
    {
        InitializeComponent();
    }

    private async void OnLaunchScannerTapped(object sender, EventArgs e)
    {
       // Check license status and return early if the license is not valid
        if (!ScanbotSDKMain.IsLicenseValid)
        {
            // License invalid
            return;
        }

        // Create the document configuration object and
        // start the document scanner with the default configuration
        var configuration = new DocumentScanningFlow();

        // Launch the document scanner RTU UI
        var scannerOutput = await ScanbotSDKMain.Rtu.DocumentScanner.LaunchAsync(configuration);

        // Handle the result if the result status is Ok
        if (scannerOutput.Status == OperationResult.Ok)
        {
            // handle the ScannedDocument object result.
            var scannedDocument = scannerOutput.Result;

            // Create a PDF file Uri from the provided ScannedDocument object
            // and share the created PDF file.
            var uri = await scannedDocument.CreatePdfAsync(new PdfConfiguration());

            // Share the pdf document
            await ShareFileAsync(uri.LocalPath);
        }
    }

    public async Task ShareFileAsync(string localFilePath)
    {
        if (File.Exists(localFilePath))
        {
            await Share.RequestAsync(new ShareFileRequest
            {
                Title = "Pdf Document",
                File = new ShareFile(localFilePath, "application/pdf")
            });
        }
    }
}
Now you can share a scanned document as a PDF file for further use. For example, you can send it via email or save it to a cloud storage.
To run the app on your Android or iOS device, use the following commands:
For Android:
dotnet build . -f net9.0-android -t:RunFor iOS:
dotnet build . -f net9.0-ios -t:Run -r ios-arm64💡 If you have multiple devices connected, you can specify which one to run your app on using the -p:AndroidDeviceId=:<Your-Device-UDID> option for Android and the -p:_DeviceName=:<Your-Device-UDID> option for iOS.
To get all device IDs, run adb devices (Android) and xcrun xctrace list devices (iOS).

Conclusion
And that’s it! You’ve successfully integrated a fully functional document scanner into your .NET MAUI app 🎉
If this tutorial has piqued your interest in integrating scanning functionalities into your app, make sure to take a look at the other features in the SDK’s documentation – or run our example project for a more hands-on experience.
Should you have questions about this tutorial or run into any issues, we’re happy to help! Just shoot us an email via tutorial-support@scanbot.io.
Happy scanning! 🤳


