

In this tutorial, you’ll learn how to create a cross-platform Android and iOS app for scanning documents using Kotlin Multiplatform for the shared codebase and Compose Multiplatform for the UI.
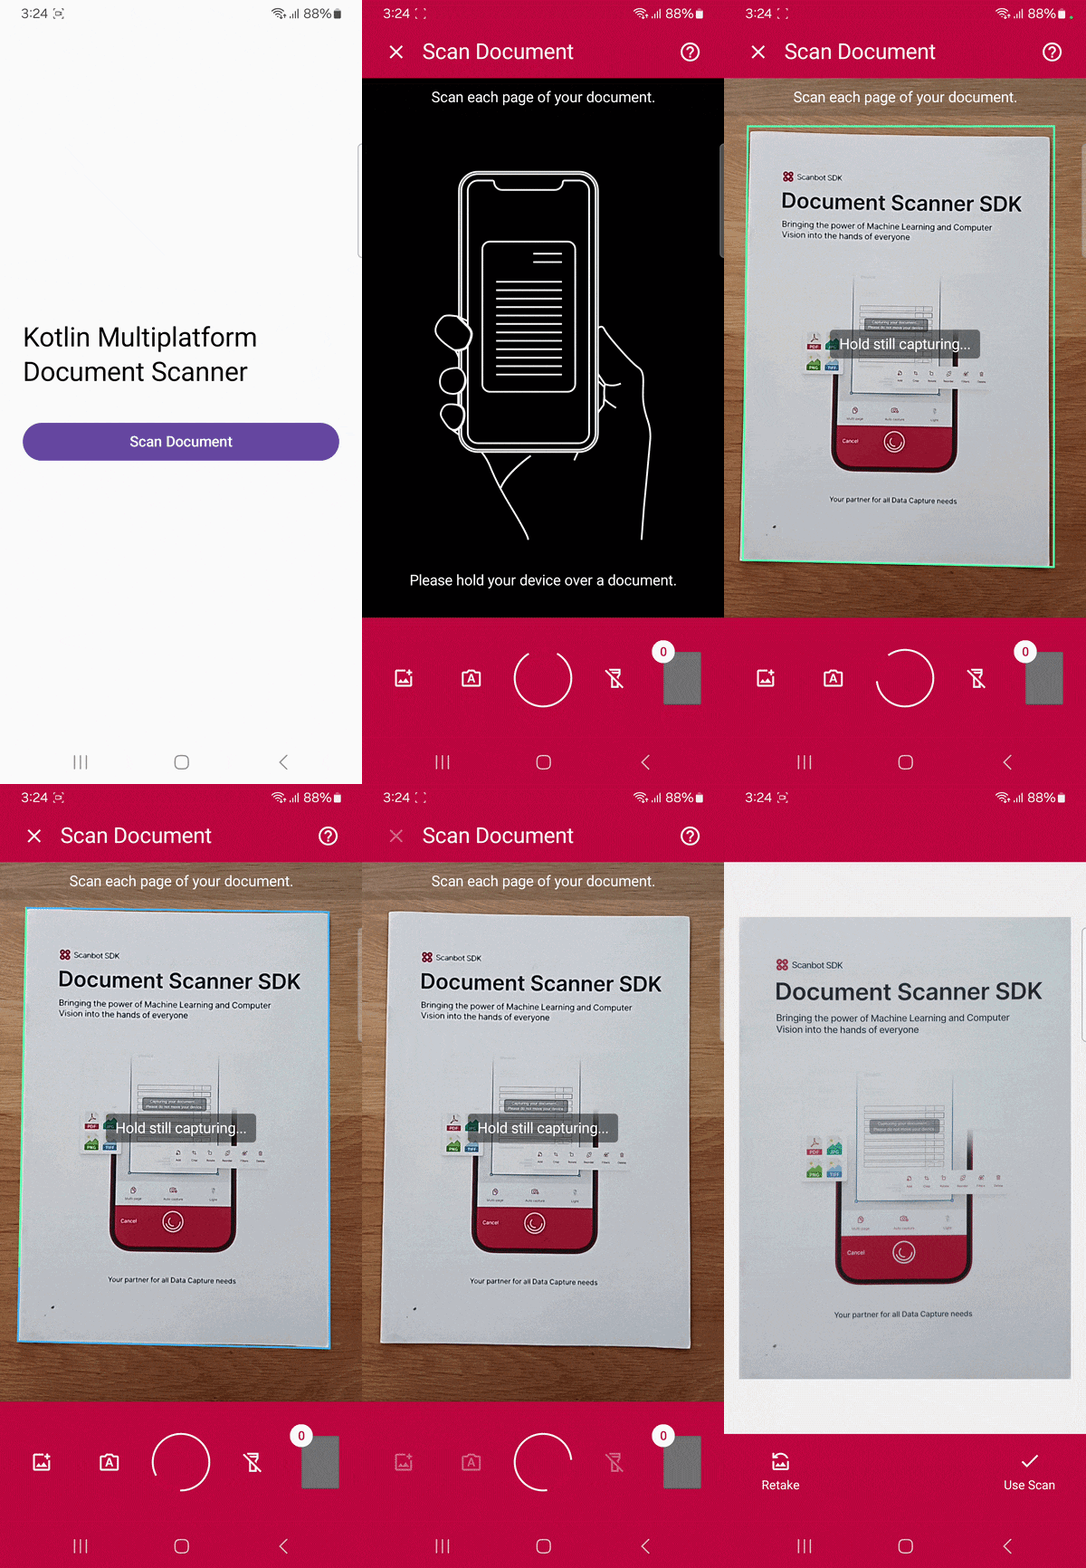
To achieve this, you’ll follow these steps:
- Preparing the project
- Configuring your project for iOS and Android
- Implementing the document scanner
Make sure you have the latest version of Android Studio installed.
Step 1: Prepare the project
1. Creating a Kotlin Multiplatform project
If you haven’t worked with Kotlin Multiplatform before, set up your development environment as described in the Kotlin Multiplatform quickstart.
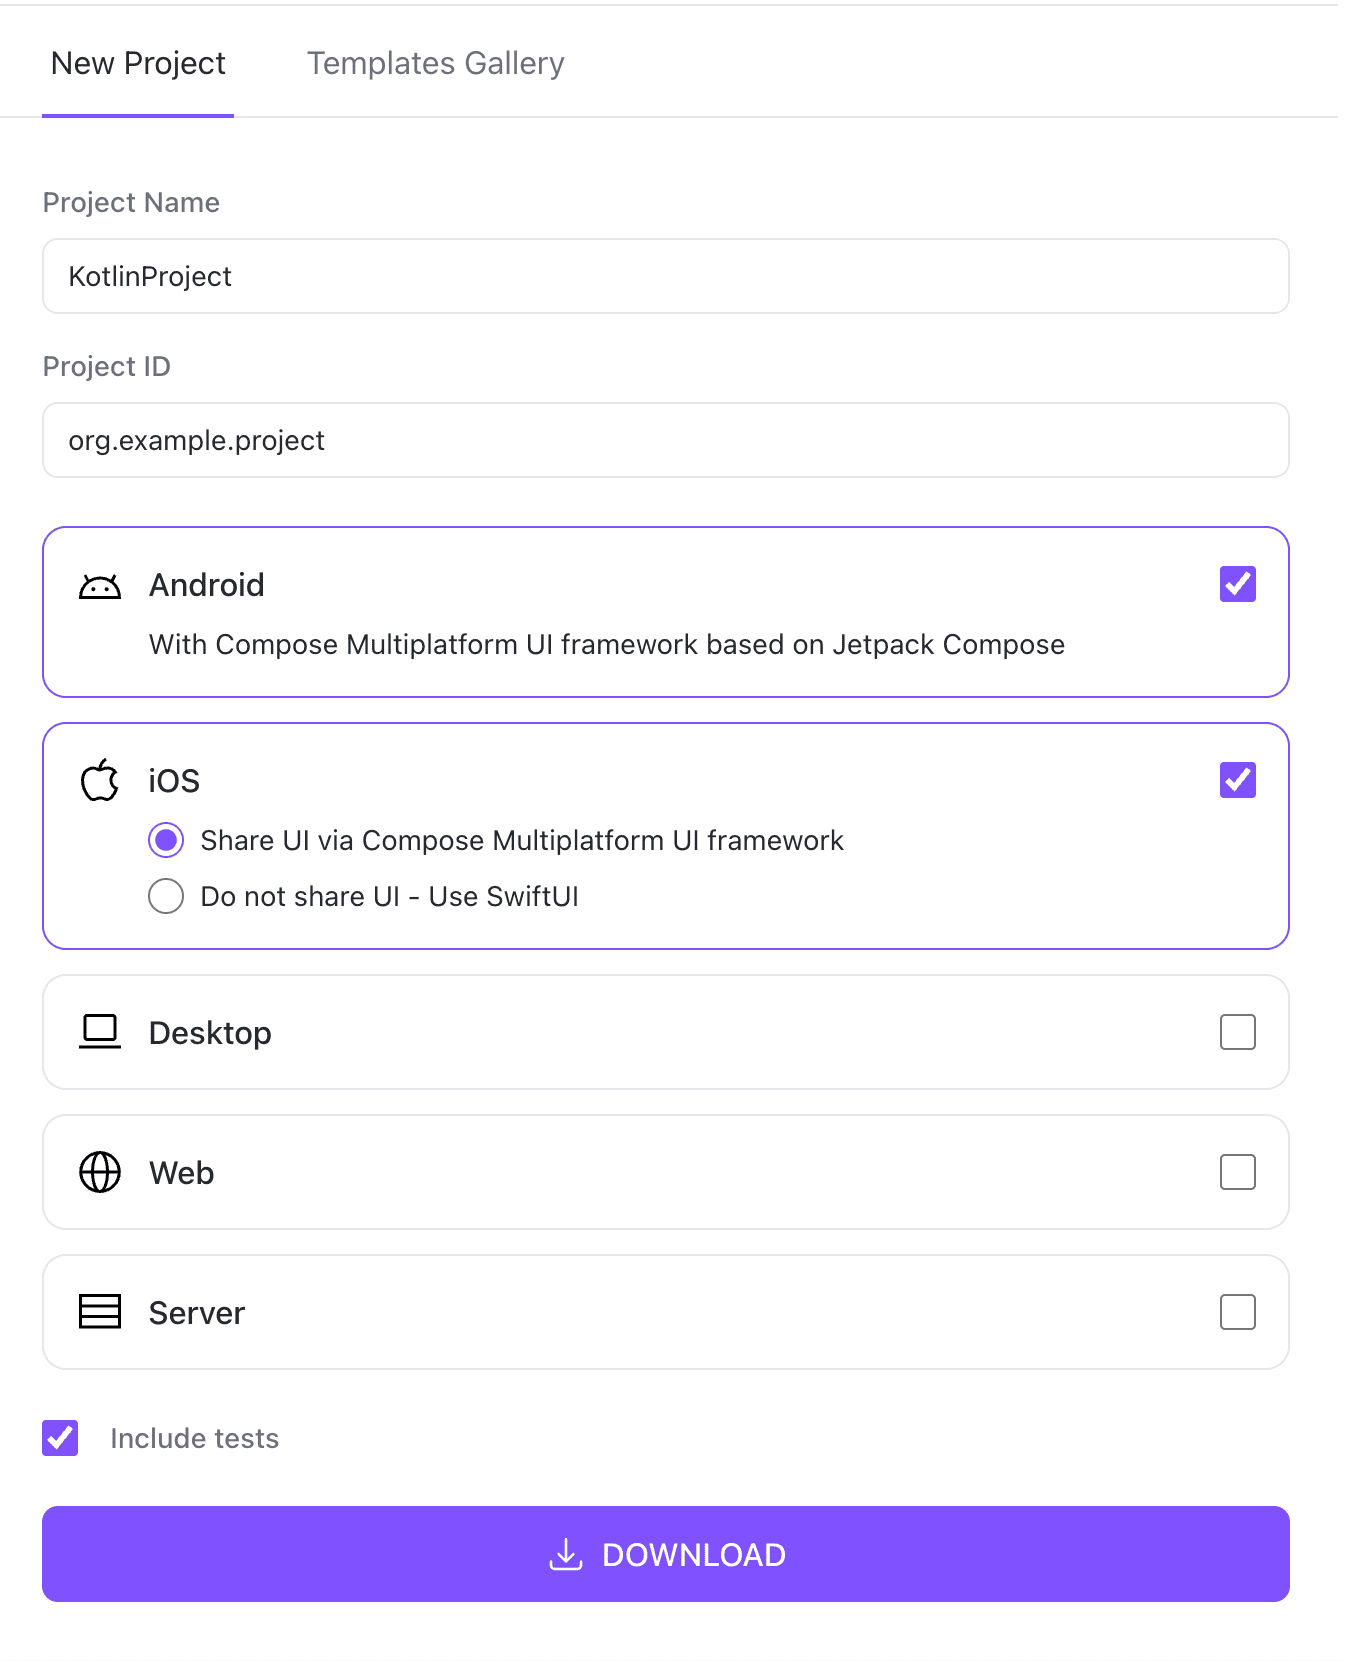
Next, create and download a Kotlin Multiplatform project using the Kotlin Multiplatform Wizard. Choose Android and iOS as platforms and select “Share UI via Compose Multiplatform UI framework“, then hit the download button.
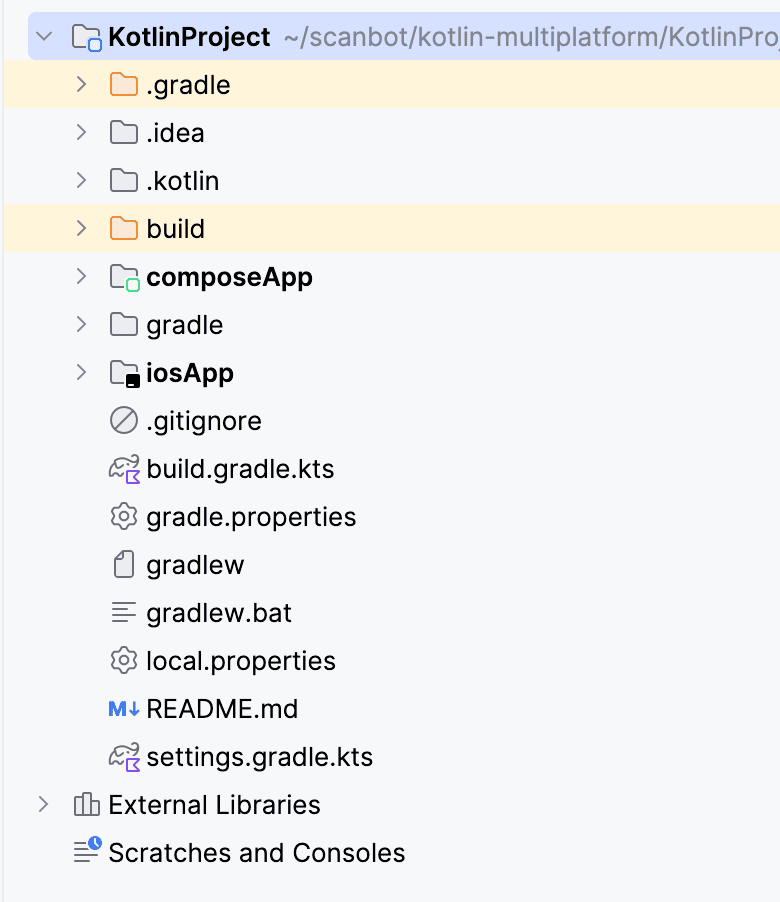
After extracting the project, open it in Android Studio. The structure when opening the Project view will look like this:
2. Adding the SDK dependency
The Scanbot Kotlin Multiplatform SDK and its Compose-based UI components are distributed via a private Maven repository. Add the repository URLs to settings.gradle.kts:
dependencyResolutionManagement {
    repositories {
        // ...
        mavenCentral()

        // Add the repositories here:
        maven(url = "https://nexus.scanbot.io/nexus/content/repositories/releases/")
        maven(url = "https://nexus.scanbot.io/nexus/content/repositories/snapshots/")
    }
}
Then add the dependencies in composeApp/build.gradle.kts:
commonMain.dependencies {
      // ...
    implementation("io.scanbot:kmp-bundle-sdk:8.0.0") // or higher
    implementation("io.scanbot:kmp-compose-ui-bundle-sdk:8.0.0") // or higher
}
💡 This tutorial uses SDK version 8.0.0. You can find the latest version in the changelog.
To ensure full compatibility with Kotlin Multiplatform, check that your jvmTarget in composeApp/build.gradle.kts is at least 17.
compilerOptions {
    jvmTarget.set(JvmTarget.JVM_17)
}
Your android-minSdk should also be 26 or higher. You can check this in gradle/libs.versions.toml.
[versions]
# ...
android-minSdk = "26"
Step 2: Configure your project for iOS and Android
1. iOS integration
The Scanbot iOS native binaries must be made available to the Kotlin/Native compiler.
You can do this in two ways:
- via Swift Package Manager (SPM),
- by directly embedding the XCFramework.
Option A: Swift Package Manager (SPM)
This approach uses the spm4Kmp Gradle plugin to pull the Scanbot iOS SDK directly from its SPM repository as part of your Gradle build. No Xcode configuration needed.
💡 JetBrains provides an official SPM integration API built into the Kotlin Multiplatform toolchain. However, at the time of writing this article, it is still experimental and requires at least Kotlin 2.4.0-Beta1. If your project is already on Kotlin 2.4.0-Beta1 or later and you’re comfortable with experimental APIs, the official approach is worth exploring. For stable production setups, the spm4Kmp plugin used in this guide is the recommended alternative.
In composeApp/build.gradle.kts, apply the plugin at the top of the file:
plugins {
    id("io.github.frankois944.spmForKmp") version "1.4.8" // or higher
}
At the top of app/build.gradle.kts, add the opt-in imports required by the plugin:
@file:OptIn(ExperimentalSpmForKmpFeature::class)

import io.github.frankois944.spmForKmp.swiftPackageConfig
import io.github.frankois944.spmForKmp.utils.ExperimentalSpmForKmpFeature
Replace (or update) your existing iOS target configuration with the following:
listOf(
    iosArm64(),
    iosSimulatorArm64()
).forEach { iosTarget ->
    iosTarget.binaries.framework {
        baseName = "ComposeApp"
        isStatic = true
    }

    iosTarget.swiftPackageConfig {
        minIos = "13.0"
        dependency {
            remotePackageVersion(
                url = uri("https://github.com/doo/scanbot-sdk-ios-spm.git"),
                version = "8.0.1", // or higher
                products = {
                    add("ScanbotSDK", exportToKotlin = true)
                },
            )
        }
    }
}
💡 You can find the latest SDK version in the Scanbot iOS SDK SPM repository.
Option B — XCFramework (Direct Embedding)
This approach gives you full control over the binary and is useful when SPM is unavailable or restricted.
Download and unzip the framework
Download the XCFramework directly from the Scanbot SDK distribution server using the latest SDK version.
https://download.scanbot.io/document-scanner-sdk/ios/xcframeworks/scanbot-ios-document-scanner-sdk-xcframework-8.0.1.zipOnce downloaded, unzip the archive:
unzip scanbot-ios-document-scanner-sdk-xcframework-{version}.zipIn the root of your project, create a scanbot_sdk folder and move the extracted framework into it:
project-root/
└── scanbot_sdk/
    └── ScanbotSDK.xcframework
Create the cinterop definition file
Kotlin/Native uses a .def file to describe how to interface with a native framework. Inside the scanbot_sdk folder, create a file named ScanbotSDK.def with the following content:
language = Objective-C
modules = ScanbotSDK
package = ScanbotSDK
This tells the Kotlin compiler that the framework exposes Objective-C modules and makes them accessible under the ScanbotSDK package in your shared Kotlin code.
Configure app/build.gradle.kts
Update app/build.gradle.kts to wire up the XCFramework slices for each iOS target:
val xcfRoot    = rootDir.resolve("scanbot_sdk/ScanbotSDK.xcframework")
val xcfDefFile = rootDir.resolve("scanbot_sdk/ScanbotSDK.def")

val xcfSlices = mapOf(
    "iosArm64"          to xcfRoot.resolve("ios-arm64"),
    "iosSimulatorArm64" to xcfRoot.resolve("ios-arm64_x86_64-simulator"),
)

listOf(iosArm64(), iosSimulatorArm64()).forEach { target ->
    val slicePath = xcfSlices.getValue(target.name).absolutePath

    target.compilations.getByName("main") {
        cinterops.create("ScanbotSDK") {
            definitionFile.set(xcfDefFile)
            compilerOpts("-framework", "ScanbotSDK", "-F$slicePath")
            extraOpts += listOf("-compiler-option", "-fmodules")
        }
    }

    target.binaries.all {
        linkerOpts("-framework", "ScanbotSDK", "-F$slicePath")
    }

    target.binaries.framework {
        baseName = "ComposeApp"
        isStatic = true
    }
}
Some key points about this configuration:
xcfSlicesmaps each Kotlin/Native target to the correct architecture slice:iosArm64→ios-arm64(real devices),iosSimulatorArm64→ios-arm64_x86_64-simulator(Apple Silicon simulators).cinterops.createregisters the cinterop binding using the.deffile. TheF$slicePathflag points the compiler to the framework directory for the specific slice.fmodulesenables Clang module support, required for Objective-C frameworks to be correctly imported into Kotlin/Native.linkerOptslinks the framework at the binary level for each target.
After syncing your Gradle project, the ScanbotSDK APIs will be accessible.
2. Android registration
On Android, the SDK requires an additional registration step before any API calls are made.
Register the Activity in composeApp/src/androidMain/kotlin/org/example/project/MainActivity.kt.
class MainActivity : ComponentActivity() {
    override fun onCreate(savedInstanceState: Bundle?) {
        enableEdgeToEdge()
        super.onCreate(savedInstanceState)

        // Register the Activity here:
        ScanbotSDK.registerActivity(this)
        setContent {
            App()
        }
    }
}
3. Setting the camera permissions
Since the SDK needs to access the device camera to scan documents, add the necessary permissions in composeApp/src/androidMain/AndroidManifest.xml …
<?xml version="1.0" encoding="utf-8"?>
<manifest xmlns:android="http://schemas.android.com/apk/res/android"
    xmlns:tools="http://schemas.android.com/tools">

    <uses-permission android:name="android.permission.CAMERA" />
    <uses-feature android:name="android.hardware.camera" />

    <application
    ...
… and in iosApp[project-name]/iosApp/Info.plist:
<key>NSCameraUsageDescription</key>
<string>Please allow camera usage to scan documents.</string>
Step 3: Implement the document scanner
1. Initializing the SDK
With the SDK installed on both platforms, the next step is to initialize it in your shared code. The SDK must be initialized once at app startup, typically inside your root @Composable function, and before any scanning UI is launched. For example, in composeApp/src/commonMain/kotlin/App.kt:
import io.scanbot.sdk.kmp.ScanbotSDK
import io.scanbot.sdk.kmp.common.sdk.configuration.SdkConfiguration

const val SCANBOT_SDK_LICENSE_KEY = "" // Replace with your Scanbot SDK license key

@Composable
fun App() {
    MaterialTheme {
        LaunchedEffect(Unit) {
            val config = SdkConfiguration(
                licenseKey = SCANBOT_SDK_LICENSE_KEY,
                loggingEnabled = true, // Set to false in production to avoid leaking scan data to logs
            )

            ScanbotSDK.initialize(config).onSuccess { licenseInfo ->
                println("Scanbot SDK initialized. License status: ${licenseInfo.status}")
            }.onFailure { error ->
                println("Error initializing Scanbot SDK: ${error.message}")
            }
        }
    }
}
The SDK runs without a license key for one minute per session. You can also generate a free trial license.
2. Setting up the main screen
For a simple navigation on the app’s main screen, add a button for starting the document scanner inside the root App() composable in App.kt. The MainScreen is then rendered once initialization is in place.
@Composable
fun MainScreen() {
    Column(
        modifier = Modifier
            .fillMaxSize()
            .padding(24.dp),
        verticalArrangement = Arrangement.Center,
        horizontalAlignment = Alignment.CenterHorizontally
    ) {
        Text(
            text = "Kotlin Multiplatform Document Scanner",
            style = MaterialTheme.typography.headlineMedium,
            modifier = Modifier.padding(bottom = 32.dp)
        )

        ScanButton("Scan Document") {
            startDocumentScanning(
                onResultHandler = { result -> /* handle result */ },
                onErrorHandler = { error -> /* handle error */ }
            )
        }
    }
}

@Composable
fun ScanButton(label: String, onClick: () -> Unit) {
    Button(
        onClick = onClick,
        modifier = Modifier.fillMaxWidth()
    ) {
        Text(label)
    }
}
3. Integrating the document scanning feature
In this example, we’re going to use the default scanning flow behavior. Feel free to customize your implementation to your liking.
import io.scanbot.sdk.kmp.page.DocumentData
import io.scanbot.sdk.kmp.ui_v2.document.configuration.DocumentScanningFlow

fun startDocumentScanning(
    onResultHandler: (DocumentData) -> Unit,
    onErrorHandler: (error: Throwable) -> Unit
) {
    ScanbotSDK.document.startScanner(
        configuration = DocumentScanningFlow().apply {
            // You can customize the scanner here
        },
        onResult = { result ->
            result.onSuccess { onResultHandler(it) }
                .onFailure { onErrorHandler(it) }
        }
    )
}
Now it’s time to test your app and its document scanning functionalities.
You can run both the Android and iOS builds from Android Studio or IntelliJ IDEA – more on how this works in the Compose Multiplatform documentation.
Conclusion
Congratulations! You’ve successfully built a cross-platform document scanning app for Android and iOS using Kotlin Multiplatform.
If this tutorial has piqued your interest in integrating document scanning functionalities into your Android or iOS app, make sure to take a look at our SDK’s other neat features in our documentation or run our example project for a more hands-on experience.
Should you have questions about this tutorial or run into any issues, we’re happy to help! Just shoot us an email via tutorial-support@scanbot.io.
FAQ
How are Kotlin Multiplatform and Compose Multiplatform related?
Kotlin Multiplatform (KMP) lets you reuse business logic, data models, and other non-UI code across platforms such as Android, iOS, desktop, and web. If you also want a consistent UI across all platforms instead of platform-specific interfaces, you can pair it with Compose Multiplatform (CMP), which provides shared declarative UI code.
How are Kotlin Multiplatform and Jetpack Compose related?
Kotlin Multiplatform (KMP) and Jetpack Compose work together as tightly connected tools for cross-platform development. Jetpack Compose is Google’s declarative UI toolkit, mainly built for native Android apps, much like SwiftUI serves iOS. JetBrains’ Compose Multiplatform (an extension of Jetpack Compose) brings this UI approach into Kotlin Multiplatform (also from JetBrains), allowing developers to share declarative interfaces across Android, iOS, desktop, and web.
What are the performance considerations for a document scanner built in Kotlin?
For a document scanner in Kotlin, the main performance concerns are image-processing cost, memory pressure, and UI responsiveness. Therefore, you should keep camera frames and bitmaps small, avoid copying large images repeatedly, and run edge detection, perspective correction, compression, OCR, and PDF generation off the main thread so the UI stays smooth. It also helps to process only the required scan area and test on low-end devices, since scan time, memory spikes, and camera/OCR behavior can vary a lot across hardware and Android versions.
Should I use Android Studio or IntelliJ IDEA to develop Kotlin Multiplatform apps?
Use IntelliJ IDEA if you want the best overall KMP experience and faster access to the latest Kotlin features and Android Studio if your workflow is heavily Android-focused and you want its emulator, device tools, and Android-specific debugging. Both now support KMP through the Kotlin Multiplatform IDE plugin, so in practice the difference is small unless your project extends beyond Android.
What are the main alternatives to Kotlin Multiplatform?
The main alternatives to KMP are Flutter, React Native, and fully native development with Swift for iOS and Kotlin for Android. Flutter and React Native are the closest cross-platform competitors, while native development is the best fit when you want maximum platform control and don’t need shared code.


