In this tutorial, you’ll learn how to build a cross-platform mobile app for scanning barcodes using Flutter and Google’s ML Kit.
To integrate the scanning functionalities, you’ll use google_mlkit_barcode_scanning, a wrapper around ML Kit that streamlines its integration into Flutter projects.
Prerequisites
- The Flutter SDK configured in your system environment path
- A physical Android device with USB debugging and/or wireless debugging enabled or an Android Virtual Device with camera access
- If you also want to target iOS:
- A Mac with Xcode set up for Flutter development
- A physical iOS device, since the iOS simulator lacks camera access
We’ll use VS Code with the Flutter extension in this tutorial, but you can also follow along using any other IDE set up for Flutter development.
Step 1: Set up the project
First, create a new project, e.g., using the command palette.

Select Application as the project type, set the project’s location, and choose a name. We’ll go with “barcodescanner” in this example.
If you prefer using the CLI, run the following command:
flutter create barcodescannerThen navigate into the project directory:
cd barcodescannerStep 2: Add the dependencies
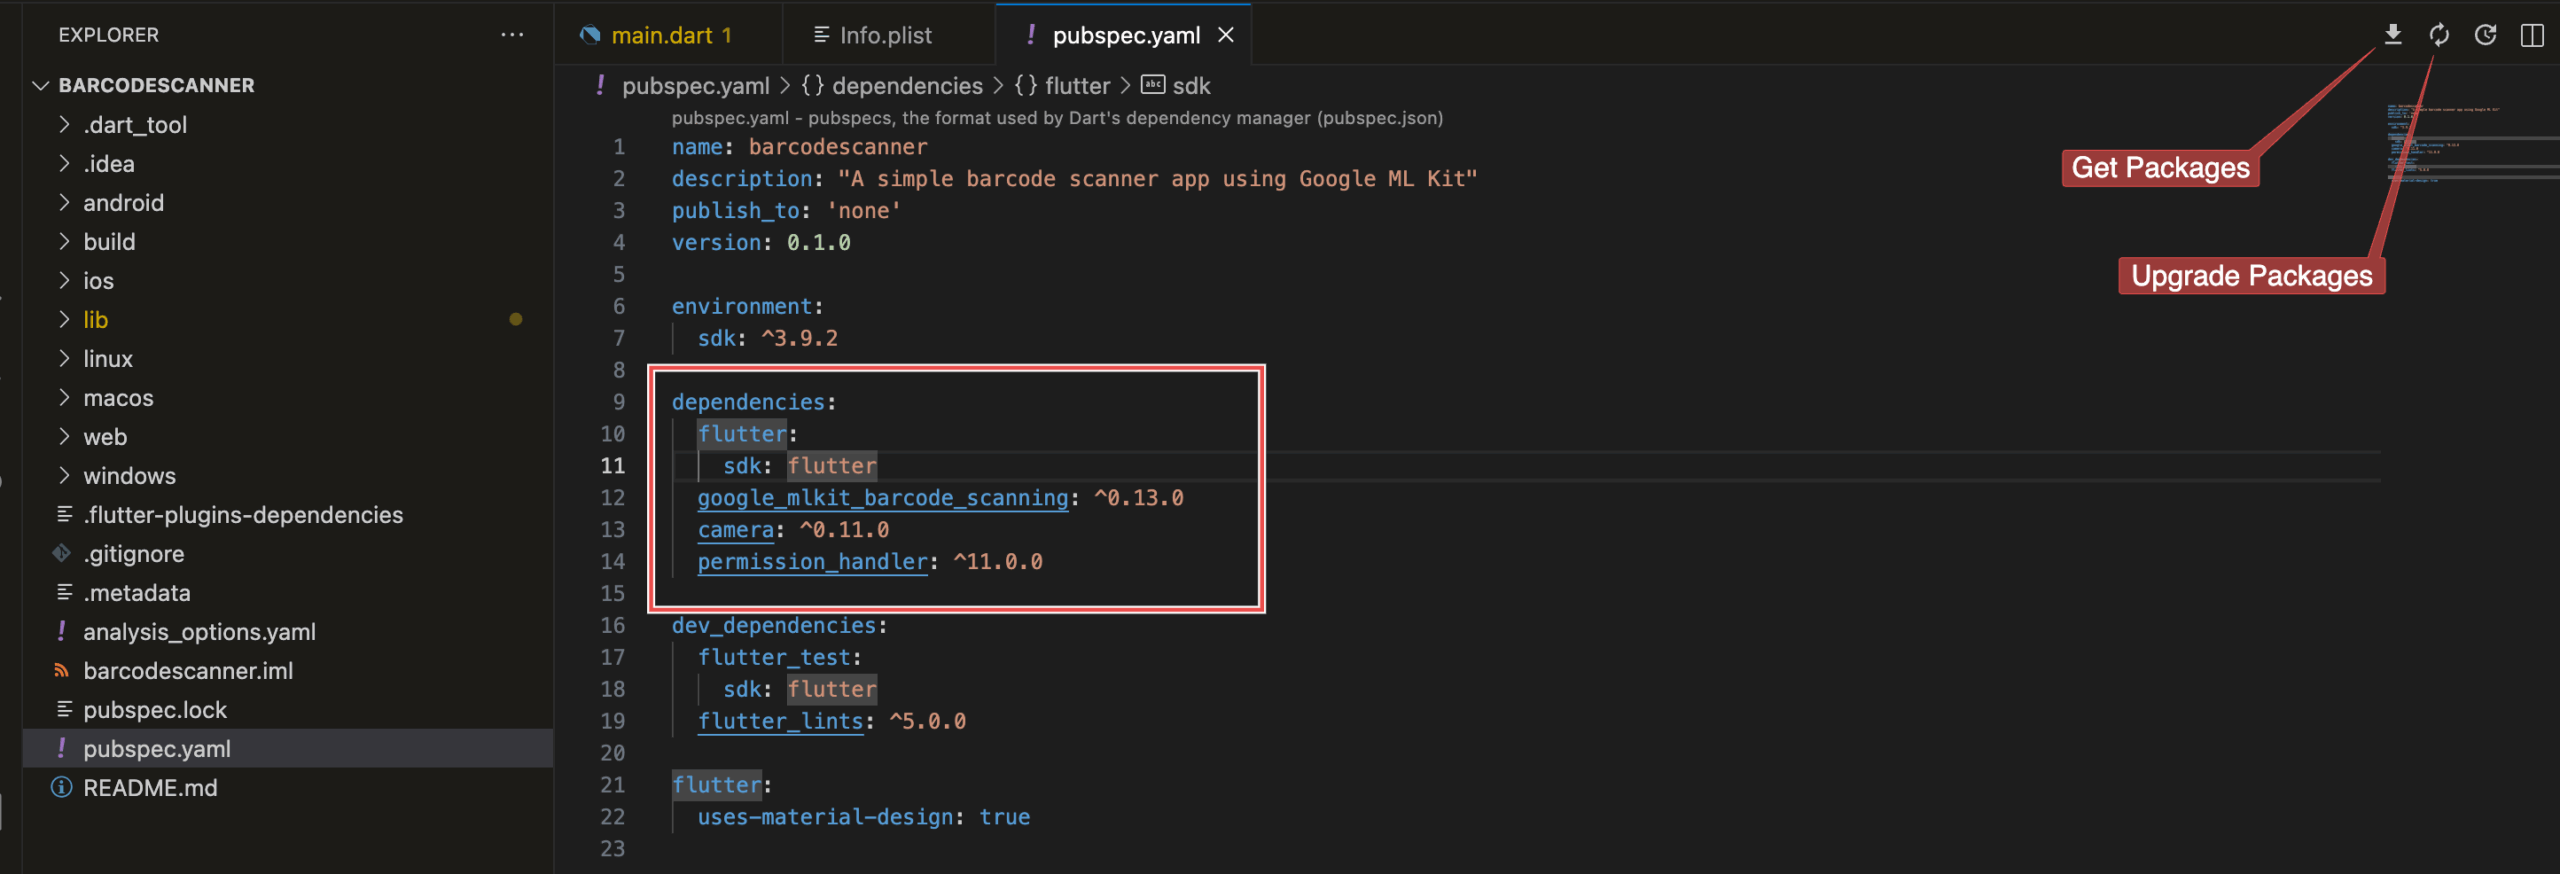
Next, open pubspec.yaml and add the following dependencies:
dependencies:
  flutter:
    sdk: flutter
   google_mlkit_barcode_scanning: ^0.14.1
   camera: ^0.11.0
   permission_handler: ^11.0.0
What this does:
google_mlkit_barcode_scanningenables on-device barcode and QR code detection using Google’s ML Kit.cameraprovides live camera access for real-time scanning.permission_handlerallows you to request and manage runtime permissions such as camera access.
The Flutter extension should automatically get the dependencies. If it doesn’t, click on the icon in the top right corner of VS Code or run flutter pub get.
Step 3: Configure the native projects
Android
By default, Flutter sets the minimum supported Android SDK to API level 21 (Android 5.0 Lollipop). Google ML Kit requires Android API level 21 (Lollipop) or higher, so Flutter’s default configuration already satisfies this requirement.
You can check this by opening android/app/build.gradle and looking for the defaultConfig section:
 defaultConfig {

        applicationId = "com.example.barcodescanner"
        minSdk = flutter.minSdkVersion
        targetSdk = flutter.targetSdkVersion
        versionCode = flutter.versionCode
        versionName = flutter.versionName
    }
iOS
The google_mlkit_barcode_scanning package requires iOS 15.5 or higher. To ensure this requirement is met, do the following:
- Navigate to ios/Podfile.
- Find the following line (usually line 2):
# platform :ios, '13.0'- Uncomment it and change the value (remove the
#).
platform :ios, '15.5'Step 4: Implement the barcode scanning feature
Now that everything is set up, you can integrate the barcode scanning library into your project.
Open lib/main.dart and replace its content with the following code:
import 'dart:io';
import 'package:flutter/material.dart';
import 'package:camera/camera.dart';
import 'package:google_mlkit_barcode_scanning/google_mlkit_barcode_scanning.dart';
import 'package:permission_handler/permission_handler.dart';

late List<CameraDescription> cameras;

Future<void> main() async {
  WidgetsFlutterBinding.ensureInitialized();
  cameras = await availableCameras();
  runApp(const MyApp());
}

class MyApp extends StatelessWidget {
  const MyApp({super.key});

  @override
  Widget build(BuildContext context) {
    return MaterialApp(
      title: 'Barcode Scanner',
      theme: ThemeData(
        colorScheme: ColorScheme.fromSeed(seedColor: Colors.deepPurple),
        useMaterial3: true,
      ),
      home: const BarcodeScannerPage(),
    );
  }
}

class BarcodeScannerPage extends StatefulWidget {
  const BarcodeScannerPage({super.key});

  @override
  State<BarcodeScannerPage> createState() => _BarcodeScannerPageState();
}

class _BarcodeScannerPageState extends State<BarcodeScannerPage> {
  CameraController? _cameraController;
  final BarcodeScanner _barcodeScanner = BarcodeScanner();
  bool _isScanning = false;
  bool _isProcessing = false;
  String _scannedData = 'Tap "Capture & Scan" to detect barcode';
  int _scanCount = 0;

  @override
  void initState() {
    super.initState();
    _initializeCamera();
  }

  @override
  void dispose() {
    _cameraController?.dispose();
    _barcodeScanner.close();
    super.dispose();
  }

  Future<void> _initializeCamera() async {
    final status = await Permission.camera.request();
    if (!status.isGranted) {
      setState(() {
        _scannedData = 'Camera permission denied';
      });
      return;
    }

    try {
      _cameraController = CameraController(
        cameras[0],
        ResolutionPreset.high,
        enableAudio: false,
      );

      await _cameraController!.initialize();

      if (mounted) {
        setState(() {
          _isScanning = true;
        });
      }
      debugPrint('✅ Camera initialized successfully');
    } catch (e) {
      debugPrint('❌ Camera initialization error: $e');
      setState(() {
        _scannedData = 'Camera error: $e';
      });
    }
  }

  Future<void> _captureAndScan() async {
    if (_cameraController == null || !_cameraController!.value.isInitialized) {
      setState(() {
        _scannedData = 'Camera not ready';
      });
      return;
    }

    if (_isProcessing) return;

    setState(() {
      _isProcessing = true;
      _scanCount++;
      _scannedData = 'Capturing image... (Attempt #$_scanCount)';
    });

    try {
      debugPrint('📸 Taking picture...');
      final XFile imageFile = await _cameraController!.takePicture();
      debugPrint('✅ Picture taken: ${imageFile.path}');

      setState(() {
        _scannedData = 'Processing image... (Attempt #$_scanCount)';
      });

      // Create InputImage from file
      final inputImage = InputImage.fromFilePath(imageFile.path);
      debugPrint('🔍 Scanning for barcodes...');

      // Process the image
      final List<Barcode> barcodes = await _barcodeScanner.processImage(
        inputImage,
      );
      debugPrint('📊 Found ${barcodes.length} barcode(s)');

      if (barcodes.isNotEmpty) {
        final barcode = barcodes.first;
        debugPrint('🎯 BARCODE DETECTED!');
        debugPrint('   Format: ${barcode.format.name}');
        debugPrint('   Value: ${barcode.displayValue}');
        debugPrint('   Raw Value: ${barcode.rawValue}');

        if (mounted) {
          setState(() {
            _scannedData =
                '✅ SUCCESS!\n\n'
                'Format: ${barcode.format.name}\n'
                'Value: ${barcode.displayValue ?? barcode.rawValue ?? "No data"}\n\n'
                'Scan #$_scanCount';
          });
        }

        // Show success dialog
        if (mounted) {
          showDialog(
            context: context,
            builder: (context) => AlertDialog(
              title: const Text('Barcode Detected!'),
              content: Text(
                'Format: ${barcode.format.name}\n\n'
                'Value: ${barcode.displayValue ?? barcode.rawValue ?? "No data"}',
              ),
              actions: [
                TextButton(
                  onPressed: () => Navigator.pop(context),
                  child: const Text('OK'),
                ),
              ],
            ),
          );
        }
      } else {
        debugPrint('⚠️ No barcodes found in image');
        if (mounted) {
          setState(() {
            _scannedData =
                '❌ No barcode detected\n\n'
                'Tips:\n'
                '• Center the barcode in frame\n'
                '• Ensure good lighting\n'
                '• Hold phone steady\n'
                '• Try from different distance\n\n'
                'Scan #$_scanCount';
          });
        }
      }

      // Clean up the image file
      try {
        await File(imageFile.path).delete();
      } catch (e) {
        debugPrint('Could not delete temp file: $e');
      }
    } catch (e, stackTrace) {
      debugPrint('❌ Error during capture/scan: $e');
      debugPrint('Stack: $stackTrace');
      if (mounted) {
        setState(() {
          _scannedData = '❌ Error: $e\n\nScan #$_scanCount';
        });
      }
    } finally {
      if (mounted) {
        setState(() {
          _isProcessing = false;
        });
      }
    }
  }

  @override
  Widget build(BuildContext context) {
    return Scaffold(
      appBar: AppBar(
        backgroundColor: Theme.of(context).colorScheme.inversePrimary,
        title: const Text('Barcode Scanner'),
      ),
      body: Column(
        children: [
          Expanded(
            flex: 2,
            child: Container(
              color: Colors.black,
              child:
                  _isScanning &&
                      _cameraController != null &&
                      _cameraController!.value.isInitialized
                  ? Stack(
                      fit: StackFit.expand,
                      children: [
                        CameraPreview(_cameraController!),
                        // Scanning frame overlay
                        Center(
                          child: Container(
                            width: 280,
                            height: 280,
                            decoration: BoxDecoration(
                              border: Border.all(
                                color: _isProcessing
                                    ? Colors.orange
                                    : Colors.green,
                                width: 3,
                              ),
                              borderRadius: BorderRadius.circular(12),
                            ),
                            child: _isProcessing
                                ? const Center(
                                    child: CircularProgressIndicator(
                                      color: Colors.orange,
                                    ),
                                  )
                                : null,
                          ),
                        ),
                        // Instructions
                        Positioned(
                          top: 20,
                          left: 0,
                          right: 0,
                          child: Container(
                            padding: const EdgeInsets.symmetric(
                              horizontal: 20,
                              vertical: 10,
                            ),
                            child: Text(
                              _isProcessing
                                  ? 'Processing...'
                                  : 'Center barcode in frame\nThen tap button below',
                              textAlign: TextAlign.center,
                              style: const TextStyle(
                                color: Colors.white,
                                fontSize: 16,
                                fontWeight: FontWeight.bold,
                                shadows: [
                                  Shadow(blurRadius: 10, color: Colors.black),
                                ],
                              ),
                            ),
                          ),
                        ),
                      ],
                    )
                  : const Center(child: CircularProgressIndicator()),
            ),
          ),
          Expanded(
            flex: 1,
            child: Container(
              width: double.infinity,
              padding: const EdgeInsets.all(20),
              color: Colors.grey[100],
              child: Column(
                mainAxisAlignment: MainAxisAlignment.center,
                children: [
                  const Text(
                    'Result:',
                    style: TextStyle(fontSize: 18, fontWeight: FontWeight.bold),
                  ),
                  const SizedBox(height: 10),
                  Expanded(
                    child: SingleChildScrollView(
                      child: Text(
                        _scannedData,
                        textAlign: TextAlign.center,
                        style: const TextStyle(fontSize: 14),
                      ),
                    ),
                  ),
                  const SizedBox(height: 10),
                  ElevatedButton.icon(
                    onPressed: _isProcessing ? null : _captureAndScan,
                    icon: _isProcessing
                        ? const SizedBox(
                            width: 20,
                            height: 20,
                            child: CircularProgressIndicator(strokeWidth: 2),
                          )
                        : const Icon(Icons.camera_alt),
                    label: Text(
                      _isProcessing ? 'Processing...' : 'Capture & Scan',
                    ),
                    style: ElevatedButton.styleFrom(
                      padding: const EdgeInsets.symmetric(
                        horizontal: 30,
                        vertical: 15,
                      ),
                      backgroundColor: _isProcessing ? Colors.grey : null,
                    ),
                  ),
                ],
              ),
            ),
          ),
        ],
      ),
    );
  }
}
Let’s break down what each part does.
BarcodeScannerPage widget
class BarcodeScannerPage extends StatefulWidget {
  const BarcodeScannerPage({super.key});

  @override
  State<BarcodeScannerPage> createState() => _BarcodeScannerPageState();
}- This is a stateful widget, since the UI changes when scanning barcodes.
State class: _BarcodeScannerPageState
Variables
CameraController? _cameraController;
final BarcodeScanner _barcodeScanner = BarcodeScanner();
bool _isScanning = false;
bool _isProcessing = false;
String _scannedData = 'Tap "Capture & Scan" to detect barcode';
int _scanCount = 0;_cameraControllercontrols the camera preview and capture._barcodeScannerhandles barcode detection._isScanningis true when the camera is initialized._isProcessingis true when capturing/scanning an image._scannedDatastores and displays the scan result._scanCountcounts how many scans were performed.
Camera initialization
@override
void initState() {
  super.initState();
  _initializeCamera();
}- Calls
_initializeCamera()when the widget is first loaded.
Future<void> _initializeCamera() async {
  final status = await Permission.camera.request();
  if (!status.isGranted) {
    setState(() {
      _scannedData = 'Camera permission denied';
    });
    return;
  }

  try {
    _cameraController = CameraController(
      cameras[0],
      ResolutionPreset.high,
      enableAudio: false,
    );
    await _cameraController!.initialize();

    if (mounted) setState(() => _isScanning = true);
    debugPrint('✅ Camera initialized successfully');
  } catch (e) {
    debugPrint('❌ Camera initialization error: $e');
    setState(() {
      _scannedData = 'Camera error: $e';
    });
  }
}- Requests camera permission.
- Initializes the first available camera.
- Sets
_isScanningto true if successful. - Handles errors if the camera cannot start.
Capturing & scanning barcodes
Future<void> _captureAndScan() async {
  if (_cameraController == null || !_cameraController!.value.isInitialized) {
    setState(() => _scannedData = 'Camera not ready');
    return;
  }
if (_isProcessing) return;- Checks if the camera is ready.
- Prevents multiple scans at the same time.
  setState(() {
    _isProcessing = true;
    _scanCount++;
    _scannedData = 'Capturing image... (Attempt #$_scanCount)';
  });

  final XFile imageFile = await _cameraController!.takePicture();
  final inputImage = InputImage.fromFilePath(imageFile.path);

final List<Barcode> barcodes = await _barcodeScanner.processImage(inputImage);- Takes a picture using the camera.
- Converts it into
InputImagefor ML Kit. - Processes the image to detect barcodes.
  if (barcodes.isNotEmpty) {
    final barcode = barcodes.first;
    setState(() {
      _scannedData = '✅ SUCCESS!\n\n'
          'Format: ${barcode.format.name}\n'
          'Value: ${barcode.displayValue ?? barcode.rawValue ?? "No data"}\n\n'
          'Scan #$_scanCount';
    });
    showDialog(
      context: context,
      builder: (context) => AlertDialog(
        title: const Text('Barcode Detected!'),
        content: Text(
          'Format: ${barcode.format.name}\n\n'
          'Value: ${barcode.displayValue ?? barcode.rawValue ?? "No data"}',
        ),
        actions: [
          TextButton(onPressed: () => Navigator.pop(context), child: const Text('OK')),
        ],
      ),
    );
  } else {
    setState(() {
      _scannedData = '❌ No barcode detected\n\nScan #$_scanCount';
    });
}- If a barcode is found:
- Updates
_scannedDatawith format and value. - Shows a dialog to notify the user.
- Updates
- If no barcode is found: Shows tips and scan count.
  await File(imageFile.path).delete();
setState(() => _isProcessing = false);- Deletes the temporary image file.
- Resets
_isProcessingso user can scan again.
Step 5: Run the app
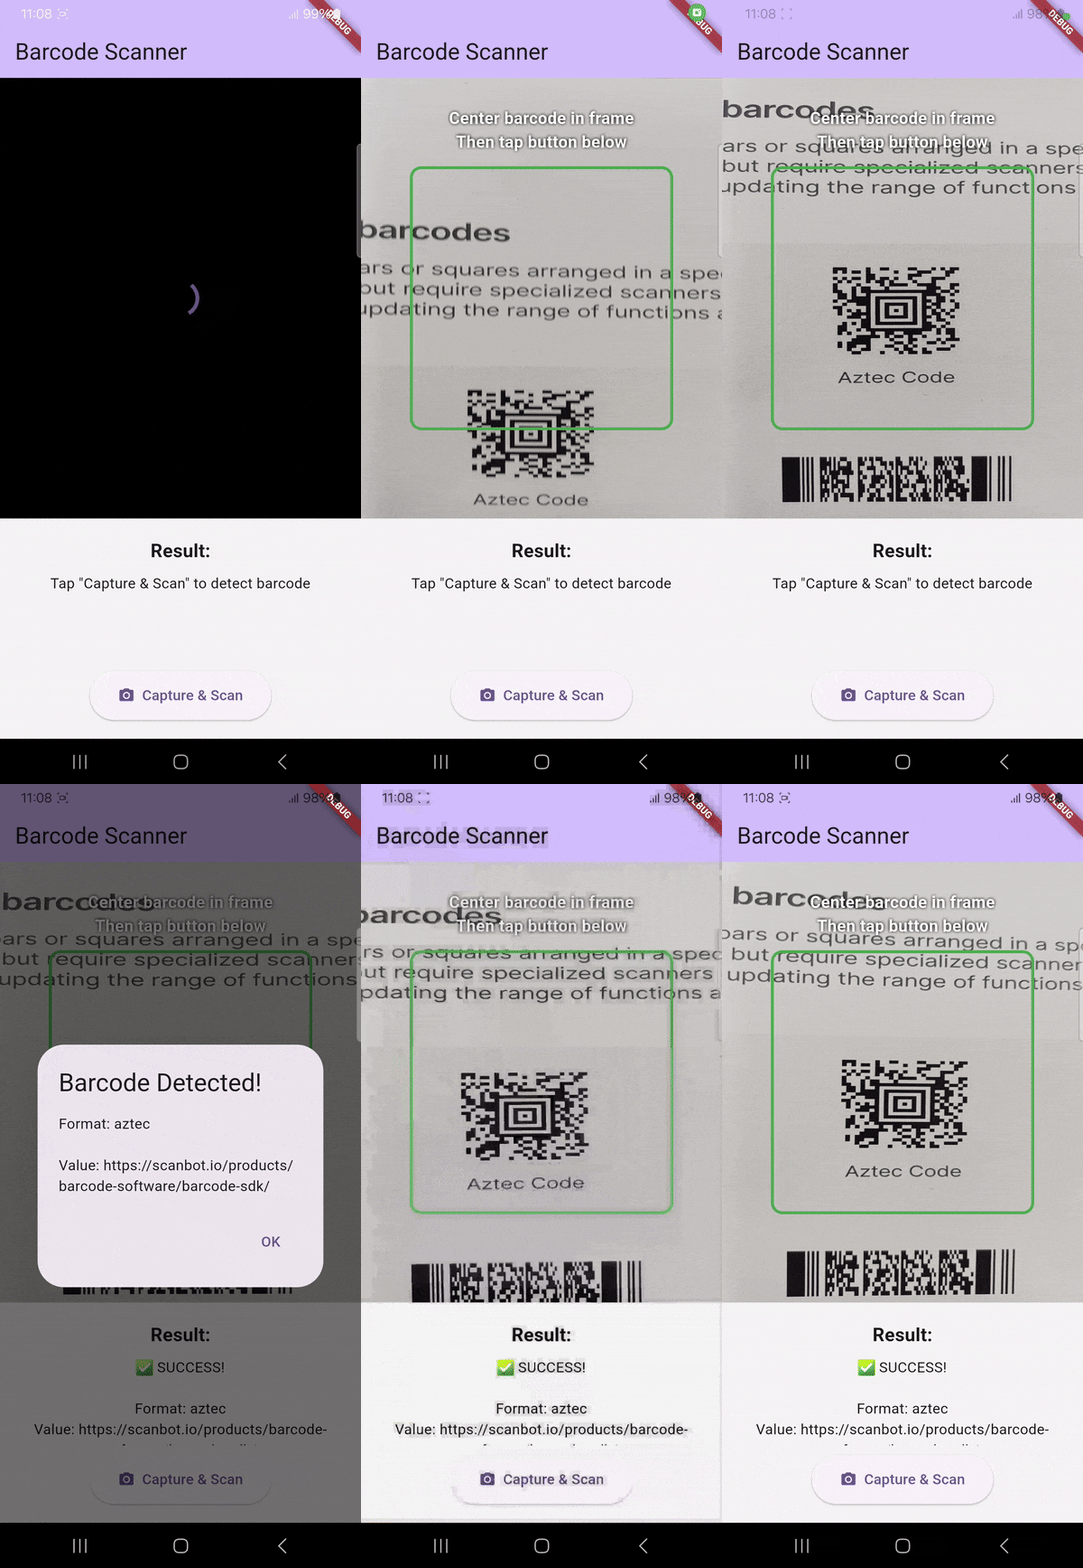
To build and run your Flutter app, click on the run button in the top right of VS Code …
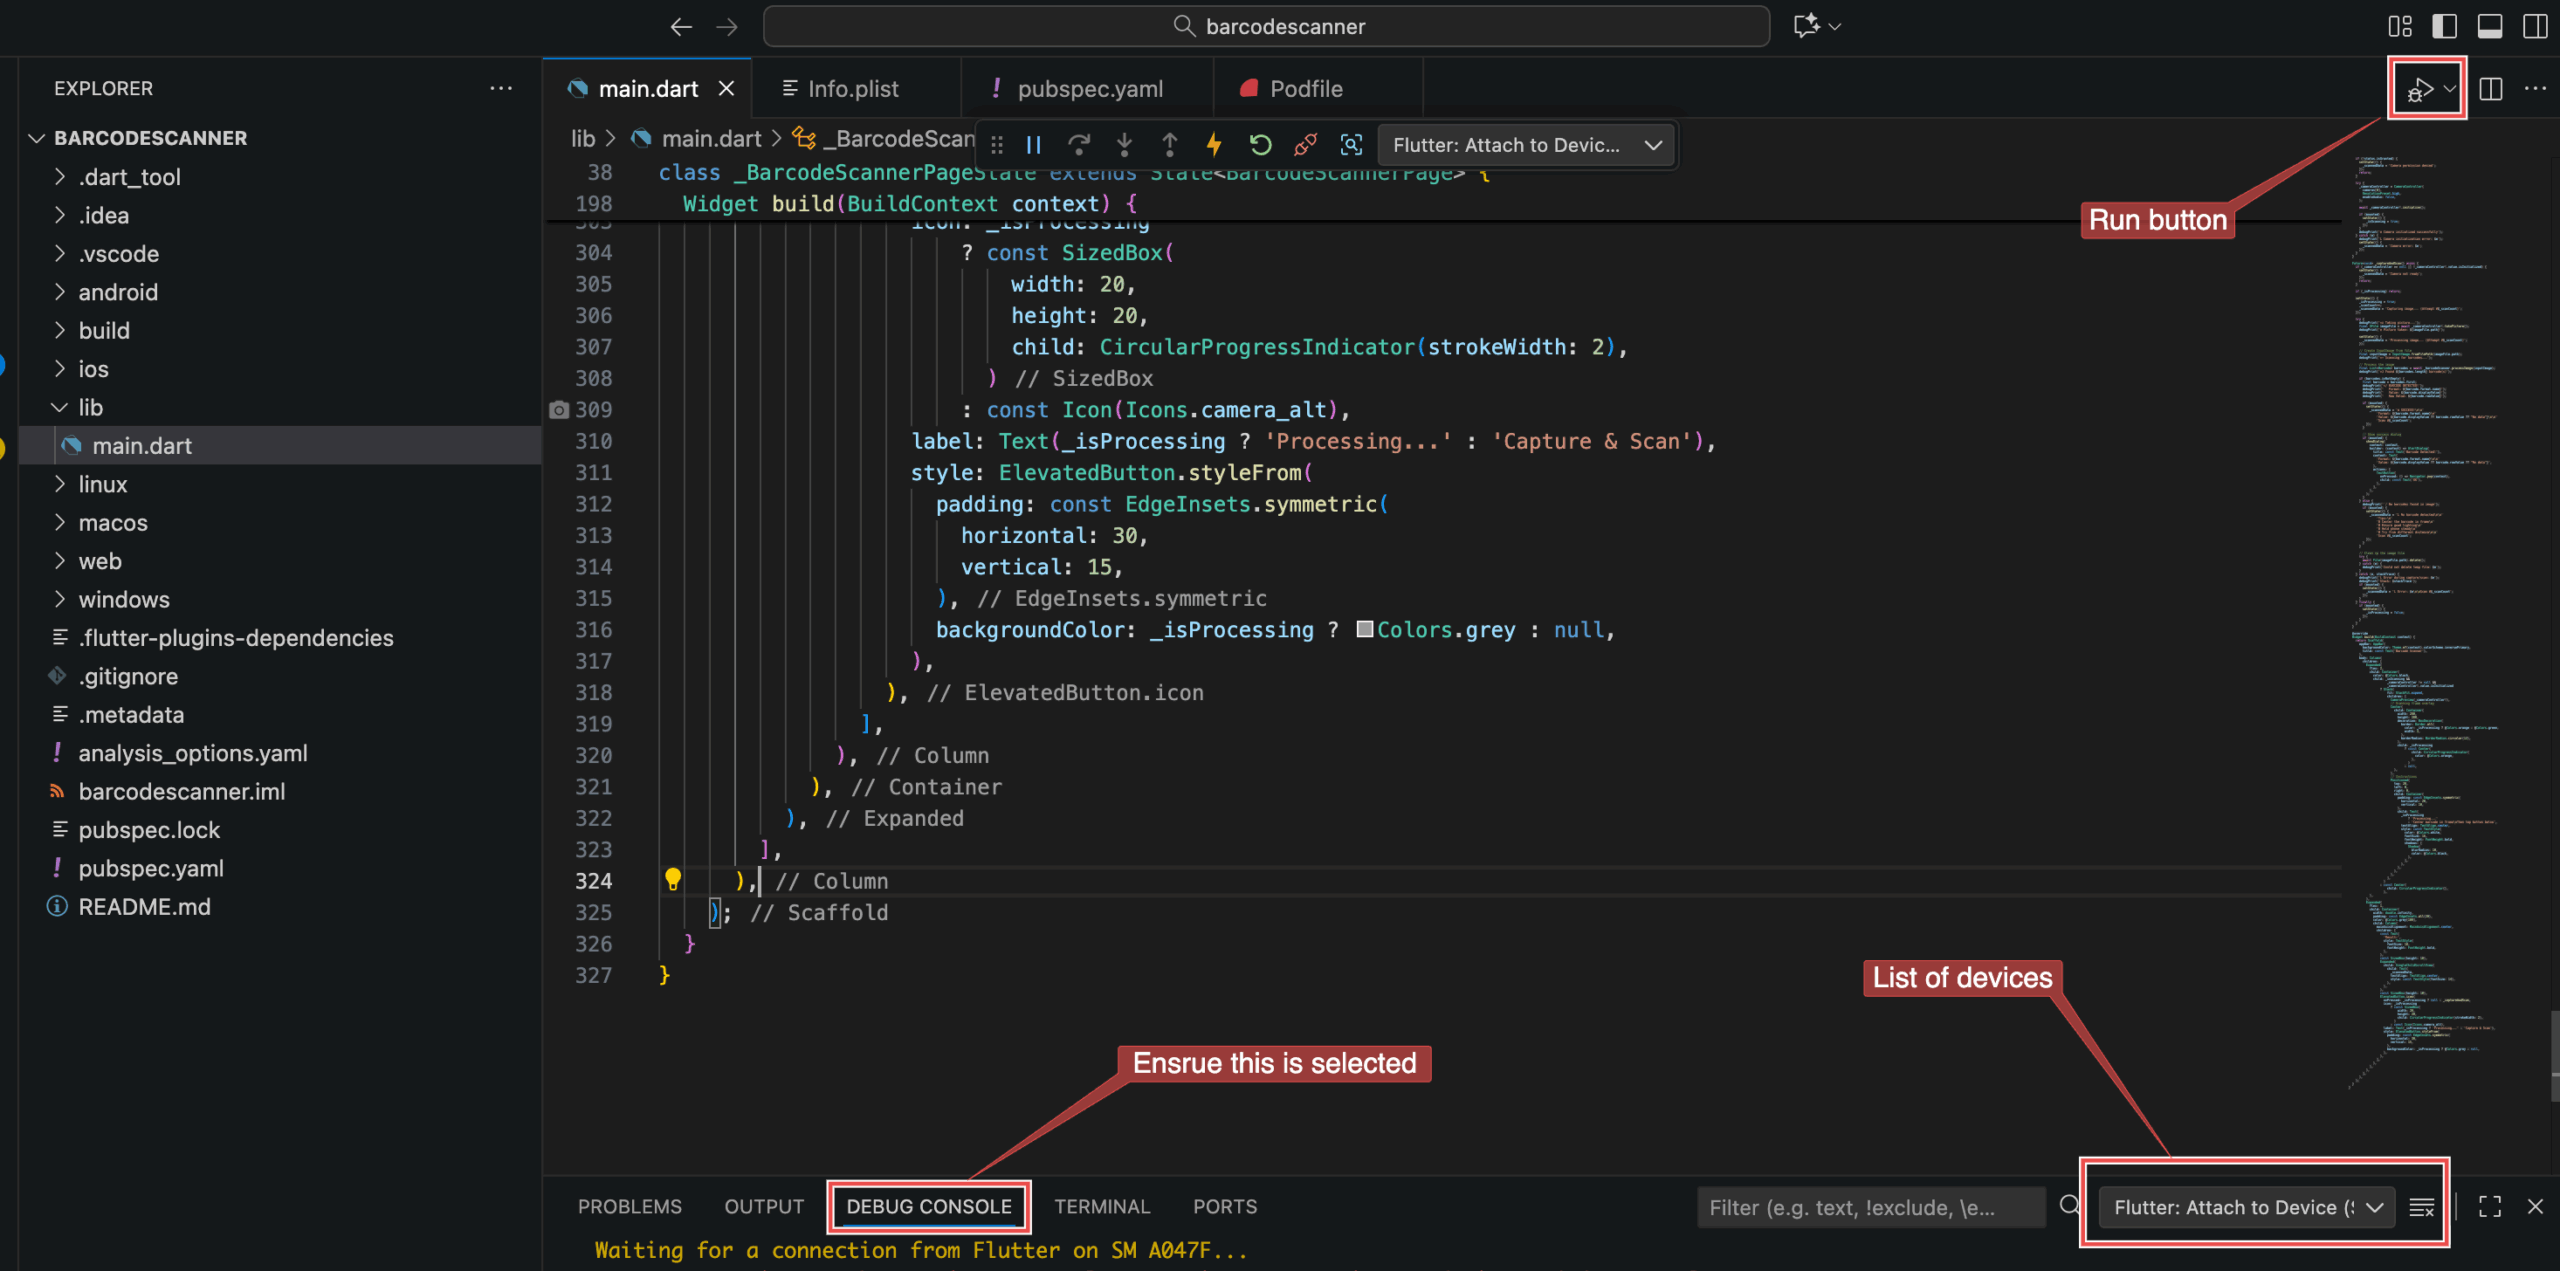
… or use the following command:
flutter run
Conclusion
This concludes our tutorial on how to set up a barcode scanning app in Flutter using ML Kit.
Free solutions like this one can be great for prototyping and personal projects. However, they have their drawbacks.
Since google_mlkit_barcode_scanning is a wrapper for Google’s ML Kit, its functionality depends entirely on this third-party library. Companies relying on ML Kit for their scanning needs won’t be able to submit feature requests nor count on help when things don’t work as expected.
We developed the Scanbot Barcode Scanner SDK to help companies overcome these hurdles. Our goal was to provide a developer-friendly solution for a wide range of platforms that consistently delivers high-quality results, even in challenging circumstances – enterprise-grade support included.
In the following tutorial, we’ll show you how to set up a barcode scanning app using the Scanbot Flutter Barcode Scanner SDK.
Building a Flutter barcode scanner app with the Scanbot SDK
To set up our app, we’ll follow these steps:
- Preparing the project
- Installing SDK
- Initializing the SDK
- Implementing the scanning modes
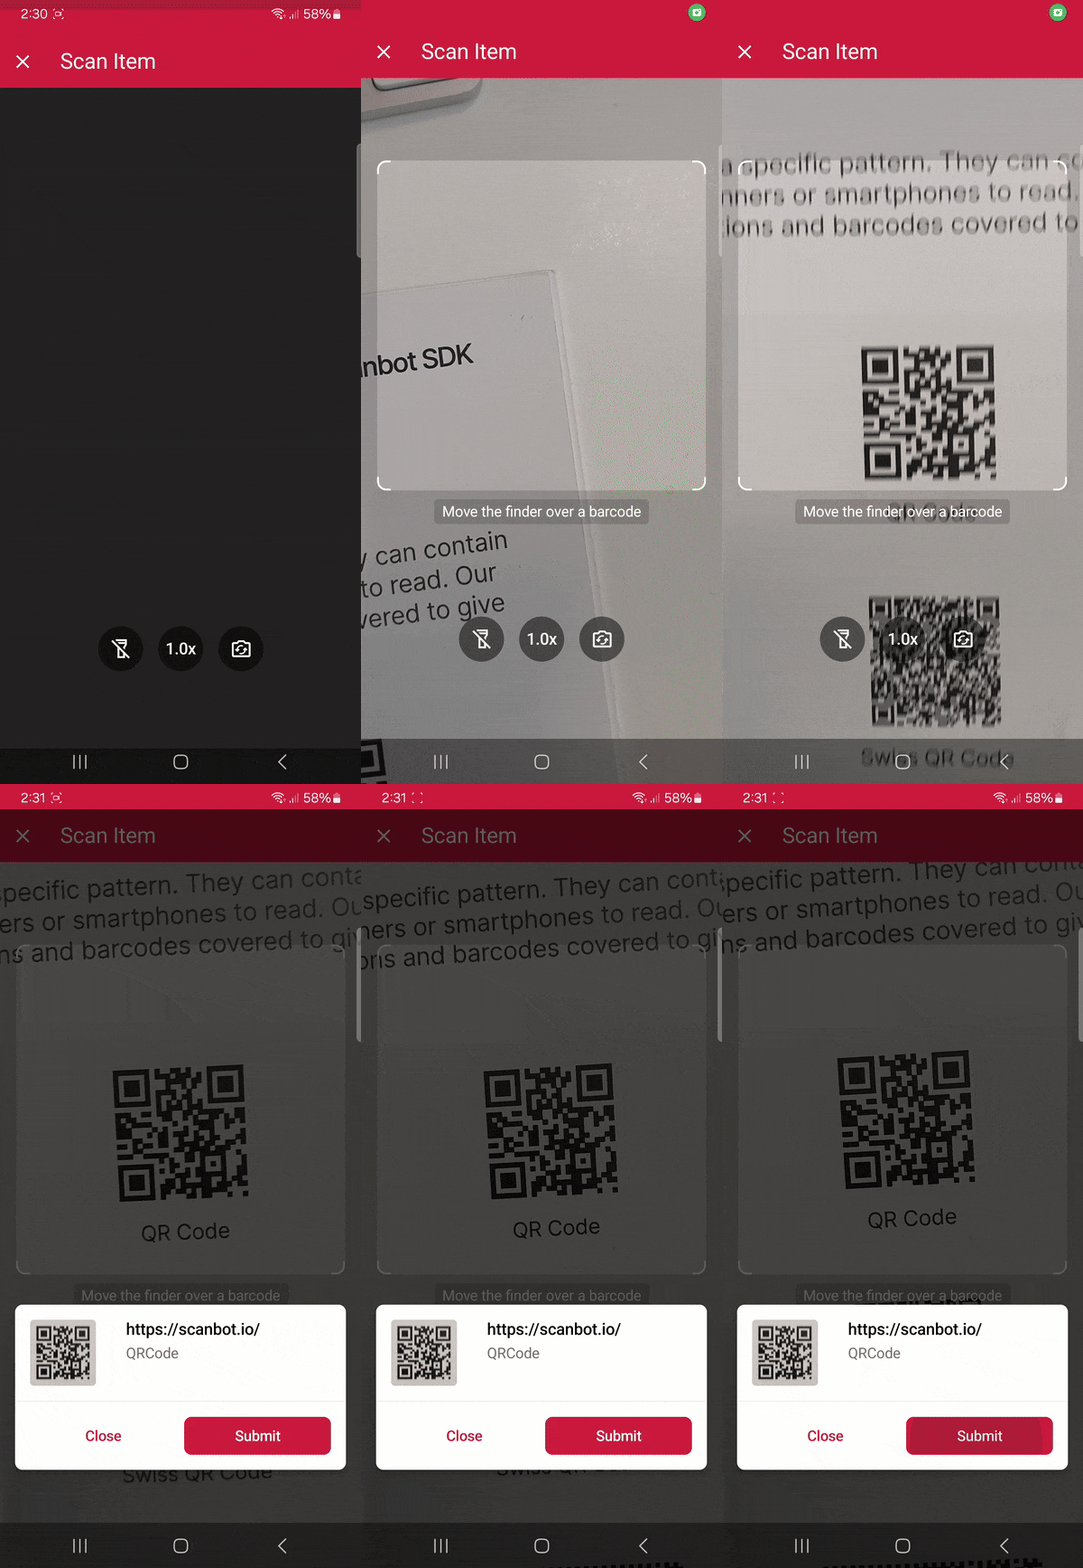
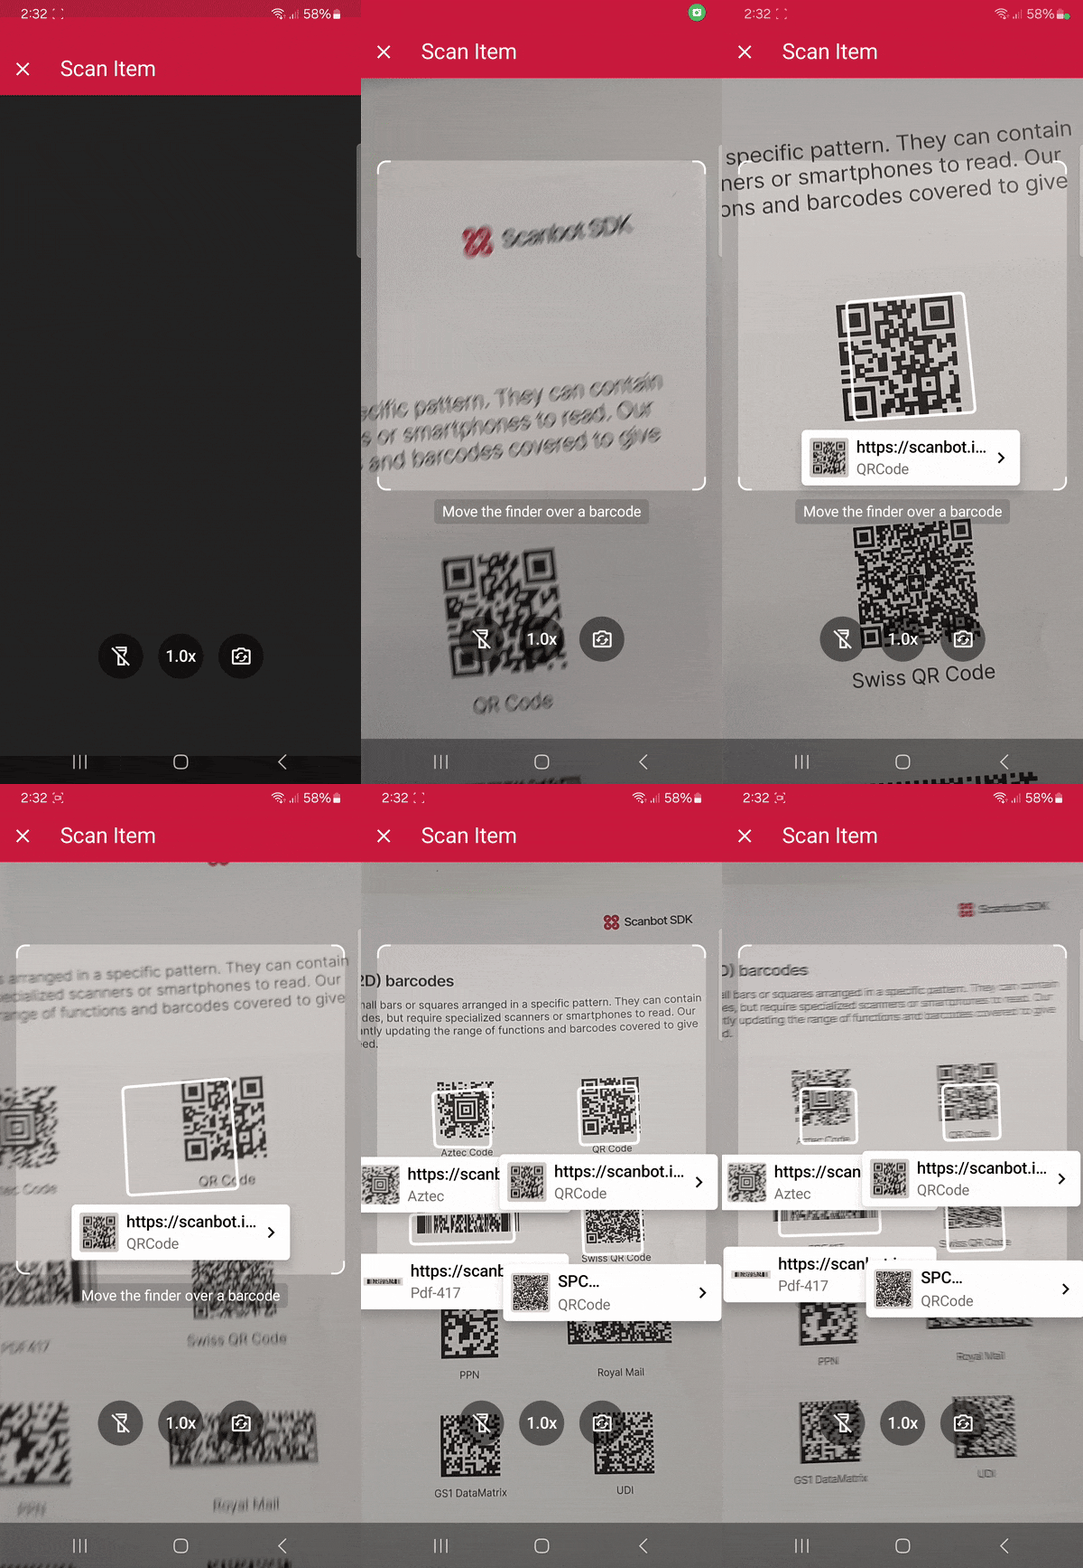
Thanks to the SDK’s Ready-to-Use UI Components, we’ll have an intuitive user interface out of the box.
Let’s get started!
Step 1: Prepare the project
First, create a new directory for your project and navigate into it:
mkdir test-flutter
cd test-flutter
Create a new Flutter project:
flutter create test_barcode_scanner
cd test_barcode_scanner
Since we need access to the device camera to scan barcodes, let’s add the necessary camera permissions for Android and iOS.
Add camera permissions to android/app/src/main/AndroidManifest.xml:
<uses-permission android:name="android.permission.CAMERA"/>
<uses-feature android:name="android.hardware.camera" />
And in ios/Runner/Info.plist:
<key>NSCameraUsageDescription</key>
<string>We need camera access to scan barcodes.</string>
Step 2: Install the SDK
Add the Scanbot Flutter Barcode Scanner package to your pubspec.yaml:
dependencies:
  flutter:
    sdk: flutter
	barcode_scanner: ^5.1.0
Run the following commnand to install the packages:
flutter pub get
💡 Please refer to our changelog for the latest version of the Barcode Scanner SDK.
Now that the project is set up, we can integrate the barcode scanning functionalities.
Step 3: Initialize the SDK
Initialize the SDK in main.dart:
import 'package:flutter/material.dart';
import 'package:barcode_scanner/scanbot_barcode_sdk_v2.dart';

const BARCODE_SDK_LICENSE_KEY = "";

void main() {
  runApp(const MyApp());
}

class MyApp extends StatelessWidget {
  const MyApp({super.key});

  @override
  Widget build(BuildContext context) {
    return const MaterialApp(
      home: MyHomePage(),
    );
  }
}

class MyHomePage extends StatefulWidget {
  const MyHomePage({super.key});

  @override
  State<MyHomePage> createState() => _MyHomePageState();
}

class _MyHomePageState extends State<MyHomePage> {
  @override
  void initState() {
    super.initState();
    _initScanbotSdk();
  }

  Future<void> _initScanbotSdk() async {
    var config = ScanbotSdkConfig(
      licenseKey: BARCODE_SDK_LICENSE_KEY,
      loggingEnabled: true,
    );

    try {
      await ScanbotBarcodeSdk.initScanbotSdk(config);
      print('Scanbot SDK initialized successfully');
    } catch (e) {
      print('Error initializing Scanbot SDK: $e');
    }
  }

  @override
  Widget build(BuildContext context) {
  ...
}
💡 Without a license key, our SDK only runs for 60 seconds per session. This is more than enough for the purposes of our tutorial, but if you like, you can generate a license key using your applicationId.
Step 4: Implement the scanning modes
The SDK’s RTU UI components make it easy to deploy our Flutter Barcode Scanner package’s different scanning modes in your app. Let’s start with the simplest use case: single-barcode scanning.
Implement the barcode scanning functionality:
void _startBarcodeScanning() async {
  try {
    // Create the default configuration object.
    var configuration = BarcodeScannerConfiguration();

    // Initialize the use case for single scanning.
    var scanningMode = SingleScanningMode();
    // Enable and configure the confirmation sheet.
    scanningMode.confirmationSheetEnabled = true;
    scanningMode.sheetColor = ScanbotColor("#FFFFFF");

    // Hide/unhide the barcode image.
    scanningMode.barcodeImageVisible = true;

    // Configure the barcode title of the confirmation sheet.
    scanningMode.barcodeTitle.visible = true;
    scanningMode.barcodeTitle.color = ScanbotColor("#000000");

    // Configure the barcode subtitle of the confirmation sheet.
    scanningMode.barcodeSubtitle.visible = true;
    scanningMode.barcodeSubtitle.color = ScanbotColor("#000000");

    // Configure the cancel button of the confirmation sheet.
    scanningMode.cancelButton.text = "Close";
    scanningMode.cancelButton.foreground.color = ScanbotColor("#C8193C");
    scanningMode.cancelButton.background.fillColor = ScanbotColor("#00000000");

    // Configure the submit button of the confirmation sheet.
    scanningMode.submitButton.text = "Submit";
    scanningMode.submitButton.foreground.color = ScanbotColor("#FFFFFF");
    scanningMode.submitButton.background.fillColor = ScanbotColor("#C8193C");

    // Configure other parameters, pertaining to single-scanning mode as needed.

    configuration.useCase = scanningMode;

    // Set an array of accepted barcode types.
    // configuration.recognizerConfiguration.barcodeFormats = [
    //   scanbotV2.BarcodeFormat.AZTEC,
    //   scanbotV2.BarcodeFormat.PDF_417,
    //   scanbotV2.BarcodeFormat.QR_CODE,
    //   scanbotV2.BarcodeFormat.MICRO_QR_CODE,
    //   scanbotV2.BarcodeFormat.MICRO_PDF_417,
    //   scanbotV2.BarcodeFormat.ROYAL_MAIL,
    ///  .....
    // ];

    // Configure other parameters as needed.

    var result = await ScanbotBarcodeSdk.startBarcodeScanner(configuration);

    if(result.operationResult == OperationResult.SUCCESS)
    {
      // TODO: present barcode result as needed
      print(result.value?.items.first.type?.name);
    }
  } catch (e) {
    print('Error: $e');
  }
}
Now let’s go to the build method and add the button on the start screen so it calls our _startBarcodeScanning method when clicked:
@override
Widget build(BuildContext context) {
  return Scaffold(
    appBar: AppBar(
      title: const Text('Barcode Scanner'),
    ),
    body: Center(
      child: ElevatedButton(
        onPressed: _startBarcodeScanning,
        style: ElevatedButton.styleFrom(
          padding: const EdgeInsets.symmetric(vertical: 20, horizontal: 40),
          textStyle: const TextStyle(fontSize: 18),
        ),
        child: const Text("Start single-barcode scanning"),
      ),
    ),
  );
}
If you like, you can build and run the app to see if everything is working correctly so far:
flutter run
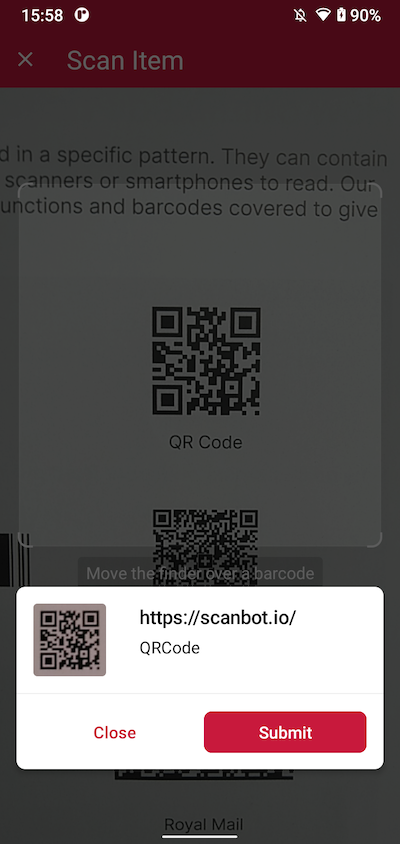
In the next step, we’re going to insert both the multi-barcode scanning and the AR overlay modules.
Let’s create two more methods, _startBarcodeMultiScanning and _startAROverlay:
void _startBarcodeMultiScanning() async {
  try {
    // Create the default configuration object.
    var configuration = BarcodeScannerConfiguration();

    // Initialize the use case for multiple scanning.
    var scanningMode = MultipleScanningMode();

    // Set the counting mode.
    scanningMode.mode = MultipleBarcodesScanningMode.COUNTING;

    // Set the sheet mode for the barcodes preview.
    scanningMode.sheet.mode = SheetMode.COLLAPSED_SHEET;

    // Set the height for the collapsed sheet.
    scanningMode.sheet.collapsedVisibleHeight = CollapsedVisibleHeight.LARGE;

    // Enable manual count change.
    scanningMode.sheetContent.manualCountChangeEnabled = true;

    // Set the delay before same barcode counting repeat.
    scanningMode.countingRepeatDelay = 1000;

    // Configure the submit button.
    scanningMode.sheetContent.submitButton.text = "Submit";
    scanningMode.sheetContent.submitButton.foreground.color =
        ScanbotColor("#000000");

    // Configure other parameters, pertaining to multiple-scanning mode as needed.

    configuration.useCase = scanningMode;

    // Set an array of accepted barcode types.
    // configuration.recognizerConfiguration.barcodeFormats = [
    //   BarcodeFormat.AZTEC,
    //   BarcodeFormat.PDF_417,
    //   BarcodeFormat.QR_CODE,
    //   BarcodeFormat.MICRO_QR_CODE,
    //   BarcodeFormat.MICRO_PDF_417,
    //   BarcodeFormat.ROYAL_MAIL,
    ///  .....
    // ];

    // Configure other parameters as needed.

    var result = await ScanbotBarcodeSdk.startBarcodeScanner(configuration);

    if(result.operationResult == OperationResult.SUCCESS)
    {
      // TODO: present barcode result as needed
      print(result.value?.items.first.type?.name);
    }
  } catch (e) {
    print('Error: $e');
  }
}
void _startAROverlay() async {
    try {
     // Create the default configuration object.
      var configuration = new BarcodeScannerConfiguration();

      // Configure the usecase.
      var usecase = new MultipleScanningMode();
      usecase.mode = MultipleBarcodesScanningMode.UNIQUE;
      usecase.sheet.mode = SheetMode.COLLAPSED_SHEET;
      usecase.sheet.collapsedVisibleHeight = CollapsedVisibleHeight.SMALL;

      // Configure AR Overlay.
      usecase.arOverlay.visible = true;
      usecase.arOverlay.automaticSelectionEnabled = false;

      // Set the configured usecase.
      configuration.useCase = usecase;

      // Set an array of accepted barcode types.
      // configuration.recognizerConfiguration.barcodeFormats = [
      //   BarcodeFormat.AZTEC,
      //   BarcodeFormat.PDF_417,
      //   BarcodeFormat.QR_CODE,
      //   BarcodeFormat.MICRO_QR_CODE,
      //   BarcodeFormat.MICRO_PDF_417,
      //   BarcodeFormat.ROYAL_MAIL,
      ///  .....
      // ];

      var result = await ScanbotBarcodeSdk.startBarcodeScanner(configuration);

      if (result.operationResult == OperationResult.SUCCESS) {
        // TODO: present barcode result as needed
        print(result.value?.items.first.type?.name);
      }
    } catch (e) {
      print('Error: $e');
    }
  }
And let’s not forget to insert the buttons:
@override
  Widget build(BuildContext context) {
    return Scaffold(
      appBar: AppBar(
        title: const Text('Barcode Scanner'),
      ),
      body: Center(
        child: Column(
          mainAxisAlignment: MainAxisAlignment.center,
          children: [
            ElevatedButton(
              onPressed: _startBarcodeScanning,
              style: ElevatedButton.styleFrom(
                padding: const EdgeInsets.symmetric(vertical: 20, horizontal: 40),
                textStyle: const TextStyle(fontSize: 18),
              ),
              child: const Text("Start single-barcode scanning"),
            ),
            const SizedBox(height: 20),
            ElevatedButton(
              onPressed: _startBarcodeMultiScanning,
              style: ElevatedButton.styleFrom(
                padding: const EdgeInsets.symmetric(vertical: 20, horizontal: 40),
                textStyle: const TextStyle(fontSize: 18),
              ),
              child: const Text("Start multi-barcode scanning"),
            ),
            const SizedBox(height: 20),
            ElevatedButton(
              onPressed: _startAROverlay,
              style: ElevatedButton.styleFrom(
                padding: const EdgeInsets.symmetric(vertical: 20, horizontal: 40),
                textStyle: const TextStyle(fontSize: 18),
              ),
              child: const Text("Start the AR overlay"),
            ),
          ],
        ),
      ),
    );
  }
Your final main.dart should look something like this:
import 'package:flutter/material.dart';
import 'package:barcode_scanner/scanbot_barcode_sdk_v2.dart';

const BARCODE_SDK_LICENSE_KEY = "";

void main() {
  runApp(const MyApp());
}

class MyApp extends StatelessWidget {
  const MyApp({super.key});

  @override
  Widget build(BuildContext context) {
    return const MaterialApp(
      home: MyHomePage(),
    );
  }
}

class MyHomePage extends StatefulWidget {
  const MyHomePage({super.key});

  @override
  State<MyHomePage> createState() => _MyHomePageState();
}

class _MyHomePageState extends State<MyHomePage> {
  @override
  void initState() {
    super.initState();
    _initScanbotSdk();
  }

  Future<void> _initScanbotSdk() async {
    var config = ScanbotSdkConfig(
      licenseKey: BARCODE_SDK_LICENSE_KEY,
      loggingEnabled: true,
    );

    try {
      await ScanbotBarcodeSdk.initScanbotSdk(config);
      print('Scanbot SDK initialized successfully');
    } catch (e) {
      print('Error initializing Scanbot SDK: $e');
    }
  }

  @override
  Widget build(BuildContext context) {
    return Scaffold(
      appBar: AppBar(
        title: const Text('Barcode Scanner'),
      ),
      body: Center(
        child: Column(
          mainAxisAlignment: MainAxisAlignment.center,
          children: [
            ElevatedButton(
              onPressed: _startBarcodeScanning,
              style: ElevatedButton.styleFrom(
                padding: const EdgeInsets.symmetric(vertical: 20, horizontal: 40),
                textStyle: const TextStyle(fontSize: 18),
              ),
              child: const Text("Start single-barcode scanning"),
            ),
            const SizedBox(height: 20),
            ElevatedButton(
              onPressed: _startBarcodeMultiScanning,
              style: ElevatedButton.styleFrom(
                padding: const EdgeInsets.symmetric(vertical: 20, horizontal: 40),
                textStyle: const TextStyle(fontSize: 18),
              ),
              child: const Text("Start multi-barcode scanning"),
            ),
            const SizedBox(height: 20),
            ElevatedButton(
              onPressed: _startAROverlay,
              style: ElevatedButton.styleFrom(
                padding: const EdgeInsets.symmetric(vertical: 20, horizontal: 40),
                textStyle: const TextStyle(fontSize: 18),
              ),
              child: const Text("Start the AR overlay"),
            ),
          ],
        ),
      ),
    );
  }

  void _startBarcodeScanning() async {
    try {
      // Create the default configuration object.
      var configuration = BarcodeScannerConfiguration();

      // Initialize the use case for single scanning.
      var scanningMode = SingleScanningMode();
      // Enable and configure the confirmation sheet.
      scanningMode.confirmationSheetEnabled = true;
      scanningMode.sheetColor = ScanbotColor("#FFFFFF");

      // Hide/unhide the barcode image.
      scanningMode.barcodeImageVisible = true;

      // Configure the barcode title of the confirmation sheet.
      scanningMode.barcodeTitle.visible = true;
      scanningMode.barcodeTitle.color = ScanbotColor("#000000");

      // Configure the barcode subtitle of the confirmation sheet.
      scanningMode.barcodeSubtitle.visible = true;
      scanningMode.barcodeSubtitle.color = ScanbotColor("#000000");

      // Configure the cancel button of the confirmation sheet.
      scanningMode.cancelButton.text = "Close";
      scanningMode.cancelButton.foreground.color = ScanbotColor("#C8193C");
      scanningMode.cancelButton.background.fillColor = ScanbotColor("#00000000");

      // Configure the submit button of the confirmation sheet.
      scanningMode.submitButton.text = "Submit";
      scanningMode.submitButton.foreground.color = ScanbotColor("#FFFFFF");
      scanningMode.submitButton.background.fillColor = ScanbotColor("#C8193C");

      // Configure other parameters, pertaining to single-scanning mode as needed.

      configuration.useCase = scanningMode;

      // Set an array of accepted barcode types.
      // configuration.recognizerConfiguration.barcodeFormats = [
      //   scanbotV2.BarcodeFormat.AZTEC,
      //   scanbotV2.BarcodeFormat.PDF_417,
      //   scanbotV2.BarcodeFormat.QR_CODE,
      //   scanbotV2.BarcodeFormat.MICRO_QR_CODE,
      //   scanbotV2.BarcodeFormat.MICRO_PDF_417,
      //   scanbotV2.BarcodeFormat.ROYAL_MAIL,
      ///  .....
      // ];

      // Configure other parameters as needed.

      var result = await ScanbotBarcodeSdk.startBarcodeScanner(configuration);

      if(result.operationResult == OperationResult.SUCCESS)
      {
        // TODO: present barcode result as needed
        print(result.value?.items.first.type?.name);
      }
    } catch (e) {
      print('Error: $e');
    }
  }

  void _startBarcodeMultiScanning() async {
    try {
      // Create the default configuration object.
      var configuration = BarcodeScannerConfiguration();

      // Initialize the use case for multiple scanning.
      var scanningMode = MultipleScanningMode();

      // Set the counting mode.
      scanningMode.mode = MultipleBarcodesScanningMode.COUNTING;

      // Set the sheet mode for the barcodes preview.
      scanningMode.sheet.mode = SheetMode.COLLAPSED_SHEET;

      // Set the height for the collapsed sheet.
      scanningMode.sheet.collapsedVisibleHeight = CollapsedVisibleHeight.LARGE;

      // Enable manual count change.
      scanningMode.sheetContent.manualCountChangeEnabled = true;

      // Set the delay before same barcode counting repeat.
      scanningMode.countingRepeatDelay = 1000;

      // Configure the submit button.
      scanningMode.sheetContent.submitButton.text = "Submit";
      scanningMode.sheetContent.submitButton.foreground.color =
          ScanbotColor("#000000");

      // Configure other parameters, pertaining to multiple-scanning mode as needed.

      configuration.useCase = scanningMode;

      // Set an array of accepted barcode types.
      // configuration.recognizerConfiguration.barcodeFormats = [
      //   BarcodeFormat.AZTEC,
      //   BarcodeFormat.PDF_417,
      //   BarcodeFormat.QR_CODE,
      //   BarcodeFormat.MICRO_QR_CODE,
      //   BarcodeFormat.MICRO_PDF_417,
      //   BarcodeFormat.ROYAL_MAIL,
      ///  .....
      // ];

      // Configure other parameters as needed.

      var result = await ScanbotBarcodeSdk.startBarcodeScanner(configuration);

      if(result.operationResult == OperationResult.SUCCESS)
      {
        // TODO: present barcode result as needed
        print(result.value?.items.first.type?.name);
      }
    } catch (e) {
      print('Error: $e');
    }
  }

  void _startAROverlay() async {
    try {
     // Create the default configuration object.
      var configuration = new BarcodeScannerConfiguration();

      // Configure the usecase.
      var usecase = new MultipleScanningMode();
      usecase.mode = MultipleBarcodesScanningMode.UNIQUE;
      usecase.sheet.mode = SheetMode.COLLAPSED_SHEET;
      usecase.sheet.collapsedVisibleHeight = CollapsedVisibleHeight.SMALL;

      // Configure AR Overlay.
      usecase.arOverlay.visible = true;
      usecase.arOverlay.automaticSelectionEnabled = false;

      // Set the configured usecase.
      configuration.useCase = usecase;

      // Set an array of accepted barcode types.
      // configuration.recognizerConfiguration.barcodeFormats = [
      //   BarcodeFormat.AZTEC,
      //   BarcodeFormat.PDF_417,
      //   BarcodeFormat.QR_CODE,
      //   BarcodeFormat.MICRO_QR_CODE,
      //   BarcodeFormat.MICRO_PDF_417,
      //   BarcodeFormat.ROYAL_MAIL,
      ///  .....
      // ];

      var result = await ScanbotBarcodeSdk.startBarcodeScanner(configuration);

      if (result.operationResult == OperationResult.SUCCESS) {
        // TODO: present barcode result as needed
        print(result.value?.items.first.type?.name);
      }
    } catch (e) {
      print('Error: $e');
    }
  }
}
Now you can go ahead and scan 1D and 2D barcodes – one after the other, many at the same time, and even with an AR overlay that lets you preview their values!

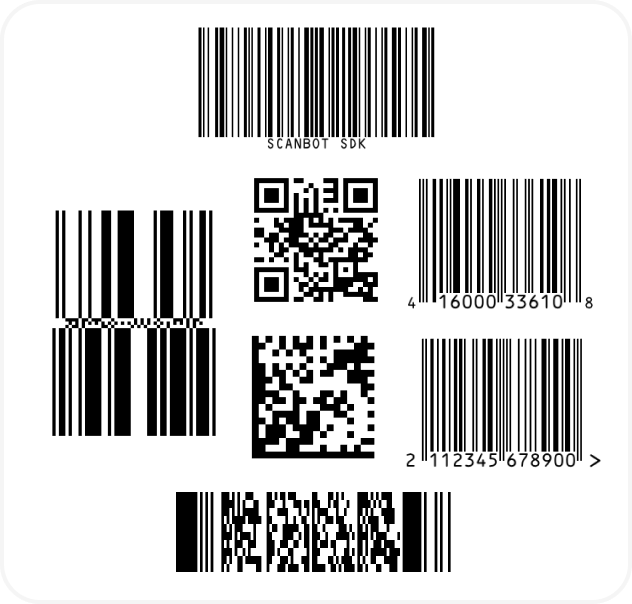
And if you’re in need of some sample barcodes for testing purposes, we’ve got you covered:
If this tutorial has piqued your interest in integrating barcode scanning functionalities into your Flutter app, make sure to take a look at our SDK’s other neat features in our documentation.
Should you have questions about this tutorial or ran into any issues, we’re happy to help! Just shoot us an email via tutorial-support@scanbot.io.
Happy coding!

