Developing mobile applications for iOS and Android often involves managing different coding environments and languages. UI frameworks like Compose Multiplatform simplify the development process significantly, especially when combined with a software development kit like our Scanbot Barcode Scanner SDK.
For Android developers, Jetpack Compose has become the standard toolkit for creating user interfaces. With its small but powerful codebase, the UI toolkit has revolutionized how Android apps are developed, making the process less cumbersome and more intuitive. To bring these advantages to more platforms, JetBrains created Compose Multiplatform. This framework enables developers to wield the power of Kotlin to write UI code compatible with both Android and iOS (with support for the latter currently in beta), thereby streamlining development.
SDKs, too, simplify app development. The Scanbot SDK provides a straightforward solution for rapidly integrating fast and reliable barcode scanning into any mobile app. Barcode scanning is an essential feature for countless use cases among various industries, including logistics, healthcare, and self-checkout in retail.
In this article, we’ll walk you through the integration process for iOS and Android using Compose Multiplatform and the Scanbot Barcode Scanner SDK.
💡 You can find source code for the project we’re building in this tutorial in our GitHub repo tagged compose-multiplatform-article.
Setting up the Compose Multiplatform project
We will use Compose Multiplatform to create both Android and iOS apps. For this, you need:
- A machine running a recent version of macOS
- Xcode
- Android Studio
- Kotlin Multiplatform Mobile plugin
Check your environment
Before you start, use the KDoctor tool to ensure that your development environment is configured correctly:
Install KDoctor with Homebrew:
brew install kdoctorRun KDoctor in your terminal:
kdoctorPreparing the project
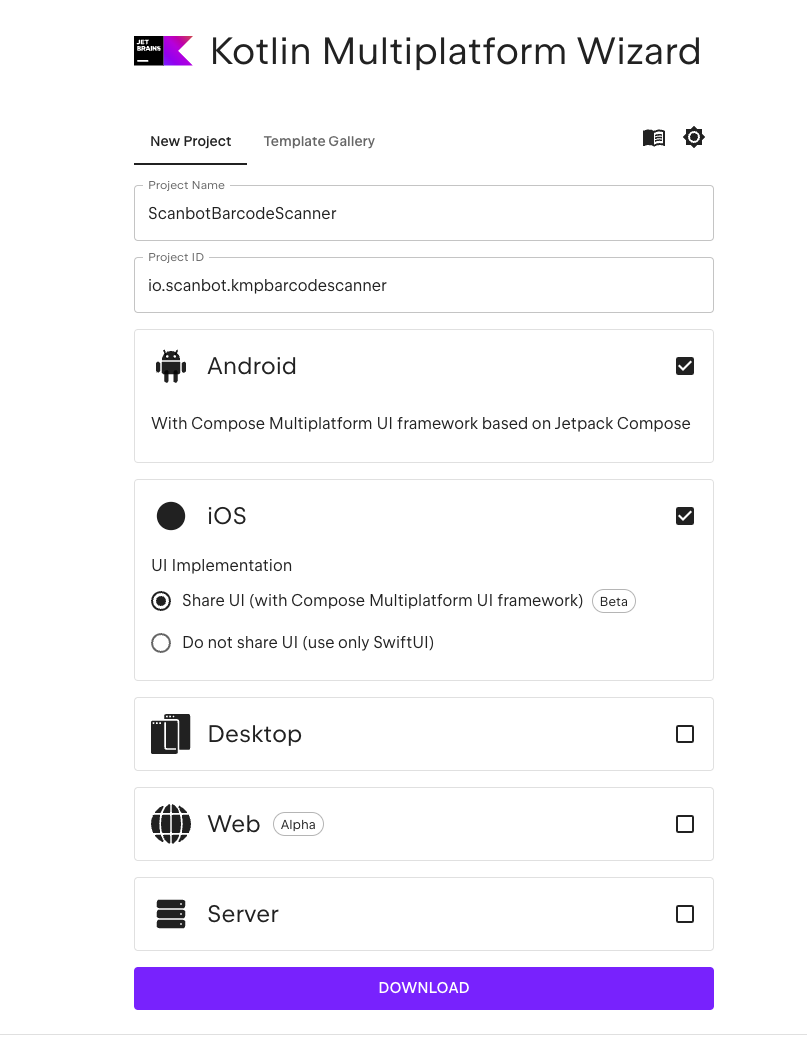
In this tutorial we will use Kotlin Multiplatform Wizard, a new way to setup the KMP project. It uses Kotlin 2.0 at the time of this article.
To get started with Compose Multiplatform using the wizard, open the link and select Android and iOS with the Share UI option selected.
The project was migrated from CocoaPods to a manual XCFramework, which makes the use of third-party dependencies for iOS a bit more complicated. Therefore, we will describe the process in detail.
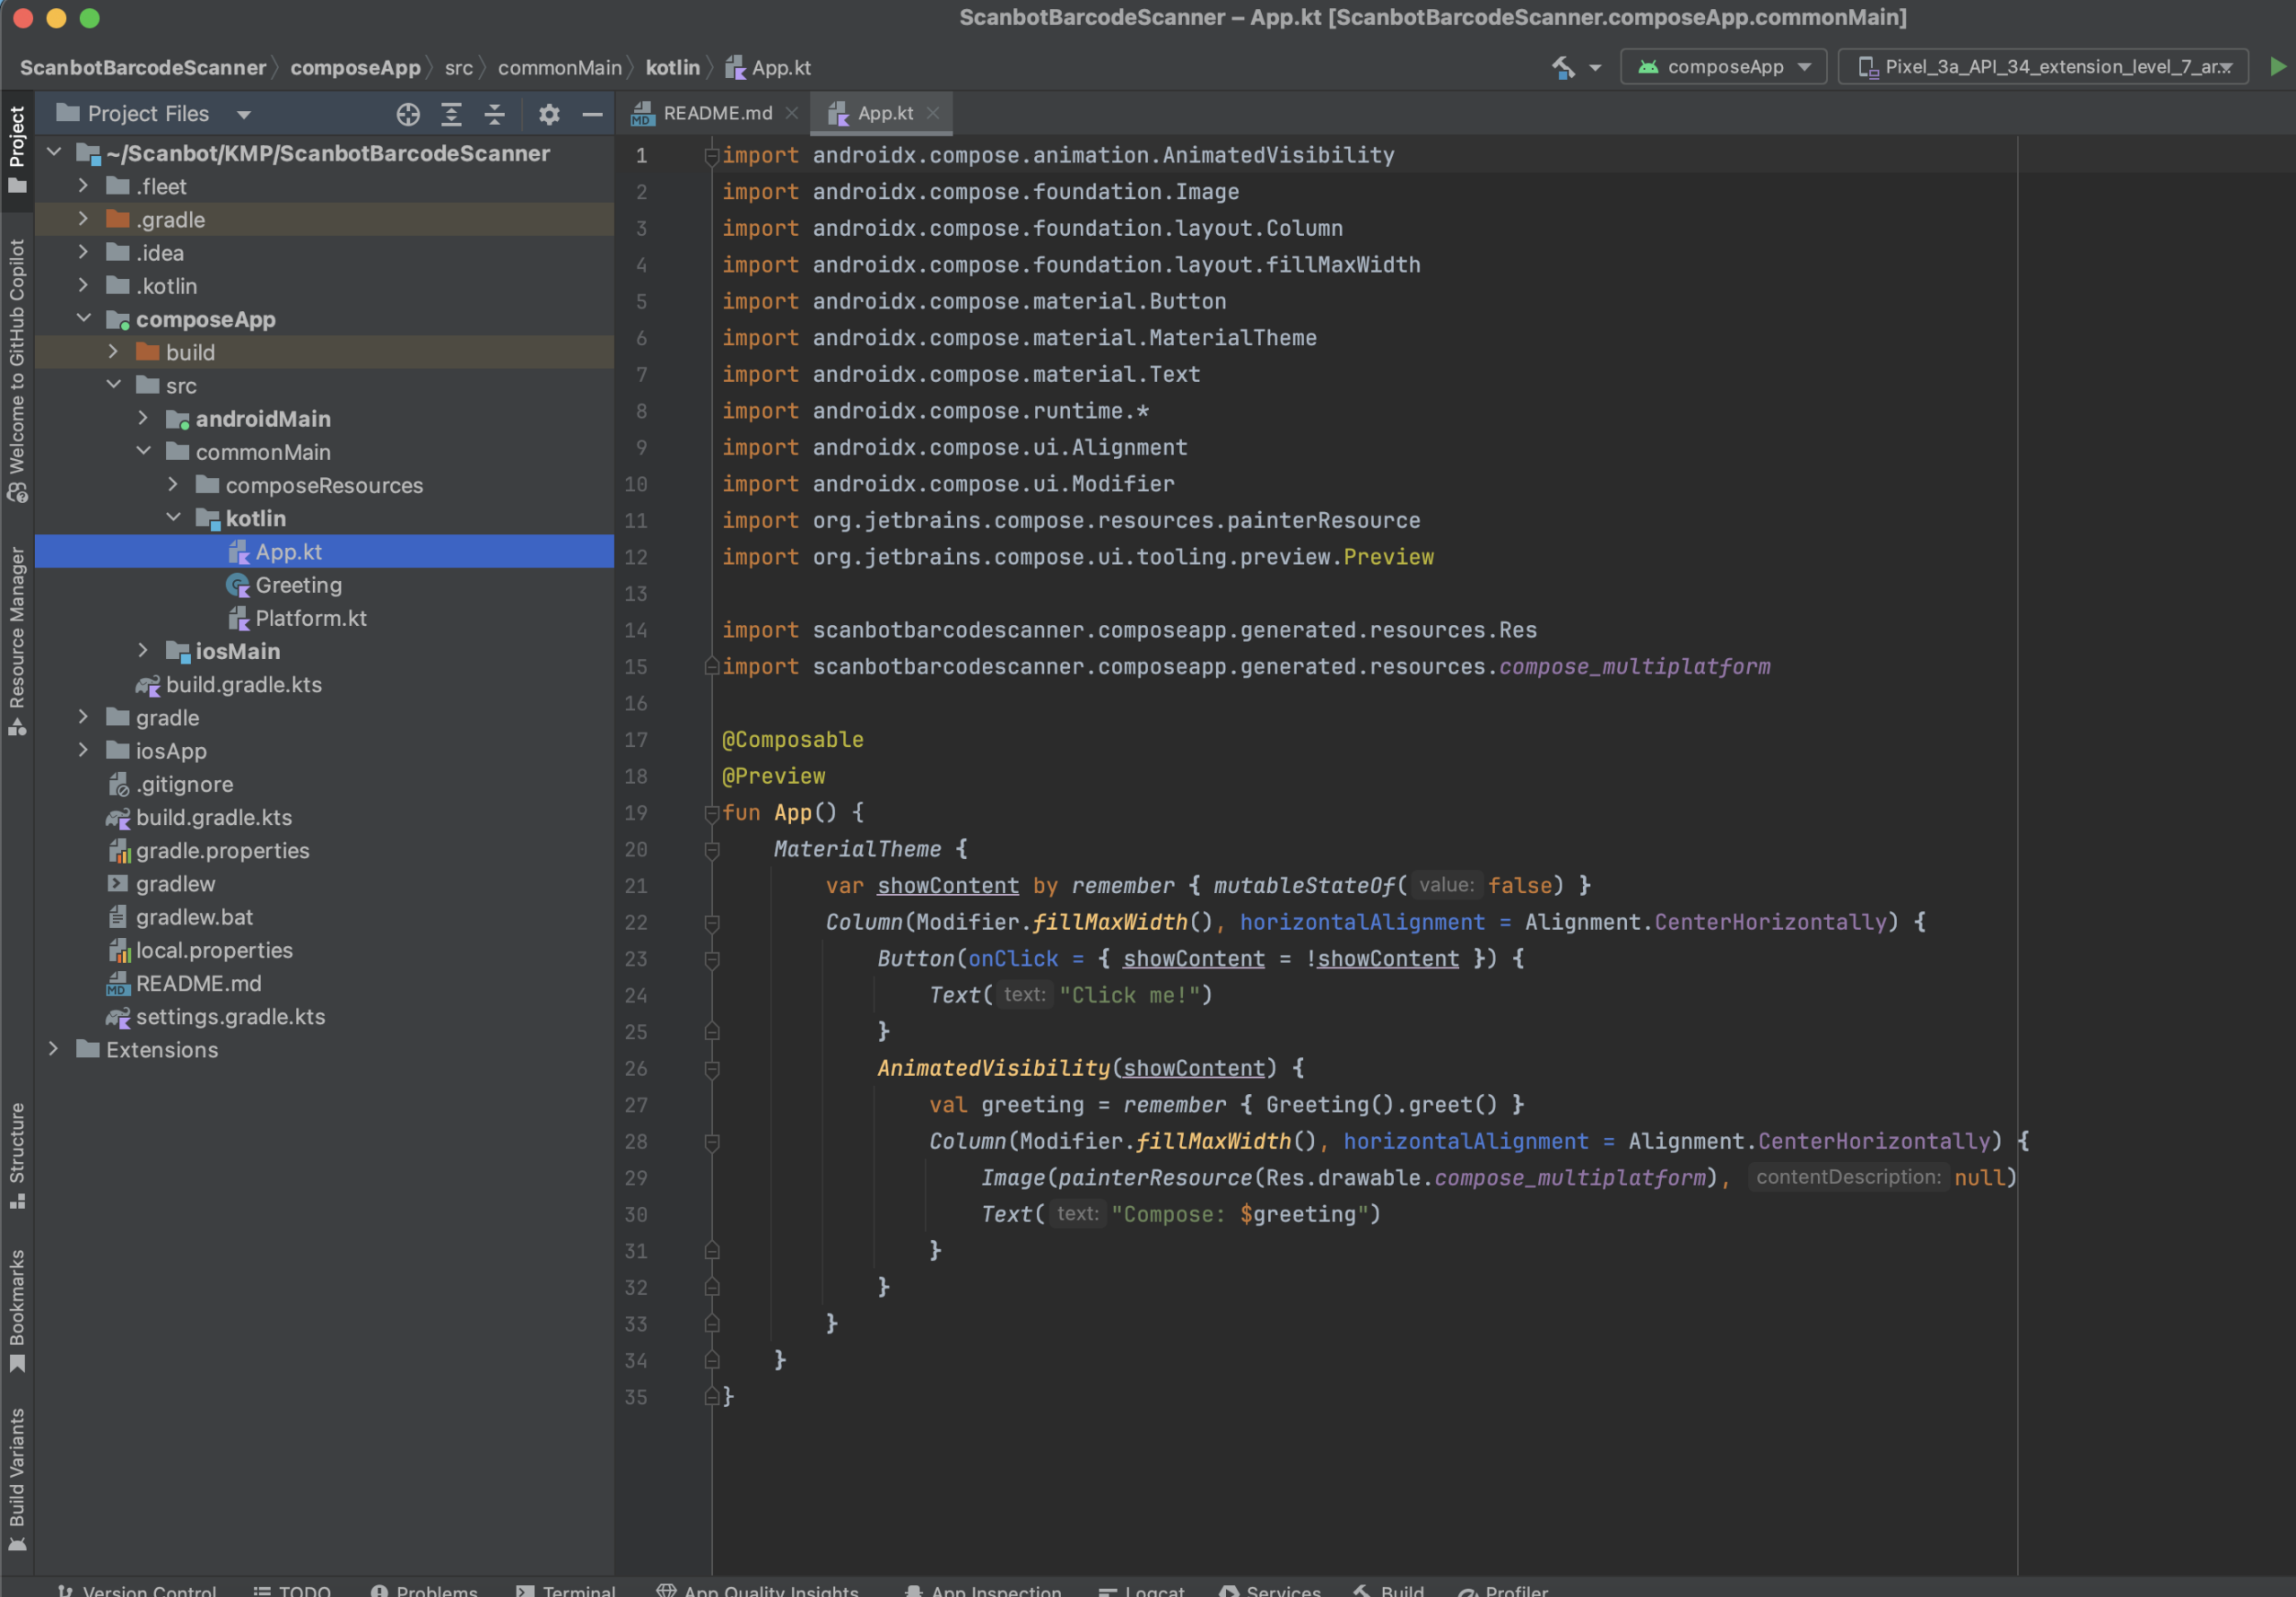
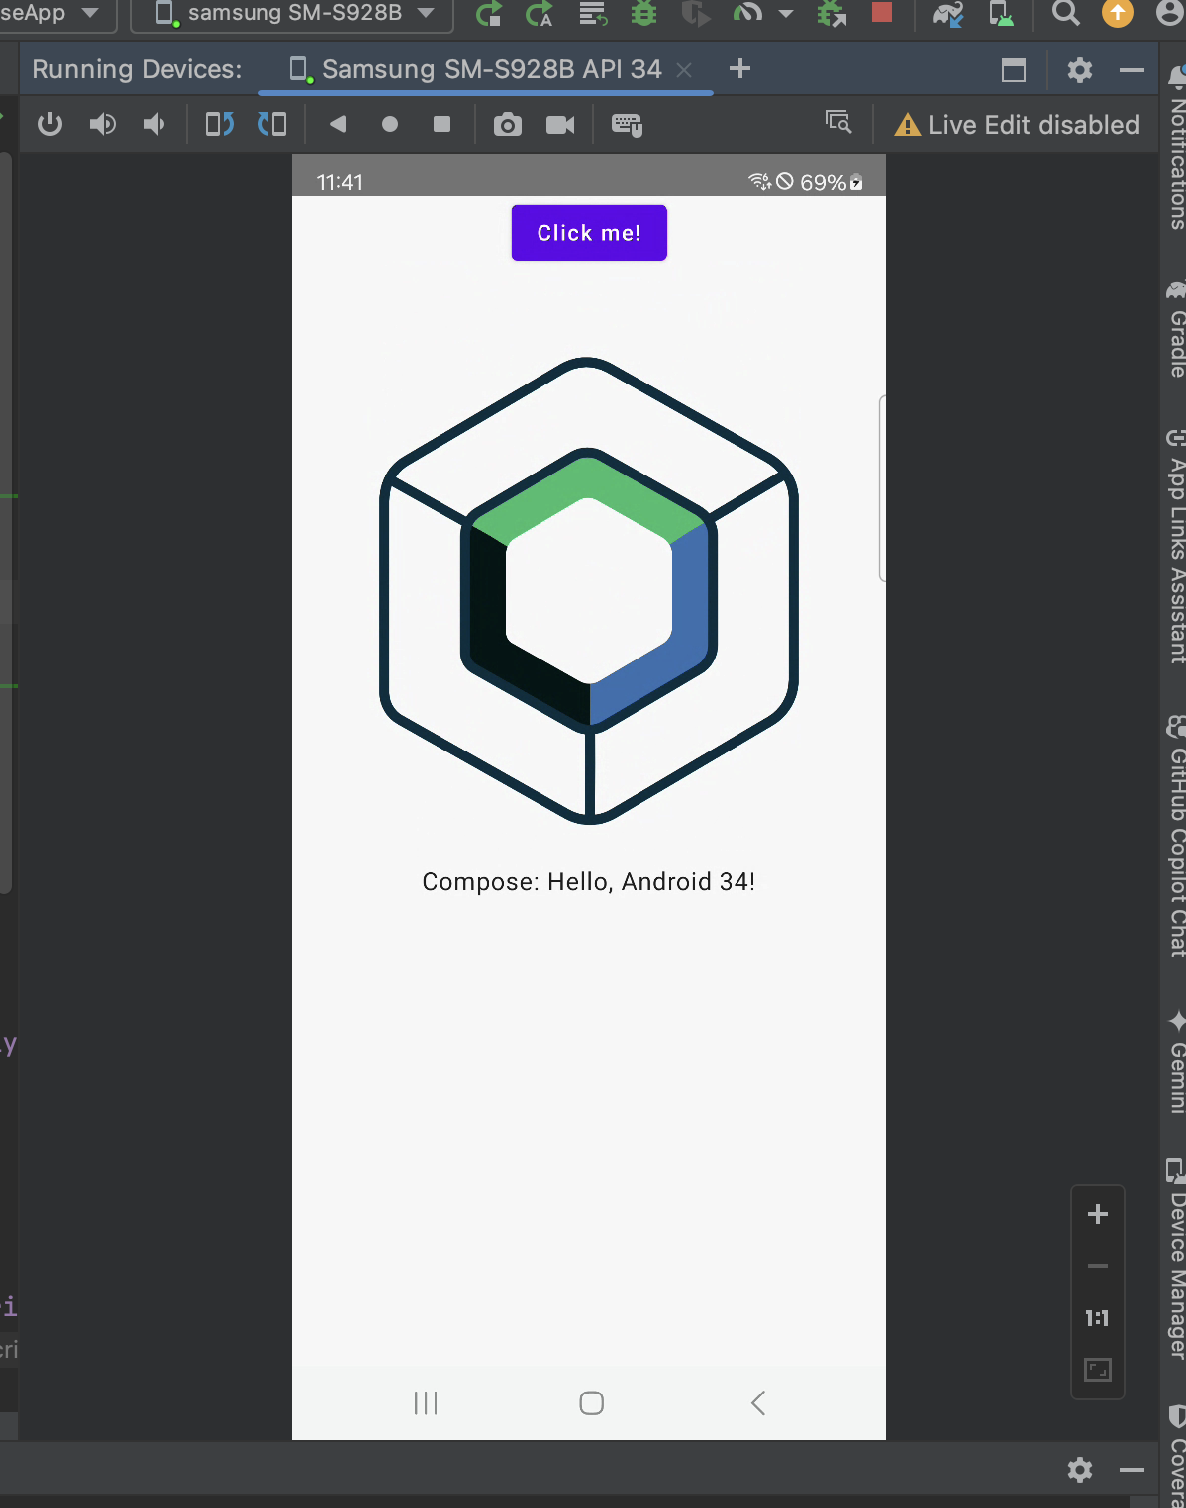
After pressing DOWNLOAD and extracting the zip archive, open the project in Android Studio, sync the project, and switch to the Project Files view. You should see the following structure:
Let’s try to run the template app on an Android device (it looks very similar on iOS).
Adding an Android dependency on the Scanbot Barcode Scanner SDK
First off, let’s set up our app on the Android side to work with the Scanbot Barcode Scanner SDK.
For this, we will follow the steps in our documentation.
In settings.gradle.kts, let’s modify the dependencyResolutionManagement section like this:
dependencyResolutionManagement {
    repositories {
        ...
        maven { url = java.net.URI("https://nexus.scanbot.io/nexus/content/repositories/releases/") }
        maven { url = java.net.URI("https://nexus.scanbot.io/nexus/content/repositories/snapshots/") }
        ...
  }
}
Next, let’s modify composeApp/build.gradle.kts by adding our Scanbot SDK dependencies:
kotlin {
 sourceSets {
...
        val androidMain by getting {
            dependencies
                ...
                implementation("io.scanbot:scanbot-barcode-scanner-sdk:5.2.0")
                implementation("io.scanbot:rtu-ui-v2-barcode:5.2.0")
                ...
            }
        }
...
}
Android Studio will hint that it is recommended to use version catalogs instead of the hardcoded version. Feel free to apply the hint to make the version of the SDK consistent with other dependencies. You can also do this later.
Adding a Native iOS dependency as XCFramework in Kotlin Multiplatform project
To be able to use our barcode scanner functionalities in iOS apps as well, we need to add a dependency on the Scanbot Barcode Scanner SDK for iOS. We’ll use the XCFramework approach for this, since it’s the default way.
💡 If you use the Cocoapods setup for iOS in your Kotlin Multiplatform project, please follow these steps to add the dependency to our ScanbotBarcodeScannerSDK cocoapod. Then you can proceed directly to the step “Implementing shared Compose Multiplatform UI”.
1. We need to make sure that the project is using the property:
kotlin.mpp.enableCInteropCommonization=true
Without that, we won’t be able to access the iOS code from the third-party library in the Kotlin layer.
2. We need to define the .def file with the following path:
composeApp/src/nativeInterop/cinterop/ScanbotBarcodeScannerSDK.def
… and with the following contents:
language = Objective-C
modules = ScanbotBarcodeScannerSDK
modules = ScanbotBarcodeScannerSDK
package = ScanbotBarcodeScannerSDK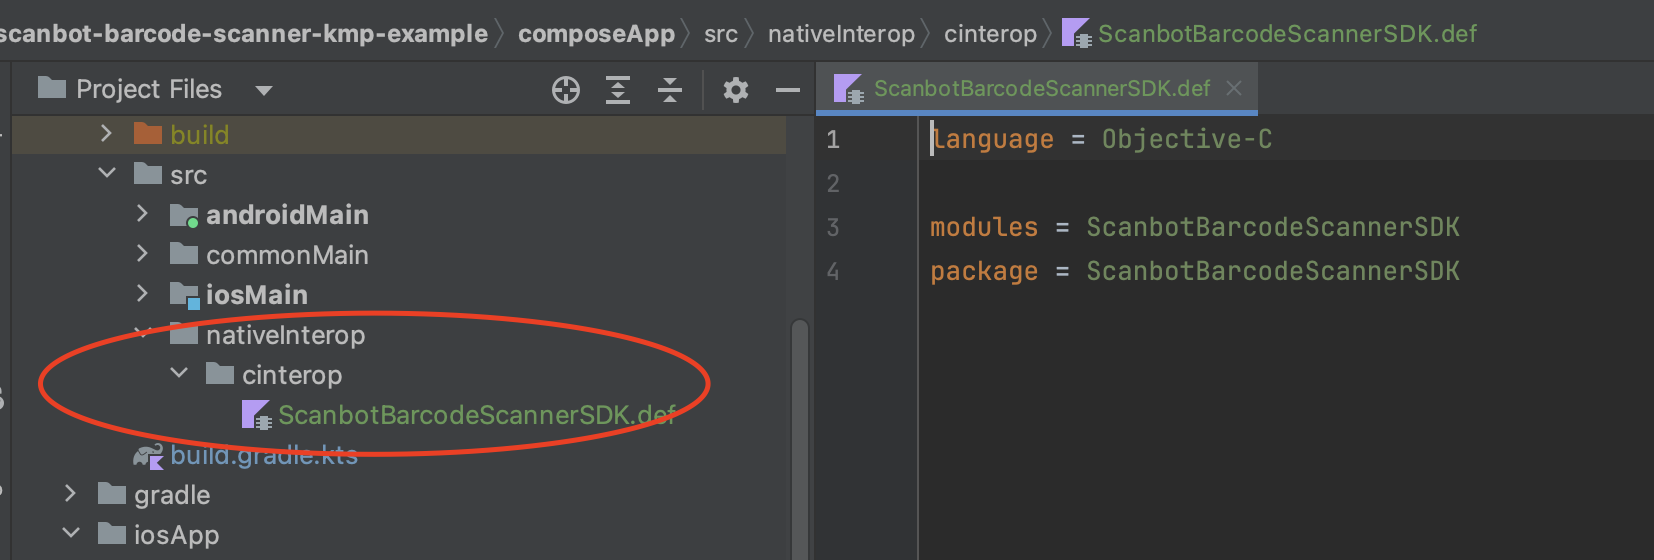
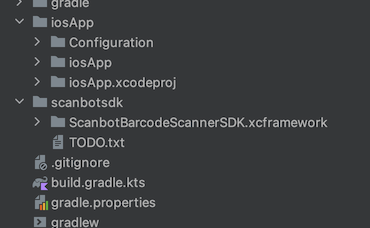
3. We need to download the Scanbot Barcode Scanner SDK for the iOS XCFramework (you can find a link to the latest version here). For this tutorial, we’ll use version 5.2.1.
Extract the zip file somewhere into the project folder, for example in scanbotsdk/ScanbotBarcodeScannerSDK.xcframework. We only need the xcframework file itself.
4. Compile and link the frameworks for the corresponding architectures in composeApp/build.gradle.kts.
Now add the paths for the .def and frameworks. To do that, we need to add the following snippet into the kotlin { ... } part of the configuration:
iosArm64 {
    val path = "$rootDir/scanbotsdk/ScanbotBarcodeScannerSDK.xcframework/ios-arm64"
    compilations.getByName("main") {
        val ScanbotBarcodeScannerSDK by cinterops.creating {
            defFile("src/nativeInterop/cinterop/ScanbotBarcodeScannerSDK.def")
            compilerOpts("-F$path", "-framework", "ScanbotBarcodeScannerSDK", "-rpath", path)
            extraOpts += listOf("-compiler-option", "-fmodules")
        }
    }
    binaries.all {
        linkerOpts("-framework", "ScanbotBarcodeScannerSDK", "-F$path")
    }
}

listOf(
    iosX64(),
    iosSimulatorArm64()
).forEach {
    val path =
        "$rootDir/scanbotsdk/ScanbotBarcodeScannerSDK.xcframework/ios-arm64_x86_64-simulator"
    it.compilations.getByName("main") {
        val ScanbotBarcodeScannerSDK by cinterops.creating {
            defFile("src/nativeInterop/cinterop/ScanbotBarcodeScannerSDK.def")
            compilerOpts("-F$path", "-framework", "ScanbotBarcodeScannerSDK", "-rpath", path)
            extraOpts += listOf("-compiler-option", "-fmodules")
        }
    }
    it.binaries.all {
        linkerOpts("-framework", "ScanbotBarcodeScannerSDK", "-F$path")
    }
}
You can put it next to the following lines:
listOf(
    iosX64(),
    iosArm64(),
    iosSimulatorArm64()
).forEach { iosTarget ->
    iosTarget.binaries.framework {
        baseName = "ComposeApp"
        isStatic = true
    }
}
Now sync the project and you will be able to access the iOS dependency file from the Kotlin classes.
However, the final app also needs to bundle the XCFramework. For that we need to open the project in Xcode and add the framework manually. Just drag the iosApp folder into Xcode.
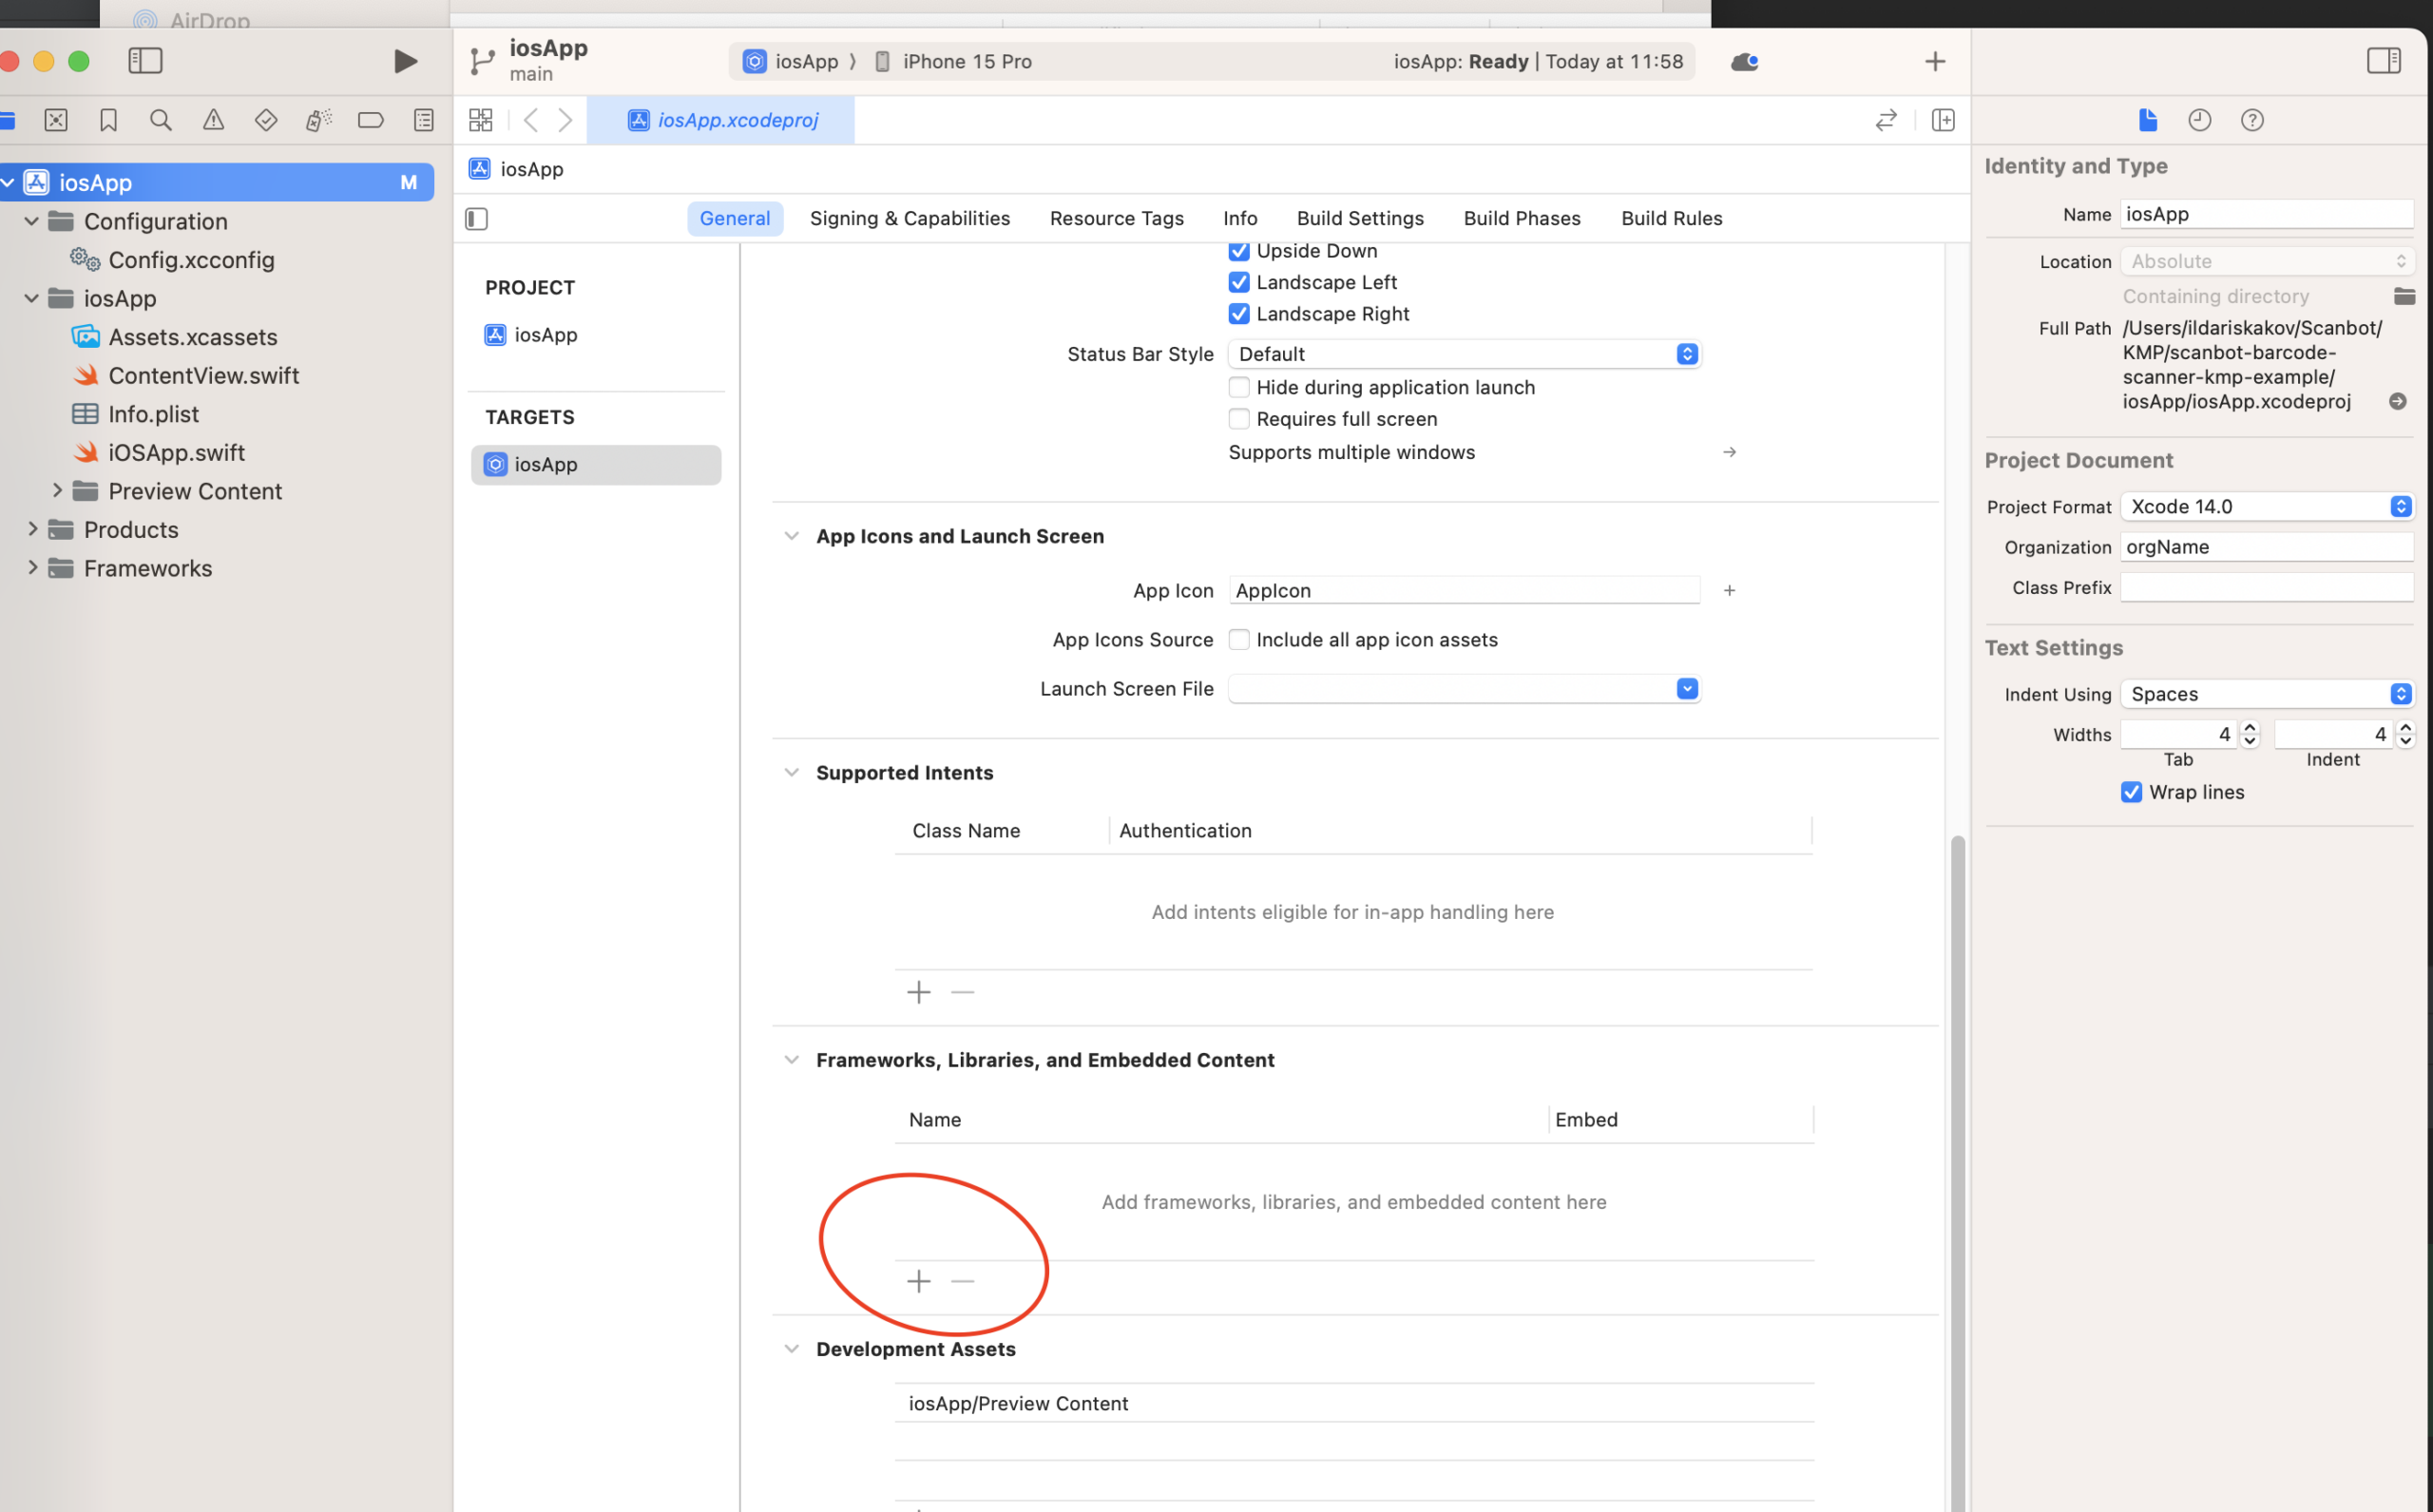
Press Add other and select the XCFramework file we put into the scanbotsdk folder. Make sure it says Embed & Sign when it appears in the list:
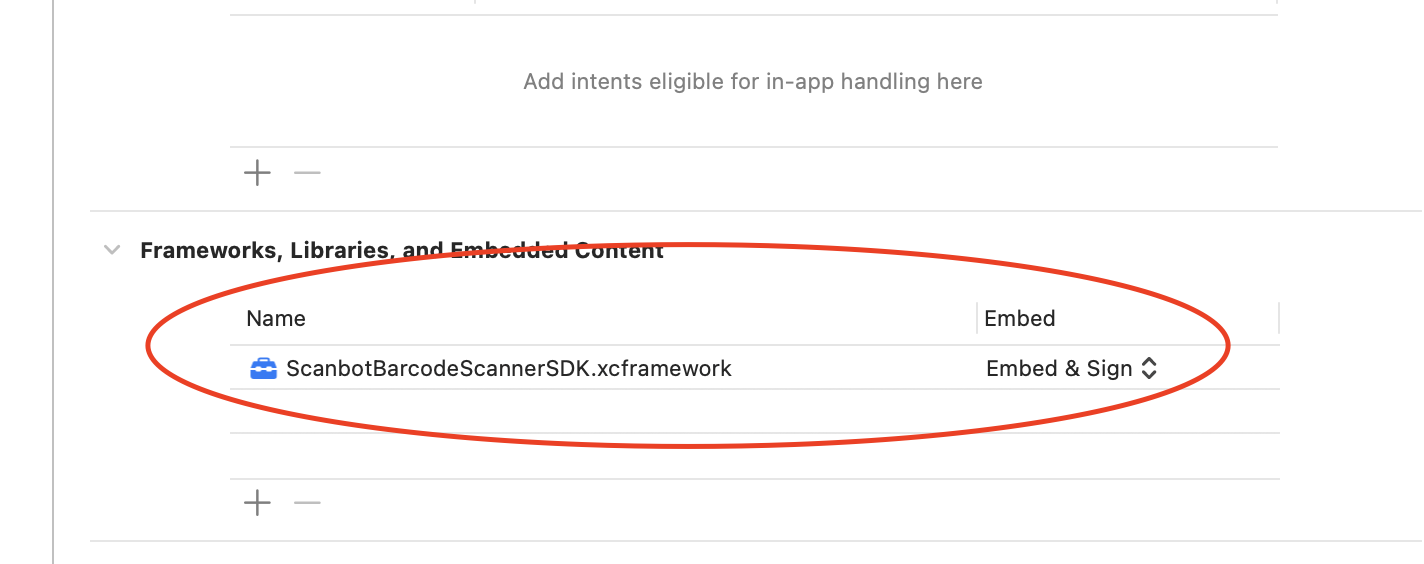
Finally, our iOS dependency setup is done.
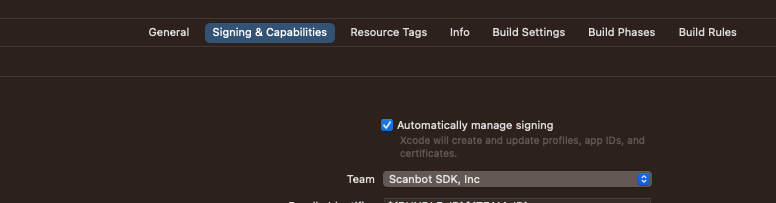
Let’s try to run our app on an iOS device. Before we continue, we have to make sure the signing properties are in order:
Implementing shared Compose Multiplatform UI
It’s pretty cool that we can create a shared UI for Android and iOS using Compose, even though iOS support is still in beta. Let’s get right to it!
We start by adding a button and a text element in the template code. The text element is where we will put the scanning results.
The template provides the following code in the App class (composeApp/src/commonMain/kotlin/App.kt):
@Composable
@Preview
fun App() {
    MaterialTheme {
        var showContent by remember { mutableStateOf(false) }
        Column(Modifier.fillMaxWidth(), horizontalAlignment = Alignment.CenterHorizontally) {
            Button(onClick = { showContent = !showContent }) {
                Text("Click me!")
            }
            AnimatedVisibility(showContent) {
                val greeting = remember { Greeting().greet() }
                Column(Modifier.fillMaxWidth(), horizontalAlignment = Alignment.CenterHorizontally) {
                    Image(painterResource(Res.drawable.compose_multiplatform), null)
                    Text("Compose: $greeting")
                }
            }
        }
    }
}
Instead of opening an image after the button is clicked, we will open the corresponding Ready-to-Use UI Component from the Scanbot SDK for Android and iOS respectively. Later, we’ll also need to define a Composable expect function BarcodeScannerNativeView on the native side.
We save the text of the last scanned barcode in a variable and define a callback for it for each of the Native views. Since the SDK must be initialized first, we’ll do just that and extract a variable for the license key.
In short, we’ll replace the existing class with the following:
@Composable
@Preview
fun App() {
MaterialTheme {
var showContent by remember { mutableStateOf(false) }
var text by remember { mutableStateOf("") }
/*
* TODO: Add the Scanbot Barcode SDK license key here.
* Please note: The Scanbot Barcode SDK will run without a license key for one minute per session!
* After the trial period is over all Scanbot SDK functions as well as the UI components will stop working.
* You can get an unrestricted "no-strings-attached" 30 day trial license key for free.
* Please submit the trial license form (https://scanbot.io/sdk/trial.html) on our website by using
* the app identifier.
*/
val licenseKey = ""
initializeScanbot(licenseKey)
Column(Modifier.fillMaxWidth(), horizontalAlignment = Alignment.CenterHorizontally) {
Button(onClick = { showContent = !showContent }) {
Text("Start barcode scanner")
}
AnimatedVisibility(showContent) {
val greeting = remember { Greeting().greet() }
Column(Modifier.fillMaxWidth(), horizontalAlignment = Alignment.CenterHorizontally) {
Text(text)
Text("Compose: $greeting")
BarcodeScannerNativeView(object : OnBarcodeScanned {
override fun onBarcodeScanned(barcode: String) {
text = barcode
}
})
}
}
}
}
}
@Composable
expect fun BarcodeScannerNativeView(onBarcodeScanned: OnBarcodeScanned)
@Composable
expect fun initializeScanbot(licenseKey: String)
interface OnBarcodeScanned {
fun onBarcodeScanned(barcode: String)
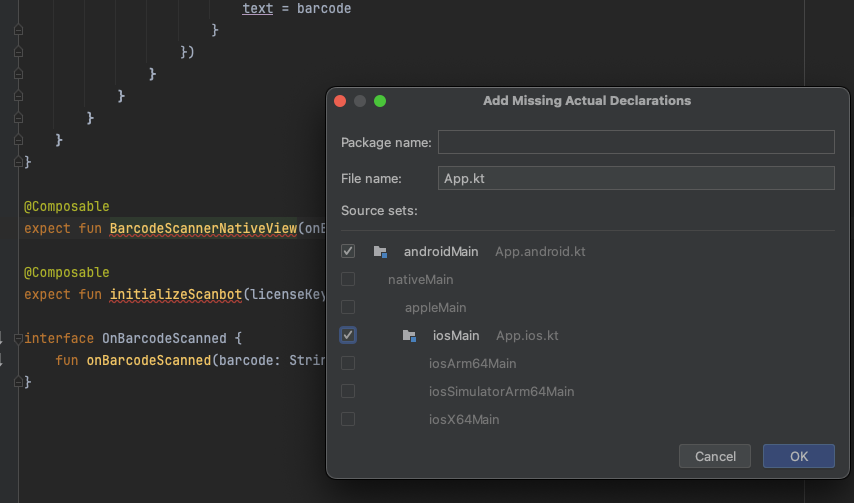
}Now that we have some expect functions, we need to adapt the corresponding platform-specific parts.
You can already create the androidMain and iosMain implementations by resolving a complaint from Android Studio about our expect functions.
Android integration
Let’s start with the Android-specific part.
First of all, as our Barcode Scanner feature will use the device’s camera, we need to add the Camera permission in our Android manifest (composeApp/src/androidMain/AndroidManifest.xml):
<uses-feature
    android:name="android.hardware.camera"
    android:required="false" />
<uses-permission android:name="android.permission.CAMERA" />
Initializing the SDK
We need to initialize the Scanbot Barcode Scanner SDK for Android before using it. Normally, we recommend doing this in the Application subclass in your Native Android part.
However, for simplicity’s sake, we’ll initialize it with LaunchedEffect in this tutorial. To call the ScanbotBarcodeScannerSDKInitializer, we also need to get the Application object, which we can request from the LocalContext.current.
💡 Note: Without a license key, the Scanbot SDK will only work for 60 seconds. You can request a free trial license key on our website.
We need to implement the expect function defined ealier with the actual function. We’ll do it here: composeApp/src/androidMain/kotlin/App.android.kt:
@Composable
actual fun initializeScanbot(licenseKey: String) {
    val current = LocalContext.current
    LaunchedEffect(true) {
        val application = current.applicationContext as Application
        ScanbotBarcodeScannerSDKInitializer()
            .license(application, licenseKey)
            .initialize(application)
    }
}
Implement calling the RTU UI Barcode Scanner screen
Now we follow the steps in the Ready-to-Use UI section.
With our recently introduced RTU UI v.2.0, we’ve added support for integrating the screen as a Jetpack Compose Sub-Component. This makes implementing the BarcodeScannerNativeView for Android very straightforward (we can do it in the same file):
@Composable
actual fun BarcodeScannerNativeView(onBarcodeScanned: OnBarcodeScanned) {
    val configuration = BarcodeScannerConfiguration()
    CompositionLocalProvider(
        LocalScanbotNativeConfiguration provides BarcodeNativeConfiguration(
            enableContinuousScanning = true
        )
    ) {
        // This view is coming from the import io.scanbot.sdk.ui_v2.barcode.BarcodeScannerView:
        BarcodeScannerView(
            configuration = configuration,
            onBarcodeScanned = {
                onBarcodeScanned.onBarcodeScanned(it.items.first().text)
            },
            onBarcodeScannerClosed = {
            }
        )
    }
}
Now the Android part is ready! With just a few lines of code, we’re now ready to run the application on our Android device:
It scans the barcode very quickly. Perfect!
iOS integration
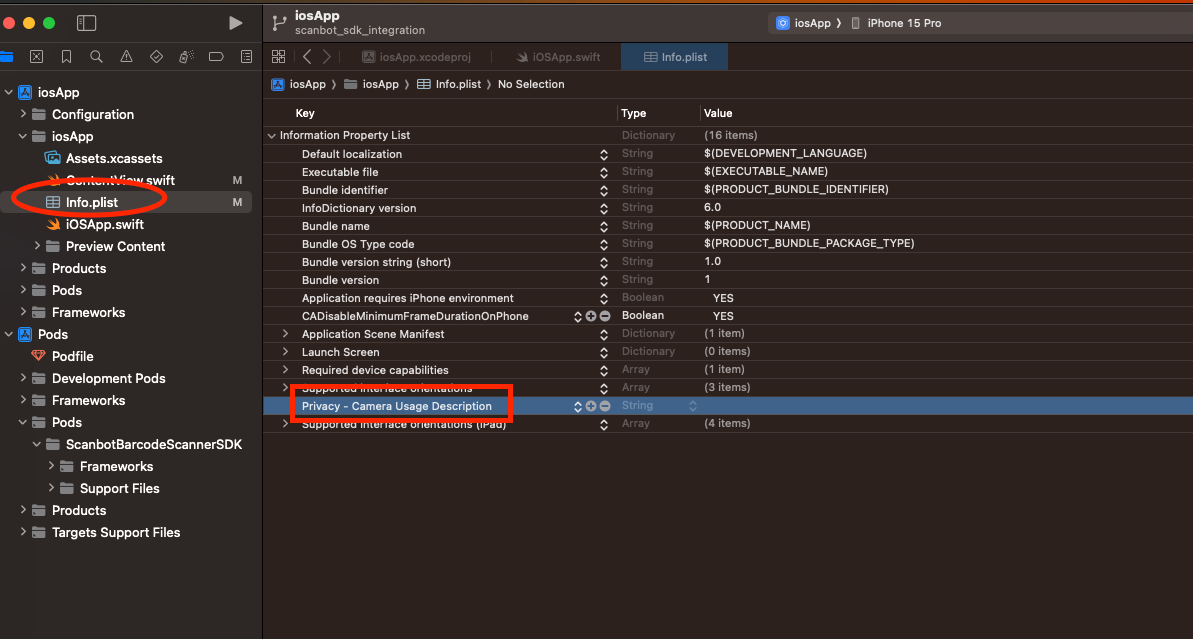
Before we go on, let’s also add the Camera permission, just as we did for Android. For the iOS project, you add it to the Info.plist file:
With our RTU UI v.2.0 and the recent updates to Compose Multiplatform, integrating the iOS view controller became much easier. Now we can do it entirely in Kotlin using Android Studio.
Let’s start with implementation of the BarcodeScannerViewController wrapper around the Barcode Scanner RTU UI view contoller.
For that we just wrap it in a UIViewController and attach in the viewDidLoad function in the file composeApp/src/iosMain/kotlin/BarcodeScannerViewController.kt.
@OptIn(ExperimentalForeignApi::class)
class BarcodeScannerViewController(val onBarcodeScanned: OnBarcodeScanned) : UIViewController(nibName = null, bundle = null) {

    @OptIn(ExperimentalForeignApi::class)
    private lateinit var scannerViewController: SBSDKUI2BarcodeScannerViewController

    override fun viewDidLoad() {
        super.viewDidLoad()

        val configuration = SBSDKUI2BarcodeScannerConfiguration()
        scannerViewController =
            SBSDKUI2BarcodeScannerViewController.createNewWithConfiguration(
                configuration = configuration,
                handler = object : (SBSDKUI2BarcodeScannerViewController?, Boolean, NSError?, SBSDKUI2BarcodeScannerResult?) -> Unit {
                    override fun invoke(
                        p1: SBSDKUI2BarcodeScannerViewController?,
                        p2: Boolean,
                        p3: NSError?,
                        result: SBSDKUI2BarcodeScannerResult?
                    ) {
                        if (result?.items()?.isNotEmpty() == true) {
                            val firstBarcode = result.items().first() as SBSDKUI2BarcodeItem
                            onBarcodeScanned.onBarcodeScanned(firstBarcode.text())
                        }
                    }
                }
            )

        this.sbsdk_attachViewController(scannerViewController, this.view)
    }
}
Finally, we need to call these from composeApp/src/iosMain/kotlin/App.ios.kt.
We’ll also do as we did with Android regarding the initialization in LaunchedEffect.
@OptIn(ExperimentalForeignApi::class)
@Composable
actual fun initializeScanbot(licenseKey: String) {
    LaunchedEffect(true) {
        if (licenseKey.isNotEmpty()) {
            Scanbot.setLicense(licenseKey)
        }
        Scanbot.initialize()
    }
}
The call to the view contoller wrapper is straightforward:
@OptIn(ExperimentalForeignApi::class)
@Composable
actual fun BarcodeScannerNativeView(onBarcodeScanned: OnBarcodeScanned) {
    UIKitViewController(
        factory = { BarcodeScannerViewController(onBarcodeScanned) },
        modifier = Modifier.fillMaxSize(),
    )
}
That’s it! Our native iOS view controller is used in the Compose Multiplatform app’s view hierarchy.
Building may take some time. But after a short wait, we can see our Compose Multiplatform app with barcode scanning functionalities running on our iOS device as well!
Concluding remarks
We hope you enjoyed this tutorial! We’re looking forward to seeing the apps you build with Compose Multiplatform and the Scanbot Barcode Scanner SDK!
If you have questions about this tutorial or ran into any issues, we’re happy to help! Just shoot us an email via tutorial-support@scanbot.io.
Want to get started integrating the Scanbot SDK into your app? We offer a free 7-day trial license – no strings attached. If you have any questions, don’t hesitate to get in touch. And keep an eye on this blog for more tutorials!