We’ve released a new major version of our Document Scanner SDK’s RTU UI Components. These further streamline the integration of our scanning functionalities into your mobile app and provide both a tried and true user experience and a number of customization options.
If you’re already using RTU UI v.1.0 and would like to migrate to v.2.0, this guide is here to help you.
The migration guide covers the following topics:
- Key improvements in v.2.0
- New document scanning flow
- New Document API
- Migration guide for Android
- Updating the SDK version
- Adding the RTU UI v.2.0 dependency
- Migrating the
DocumentScannerActivity - Migrating the
CroppingActivity - Migrating the
FinderDocumentScannerActivity - Optional: Migrating storage from v.1.0 to v.2.0
- Migration guide for iOS
- Updating the SDK version
- Migrating the
SBSDKUIDocumentScannerViewController - Migrating the
SBSDKUICroppingViewController - Migrating the
SBSDKUIFinderDocumentScannerViewController - Optional: Migrating storage from v.1.0 to v.2.0
First, let’s take a look at what changed between v.1.0 and v.2.0.
Key improvements in v.2.0
Two of the most significant differences are the new, highly customizable scanning flow and changes to the way the Document API works.
New document scanning flow
Most notably in RTU UI v.2.0, we have split the document scanning workflow into six separate screens. You can freely enable and disable them to create your custom document scanning workflow. They let your users review scanned documents, rotate, crop, reorder, and retake specific pages, as well as delete one or all pages directly within the scanner.
The available screens are:
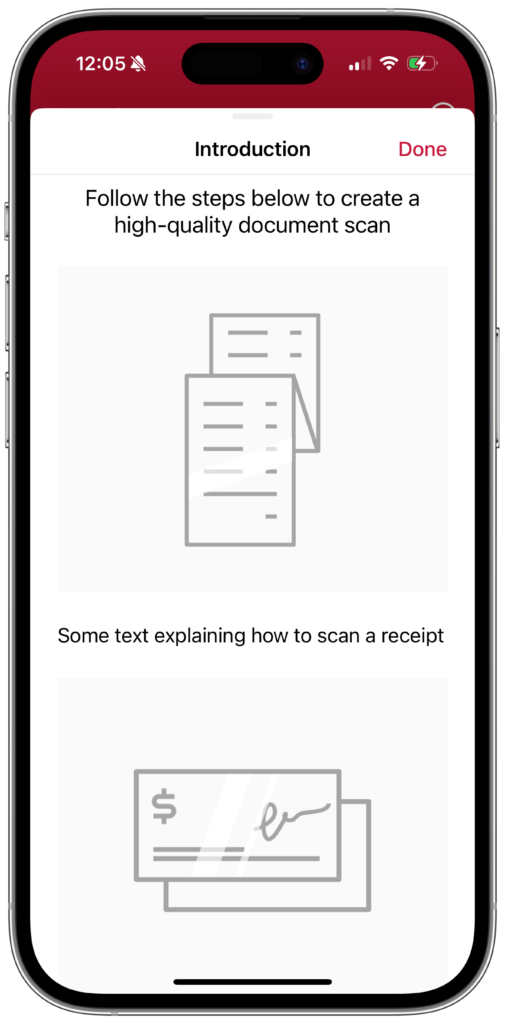
The Introduction Screen gives users a step-by-step guide for how to use the scanner effectively. You can configure each step with your custom text.
The introduction can be used to highlight key features and outline the specific scanning workflow of your use case.
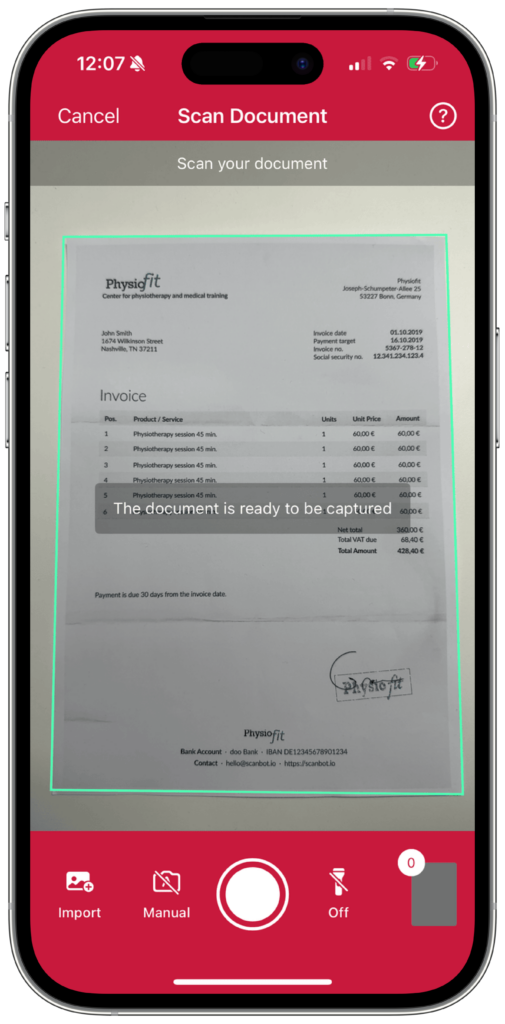
The Scanning Screen provides a seamless and efficient document capture experience. Here are some key features:
- Import from gallery: Users can import images from their device’s gallery. This lets you use existing photos in your document scanning workflow.
- Page limit configuration: You can limit the number of pages that can be scanned in a single session. This helps manage document size and user expectations.
- Capture feedback animation: Choose between a checkmark animation or the document genie/funnel animation to enhance user interaction and provide visual confirmation of successful captures.
- User guidance: Overlay dynamic text instructions to guide the user through the scanning process. This guidance adapts to the current state, such as suggesting adjustments if the document is at a poor angle or if the lighting is insufficient. You can set custom text for each state.
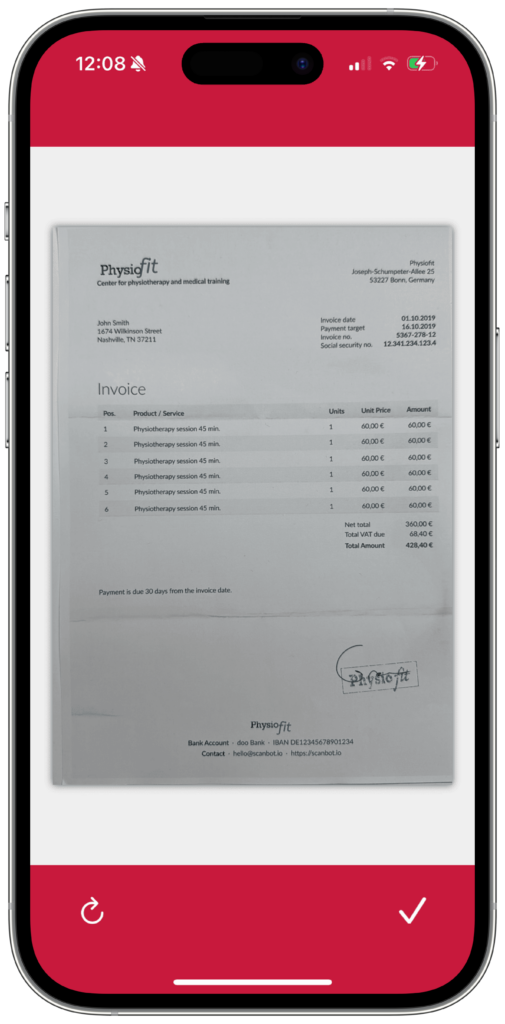
The Acknowledge Screen helps ensure the quality of the scanned documents. To determine suitability, the captured image is thoroughly analyzed. You can set the minimum quality required using the following enums:
noDocumentveryPoorpoorreasonablegoodexcellent
You can also configure whether the Acknowledge Screen itself is shown by using the following modes:
badQuality: The screen is shown only if the minimum quality is not met.always: The screen is shown after every capture, regardless of image quality.none: The screen is never shown, even if the quality threshold is not met.
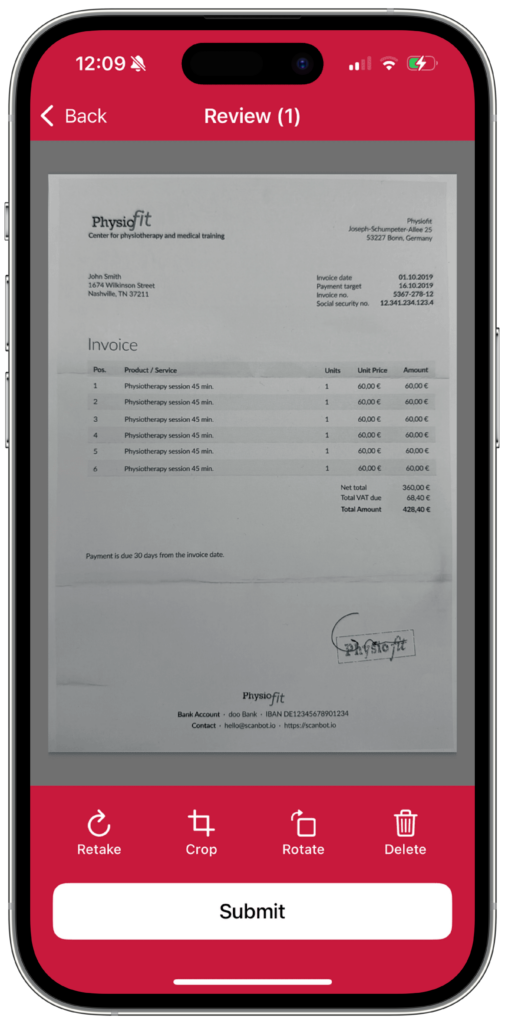
The Review Screen allows users to manage and review their scanned documents before finalizing them. This screen provides several tools to ensure that all pages are in the correct order and meet the requirements:
- Rotate: For changing a page’s orientation
- Crop: Takes users to the Crop Screen (see below)
- Reorder: Takes users to the Reorder Screen (see below)
- Retake: For scanning a page once more
- Add Page: For adding pages at any position within a multi-page document
- Delete: For deleting one or more pages
- Zoom: For zooming in on the document
- Submit: For completing the scanning flow
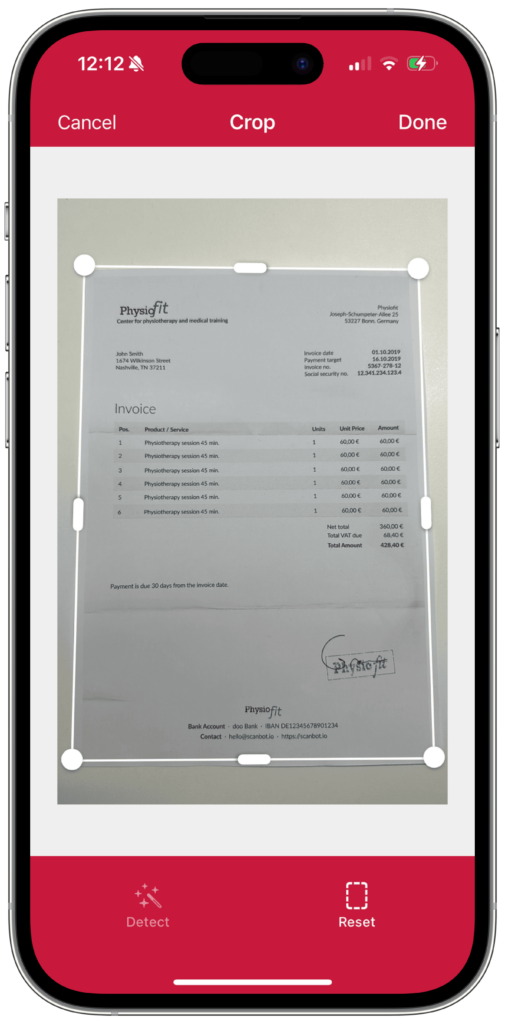
The Crop Screen enables a cropping tool for precise adjustments to document images. It can also be initialized as a standalone screen.
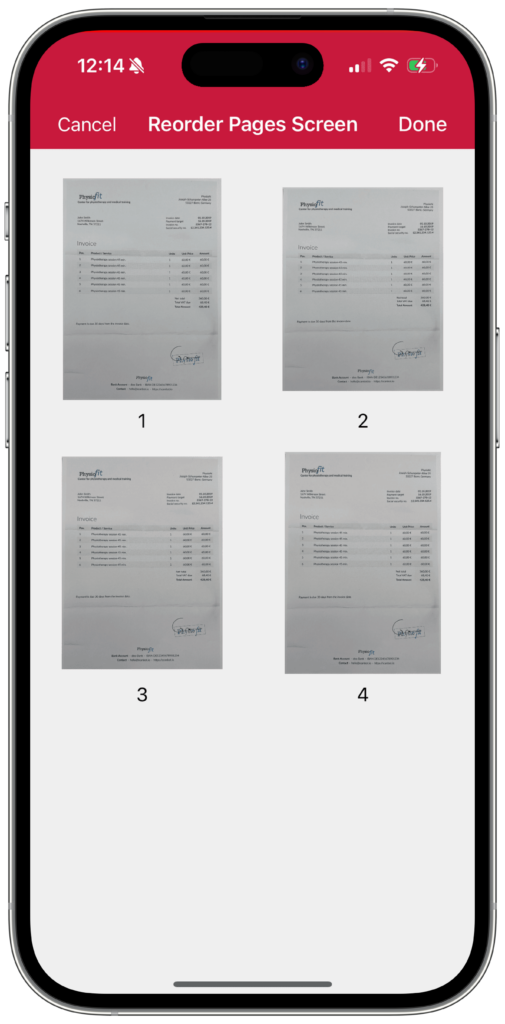
The Reorder Screen allows users to easily change the order of the scanned pages in an intuitive drag-and-drop interface.
At the end of the scanning workflow, users can save the document scan as a PDF, TIFF, JPEG, or PNG file.
For more information on how to configure and implement each screen in your app, head over to our documentation (Android | iOS).
If you would like to see the document scanning flow in action, you can build and run our example apps (Android | iOS).
New Document API
The new RTU UI version uses a new approach to handling scanned documents. Whereas in RTU UI v.1.0, you worked with Page (Android) and SBSDKDocumentPage (iOS) objects, v.2.0 introduces Document (Android) and SBSDKScannedDocument (iOS) objects. These document objects, in turn, contain the individual scanned pages.
Each page consists of an original image of the scan, various editing properties like cropping polygon, rotation, and filters, some metadata properties like the document detection status and the Document Quality Analyzer result, and a number of processed images in different stages. The scanned pages can be organized (added, removed, and moved) within the scanned document.
This new approach facilitates managing whole documents instead of individual pages.
Migration guide for Android
If you would like to migrate from the Scanbot Document Scanner SDK’s RTU UI v.1.0 to v.2.0 in your Android app, follow these steps.
Step 1: Update the SDK version
First, make sure to update the SDK to version 6.0.0 or higher. You can find the latest version in the changelog.
Step 2: Add the RTU UI v.2.0 dependency
To add the new RTU UI to your project, add the following dependency to your build.gradle.kts file:
// Ready-to-use UI v2 dependency:
implementation("io.scanbot:rtu-ui-v2-bundle:$latestSdkVersion")

// Required for the Acknowledge screen and the Document Quality Analyser feature:
implementation("io.scanbot:sdk-multitasktext-assets:$latestSdkVersion")
For a smoother transition, you can keep the RTU UI v.1.0 dependency until the migration process is finished and remove it afterward.
// This dependency can be removed as soon as the migration is finished:
implementation("io.scanbot:sdk-package-ui:$scanbotSdkVersion")
Step 3: Migrate the DocumentScannerActivity
To implement the new scanning workflow in your app, update the RTU UI launcher and the way results are processed.
Example:
// ... other imports
import io.scanbot.sdk.ui_v2.common.activity.registerForActivityResultOk
import io.scanbot.sdk.ui_v2.document.configuration.DocumentScanningFlow
import io.scanbot.sdk.ui_v2.document.DocumentScannerActivity

// Your activity class:
class MainActivity : AppCompatActivity() {
    private lateinit var documentScannerResultLauncher: ActivityResultLauncher<DocumentScanningFlow>

    override fun onCreate(savedInstanceState: Bundle?) {
        super.onCreate(savedInstanceState)
        setContentView(R.layout.activity_main)

        val previewImageView = findViewById<ImageView>(R.id.first_page_image_preview)

        documentScannerResultLauncher =
            registerForActivityResultOk(DocumentScannerActivity.ResultContract(this)) {
                resultEntity: DocumentScannerActivity.Result ->
                val result: Document? = resultEntity.result
                val pages: List<Page>? = result?.pages
                pages?.get(0)?.let {
                    // in v2 you can access the image bitmap directly from the Page:
                    val previewImage = it.documentPreviewImage
                    previewImageView.setImageBitmap(previewImage)
                }
            }

        findViewById<Button>(R.id.open_document_scanner).setOnClickListener {
            openDocumentScannerRtuV2()
        }
    }
    // ...
}
Afterwards, update the RTU UI configuration.
Example:
// ... other imports
import io.scanbot.sdk.ui_v2.common.ScanbotColor
import io.scanbot.sdk.ui_v2.document.configuration.AcknowledgementMode
import io.scanbot.sdk.ui_v2.document.configuration.CaptureFeedback
import io.scanbot.sdk.ui_v2.document.configuration.DocumentScanningFlow
import io.scanbot.sdk.ui_v2.document.configuration.PageSnapFeedbackMode

// ...
// in your Activity class:
private fun openDocumentScannerRtuV2() {
    // Customize text resources, behavior and UI:
    val configuration = DocumentScanningFlow().apply {
        screens.camera.apply {
            cameraConfiguration.apply {
                // Equivalent to setIgnoreBadAspectRatio(true)
                ignoreBadAspectRatio = true

                // Equivalent to setAutoSnappingSensitivity(0.75f)
                autoSnappingSensitivity = 0.75
            }

            // Ready-to-Use UI v2 contains an acknowledgment screen to
            // verify the captured document with the built-in Document Quality Analyzer.
            // You can still disable this step:
            acknowledgement.acknowledgementMode = AcknowledgementMode.NONE

            // When you disable the acknowledgment screen, you can enable the capture feedback,
            // there are different options available, for example you can display a checkmark animation:
            captureFeedback = CaptureFeedback(
                snapFeedbackMode = PageSnapFeedbackMode.pageSnapCheckMarkAnimation()
            )

            // You may hide the import button in the camera screen, if you don't need it:
            bottomBar.importButton.visible = false
        }

        // Equivalent to setBottomBarBackgroundColor(Color.RED), but not recommended:
        appearance.bottomBarBackgroundColor = ScanbotColor(Color.BLUE)

        // However, now all the colors can be conveniently set using the Palette object:
        palette.apply {
            sbColorPrimary = ScanbotColor(Color.BLUE)
            sbColorOnPrimary = ScanbotColor(Color.WHITE)
            sbColorOnSurfaceVariant = ScanbotColor(Color.DKGRAY)
            // ..
        }

        // Now all the text resources are in the localization object
        localization.apply {
            // Equivalent to setTextHintOK("Don't move.\nCapturing document...")
            cameraUserGuidanceReadyToCapture = "Don't move.\nCapturing document..."
        }

        // Ready-to-Use UI v2 contains a review screen, you can disable it:
        screens.review.enabled = false

        // Multi Page button is always hidden in RTU v2
        // Therefore setMultiPageButtonHidden(true) is not available

        // Equivalent to setMultiPageEnabled(false)
        outputSettings.pagesScanLimit = 1
    }
Step 4: Migrate the CroppingActivity
As with the DocumentScannerActivity, first update the launcher and the result processing of the CroppingActivity …
Example:
// ... other imports
import io.scanbot.sdk.ui_v2.common.activity.registerForActivityResultOk
import io.scanbot.sdk.ui_v2.document.configuration.DocumentScanningFlow
import io.scanbot.sdk.ui_v2.document.DocumentScannerActivity

// Your activity class:
class MainActivity : AppCompatActivity() {
    private lateinit var croppingResultLauncher: ActivityResultLauncher<CroppingConfiguration>

    override fun onCreate(savedInstanceState: Bundle?) {
        super.onCreate(savedInstanceState)
        setContentView(R.layout.activity_main)

        val previewImageView = findViewById<ImageView>(R.id.first_page_image_preview)

        croppingResultLauncher =
            registerForActivityResultOk(
                CroppingActivity.ResultContract()
            ) { resultEntity ->
                resultEntity.result?.let {
                    val documentApi = ScanbotSDK(this).documentApi
                    // This way you can access the document from the Document API:
                    val document = documentApi.loadDocument(documentId = it.documentUuid)
                    val previewImage = document?.pageWithId(it.pageUuid)?.documentPreviewImage
                    previewImageView.setImageBitmap(previewImage)
                }
            }

        findViewById<Button>(R.id.open_document_scanner).setOnClickListener {
            openCroppingRtuV2()
        }
    }
    // ...
}
… and then the RTU UI configuration.
Example:
// ... other imports
import io.scanbot.sdk.ui_v2.common.ScanbotColor
import io.scanbot.sdk.ui_v2.document.configuration.CroppingConfiguration

// ...
// in your Activity class:
private fun openCroppingRtuV2() {
    // Customize text resources, behavior and UI:
    val configuration = CroppingConfiguration(
        // Now you need to pass the document UUID and the page UUID:
        documentUuid = documentUuid,
        pageUuid = pageUuid,
    )

    // Now you can apply your business colors using the Palette object:
    configuration.palette.apply {
        sbColorPrimary = ScanbotColor(Color.BLUE)
        // ..
    }

    croppingResultLauncher.launch(configuration)
}
Step 5: Migrating the FinderDocumentScannerActivity
To migrate from the FinderDocumentScannerActivity to the new DocumentScanningFlow, once again update the launcher and the result processing …
Example:
// ... other imports
import io.scanbot.sdk.ui_v2.common.activity.registerForActivityResultOk
import io.scanbot.sdk.ui_v2.document.configuration.DocumentScanningFlow
import io.scanbot.sdk.ui_v2.document.DocumentScannerActivity

// Your activity class:
class MainActivity : AppCompatActivity() {
    private lateinit var documentScannerResultLauncher: ActivityResultLauncher<CroppingConfiguration>

    override fun onCreate(savedInstanceState: Bundle?) {
        super.onCreate(savedInstanceState)
        setContentView(R.layout.activity_main)

        val previewImageView = findViewById<ImageView>(R.id.first_page_image_preview)

        documentScannerResultLauncher =
            registerForActivityResultOk(DocumentScannerActivity.ResultContract(this)) { resultEntity: DocumentScannerActivity.Result ->
                resultEntity.result?.pages?.get(0)?.let {
                    // in v2 you can access the image bitmap directly from the result entity:
                    val previewImage = it.documentPreviewImage
                    previewImageView.setImageBitmap(previewImage)
                }
            }

        findViewById<Button>(R.id.open_document_scanner).setOnClickListener {
            openDocumentScannerRtuV2withFinder()
        }
    }
    // ...
}
… and update the RTU UI configuration.
Example:
// ... other imports
import io.scanbot.sdk.ui_v2.common.AspectRatio
import io.scanbot.sdk.ui_v2.common.ScanbotColor
import io.scanbot.sdk.ui_v2.document.configuration.AcknowledgementMode
import io.scanbot.sdk.ui_v2.document.configuration.DocumentScanningFlow
import io.scanbot.sdk.ui_v2.document.configuration.PageSnapFeedbackMode
import io.scanbot.sdk.ui_v2.document.configuration.PreviewButton

// ...
// in your Activity class:
private fun openDocumentScannerRtuV2withFinder() {
    // Customize text resources, behavior and UI:
    val configuration = DocumentScanningFlow().apply {
        palette.apply {
            sbColorPrimary = ScanbotColor(Color.BLUE)
        }
        screens.camera.apply {
            viewFinder.apply {
                visible = true
                aspectRatio = AspectRatio(3.0, 4.0)
            }
            bottomBar.apply {
                previewButton = PreviewButton.noButtonMode()
                autoSnappingModeButton.visible = false
                importButton.visible = false
            }
            acknowledgement.acknowledgementMode = AcknowledgementMode.NONE
            captureFeedback.snapFeedbackMode = PageSnapFeedbackMode.pageSnapCheckMarkAnimation()
        }
        screens.review.enabled = false
        outputSettings.pagesScanLimit = 1
    }

    documentScannerResultLauncher.launch(configuration)
}
Optional: Migrate storage from v.1.0 to v.2.0
To migrate pages created with RTU UI v.1.0 (based on the legacy Page objects) to RTU UI v.2.0, you can use the provided migration function.
This function takes the original pages and converts them into a new document. The old metadata and the original images are stored in a new document, with all changes reapplied.
Example:
// Take a list of legacy pages that represent one document and convert them to a new document.
val legacyPages: List<io.scanbot.sdk.persistence.page.legacy.Page> = ...
val document = legacyPages.toDocument(ScanbotSDK(context), documentImageSizeLimit = 2048)

// Now you may delete the files corresponding to the `legacyPages` to free up storage.
Migration guide for iOS
If you would like to migrate from the Scanbot Document Scanner SDK’s RTU UI v.1.0 to v.2.0 in your iOS app, follow these steps.
Step 1: Update the SDK version
First, make sure to update the SDK to version 6.0.0 or higher. You can find the latest version in the changelog.
Step 2: Migrate the SBSDKUIDocumentScannerViewController
To implement the new scanning workflow in your app, update the view controller as well as the delegate and the result processing.
Example:
import UIKit
import ScanbotSDK

// With RTU UI v.2.0 we don't need to implement a delegate in our ViewController anymore
class ViewController: UIViewController {

    @IBOutlet weak var imageView: UIImageView!

    override func viewDidLoad() {
        super.viewDidLoad()
    }

    // We will process a scanned document here:
    func processDocument(document: SBSDKScannedDocument) {
        // This is how we can access the document preview image from the SBSDKScannedDocument
        imageView.image = document.pages.first?.documentImagePreview
    }

    @IBAction func openScannerTapped(_ sender: Any) {
        openDocumentScannerRtuV2()
    }


    func openDocumentScannerRtuV2() {
        let configuration = SBSDKUI2DocumentScanningFlow()

        // See the next section for the configuration migration details.
        // ...

        SBSDKUI2DocumentScannerController.present(on: self,
                                                  configuration: configuration) { document in
        // With RTU UI v.2.0 we can process the document directly in the lambda
        if let document {
            self.processDocument(document: document)
        }
   }
    // ..
}
Afterwards, update the RTU UI configuration.
Example:
// ...
// in your ViewController class:
func openDocumentScannerRtuV2() {
    let configuration = SBSDKUI2DocumentScanningFlow()

    let cameraScreenConfiguration = configuration.screens.camera

    // Equivalent to behaviorConfiguration.ignoreBadAspectRatio = true
    cameraScreenConfiguration.cameraConfiguration.ignoreBadAspectRatio = true

    // Equivalent to behaviorConfiguration.autoSnappingSensitivity = 0.75
    cameraScreenConfiguration.cameraConfiguration.autoSnappingSensitivity = 0.75

    // Ready-to-Use UI v2 contains an acknowledgment screen to
    // verify the captured document with the built-in Document Quality Analyzer.
    // You can still disable this step:
    cameraScreenConfiguration.acknowledgement.acknowledgementMode = SBSDKUI2AcknowledgementMode.none

    // When you disable the acknowledgment screen, you can enable the capture feedback,
    // there are different options available, for example you can display a checkmark animation:
    cameraScreenConfiguration.captureFeedback.snapFeedbackMode = SBSDKUI2PageSnapFeedbackMode.pageSnapCheckMarkAnimation()

    // You may hide the import button in the camera screen, if you don't need it:
    cameraScreenConfiguration.bottomBar.importButton.visible = false

    // Equivalent to uiConfiguration.bottomBarBackgroundColor = UIColor.blue, but not recommended:
    configuration.appearance.bottomBarBackgroundColor = SBSDKUI2Color(uiColor: UIColor.blue)

    // However, now all the colors can be conveniently set using the Palette object:
    let palette = configuration.palette
    palette.sbColorPrimary = SBSDKUI2Color(uiColor: UIColor.blue)
    palette.sbColorOnPrimary = SBSDKUI2Color(uiColor: UIColor.white)
    // ..

    // Now all the text resources are in the localization object
    let localization = configuration.localization
    localization.cameraUserGuidanceReadyToCapture = "Don't move. Capturing document..."

    // Ready-to-Use UI v2 contains a review screen, you can disable it:
    configuration.screens.review.enabled = false

    // Multi Page button is always hidden in RTU v2
    // Therefore uiConfiguration.isMultiPageButtonHidden = true is not available

    // Equivalent to behaviorConfiguration.isMultiPageEnabled = false
    configuration.outputSettings.pagesScanLimit = 1

    SBSDKUI2DocumentScannerController.present(on: self,
                                              configuration: configuration) { document in
        // With RTU UI v.2.0 we can process the document directly in the lambda
        if let document {
            self.processDocument(document: document)
        }
   }
}
Step 3: Migrate the SBSDKUIDocumentScannerViewController
As with the SBSDKUIDocumentScannerViewController, first update the view controller and the result processing of the SBSDKUICroppingViewController …
Example:
import UIKit
import ScanbotSDK
// ... other imports

// Your ViewController class:
class ViewController: UIViewController {

    @IBOutlet weak var imageView: UIImageView!

    override func viewDidLoad() {
        super.viewDidLoad()
    }

    @IBAction func openScannerTapped(_ sender: Any) {
        openCroppingRtuV2()
    }

    func openCroppingRtuV2() {
        let configuration = SBSDKUI2CroppingConfiguration(documentUuid: documentUuid,
                                                          pageUuid: pageUuid)

        // ...screen configuration

        SBSDKUI2CroppingViewController.present(on: self, configuration: configuration) { result in
            let page = SBSDKScannedDocument(documentUuid: result.documentUuid)?.page(with: result.pageUuid)
            self.imageView.image = page?.documentImage
        }
    }
}
… and then the RTU UI configuration.
Example:
// ...
// in your ViewController class:
func openCroppingRtuV2() {
    let configuration = SBSDKUI2CroppingConfiguration(documentUuid: documentUuid,
                                                      pageUuid: pageUuid)

    // All the colors can be conveniently set using the Palette object:
    configuration.palette.sbColorPrimary = SBSDKUI2Color(uiColor: UIColor.blue)

    // Now all the text resources are in the localization object
    configuration.localization.croppingTopBarConfirmButtonTitle = "Apply"

    SBSDKUI2CroppingViewController.present(on: self, configuration: configuration) { result in
        let page = SBSDKScannedDocument(documentUuid: result.documentUuid)?.page(with: result.pageUuid)
        self.imageView.image = page?.documentImage
    }
}
Step 4: Migrating the SBSDKUIFinderDocumentScannerViewController
To migrate from the SBSDKUIFinderDocumentScannerViewController to the new DocumentScanningFlow configuration with the SBSDKUI2DocumentScannerController, once again update the delegate and the result processing …
Example:
import UIKit
import ScanbotSDK

// With RTU UI v.2.0 we don't need to implement a delegate in our ViewController anymore
class ViewController: UIViewController {

    @IBOutlet weak var imageView: UIImageView!

    override func viewDidLoad() {
        super.viewDidLoad()
    }

    // We will process a scanned document here:
    func processDocument(document: SBSDKScannedDocument) {
        // This is how we can access the document preview image from the SBSDKScannedDocument
        imageView.image = document.pages.first?.documentImagePreview
    }

    @IBAction func openScannerTapped(_ sender: Any) {
        openFinderDocumentScannerRtuV2()
    }

    func openFinderDocumentScannerRtuV2() {
        let configuration = SBSDKUI2DocumentScanningFlow()

        // ...screen configuration

        SBSDKUI2DocumentScannerController.present(on: self,
                                                  configuration: configuration) { document in
            // With RTU UI v.2.0 we can process the document directly in the lambda
            if let document {
                self.processDocument(document: document)
            }
        }
    }
}
… and update the RTU UI configuration.
Example:
// ...
// in your ViewController class:
func openFinderDocumentScannerRtuV2() {
    let configuration = SBSDKUI2DocumentScanningFlow()

    let palette = configuration.palette
    palette.sbColorPrimary = SBSDKUI2Color(uiColor: UIColor.blue)
    palette.sbColorOnPrimary = SBSDKUI2Color(uiColor: UIColor.white)
    // ..

    let cameraScreenConfiguration = configuration.screens.camera

    let viewFinder = cameraScreenConfiguration.viewFinder
    viewFinder.visible = true
    viewFinder.aspectRatio = SBSDKUI2AspectRatio(width: 3, height: 4)

    let bottomBar = cameraScreenConfiguration.bottomBar
    bottomBar.previewButton = SBSDKUI2PreviewButton.noButtonMode()
    bottomBar.autoSnappingModeButton.visible = false
    bottomBar.importButton.visible = false

    cameraScreenConfiguration.acknowledgement.acknowledgementMode = SBSDKUI2AcknowledgementMode.none
    cameraScreenConfiguration.captureFeedback.snapFeedbackMode = SBSDKUI2PageSnapFeedbackMode.pageSnapCheckMarkAnimation()

    configuration.screens.review.enabled = false
    configuration.outputSettings.pagesScanLimit = 1

    SBSDKUI2DocumentScannerController.present(on: self,
                                              configuration: configuration) { document in
        // With RTU UI v.2.0 we can process the document directly in the lambda
        if let document {
            self.processDocument(document: document)
        }
    }
}
Optional: Migrate storage from v.1.0 to v.2.0
To migrate pages created with RTU UI v.1.0 (based on the legacy SBSDKDocument objects) to RTU UI v.2.0, you can use the provided migration function.
This function takes the original pages and converts them into a new document. The old metadata and the original images are stored in a new document, with all changes reapplied.
Example:
func createFromDocument(_ document: SBSDKDocument) -> SBSDKScannedDocument? {

    // Create the scanned document using convenience initializer `init?(document:documentImageSizeLimit:)`
    // `SBSDKDocument` doesn't support `documentImageSizeLimit`, but you can add it to unify size of the documents.
    let scannedDocument = SBSDKScannedDocument(document: document, documentImageSizeLimit: 2048)

    // Return newly created scanned document
    return scannedDocument
}

// Now you may delete the files corresponding to the SBSDKDocument to free up storage.
Conclusion
We hope this guide streamlines your migration from our Document Scanner SDK’s RTU UI v.1.0 to v.2.0, and that the many new features introduced with this release prove helpful for your use case.
If you have any further questions, please send us an email via: sdksupport@scanbot.io
