In this tutorial, you’ll learn how to build a cross-platform mobile app for scanning documents using Flutter and Google’s ML Kit.
To integrate the scanning functionalities, you’ll use google_mlkit_document_scanner, a wrapper around ML Kit that streamlines its integration into Flutter projects.
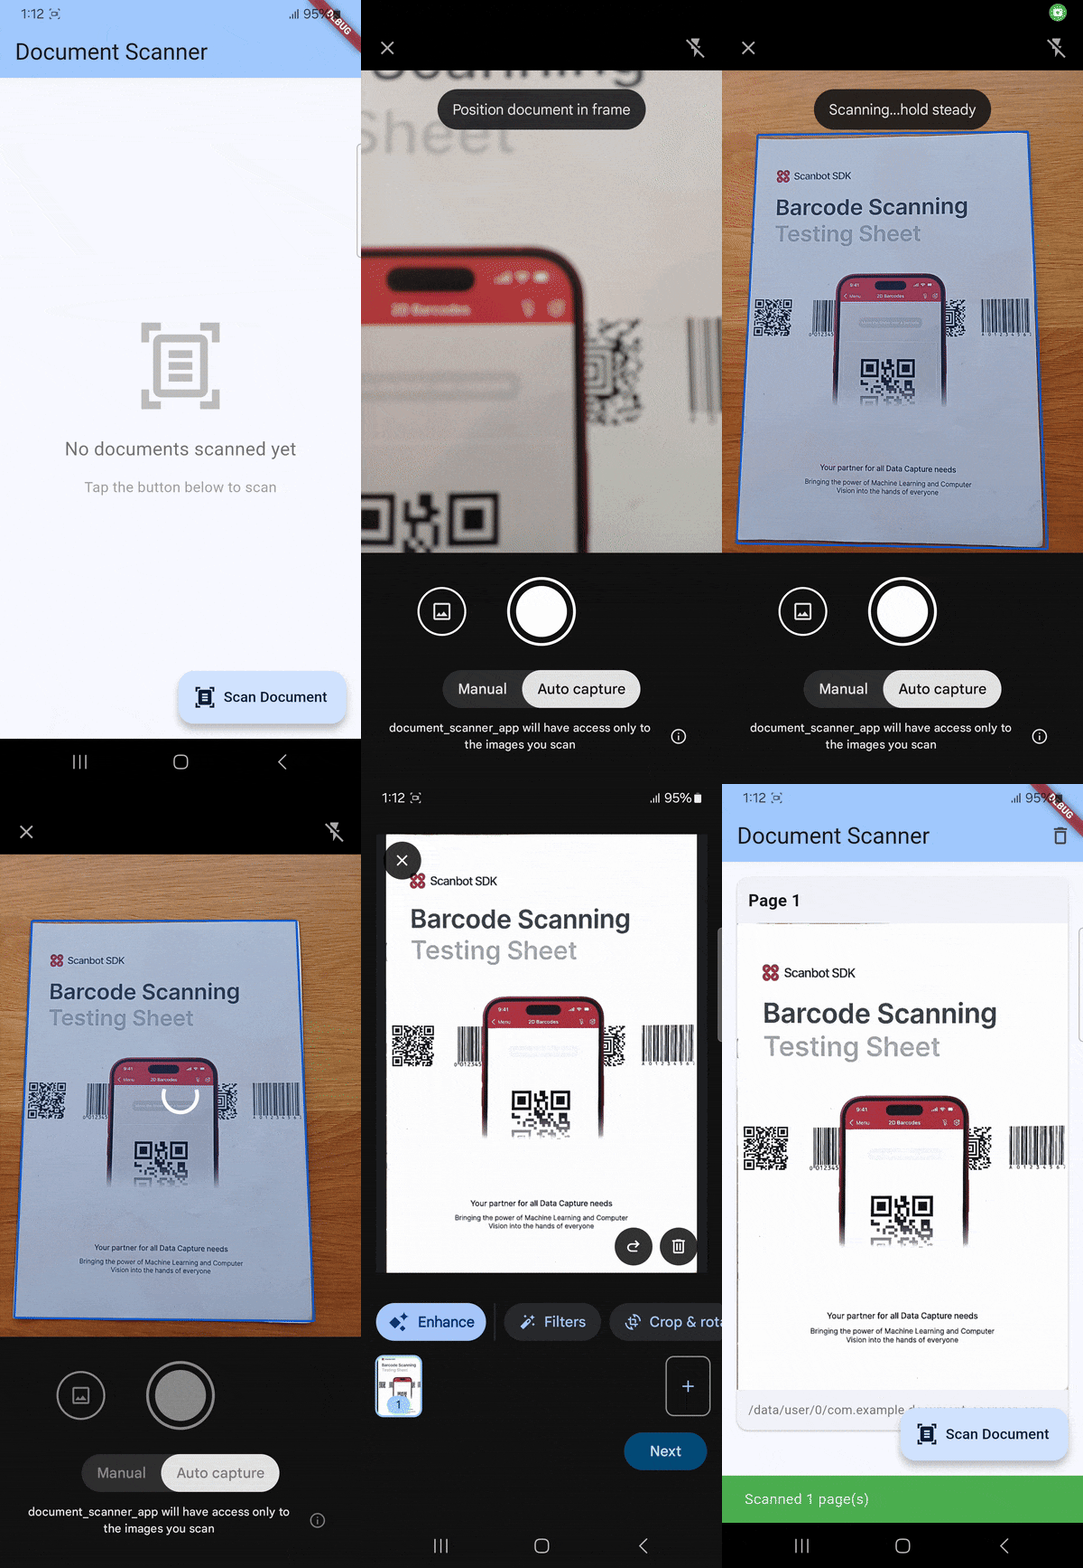
To achieve this, you’ll follow these steps:
- Setting up the app
- Adding the dependencies
- Configuring the native projects
- Implementing the document scanning feature
- Running the app
Prerequisites
- Android Studio (Narwhal 4 feature drop or newer) with the Flutter and Dart plugins installed
- The Flutter SDK configured in your system environment path
- A physical Android device with USB debugging and/or wireless debugging enabled or an Android Virtual Device with camera access
- If you also want to target iOS:
- A Mac with Xcode set up for Flutter development
- A physical iOS device, since the iOS simulator lacks camera access
Step 1: Set up the project
- Open Android Studio.
- Click File → New → New Flutter Project.
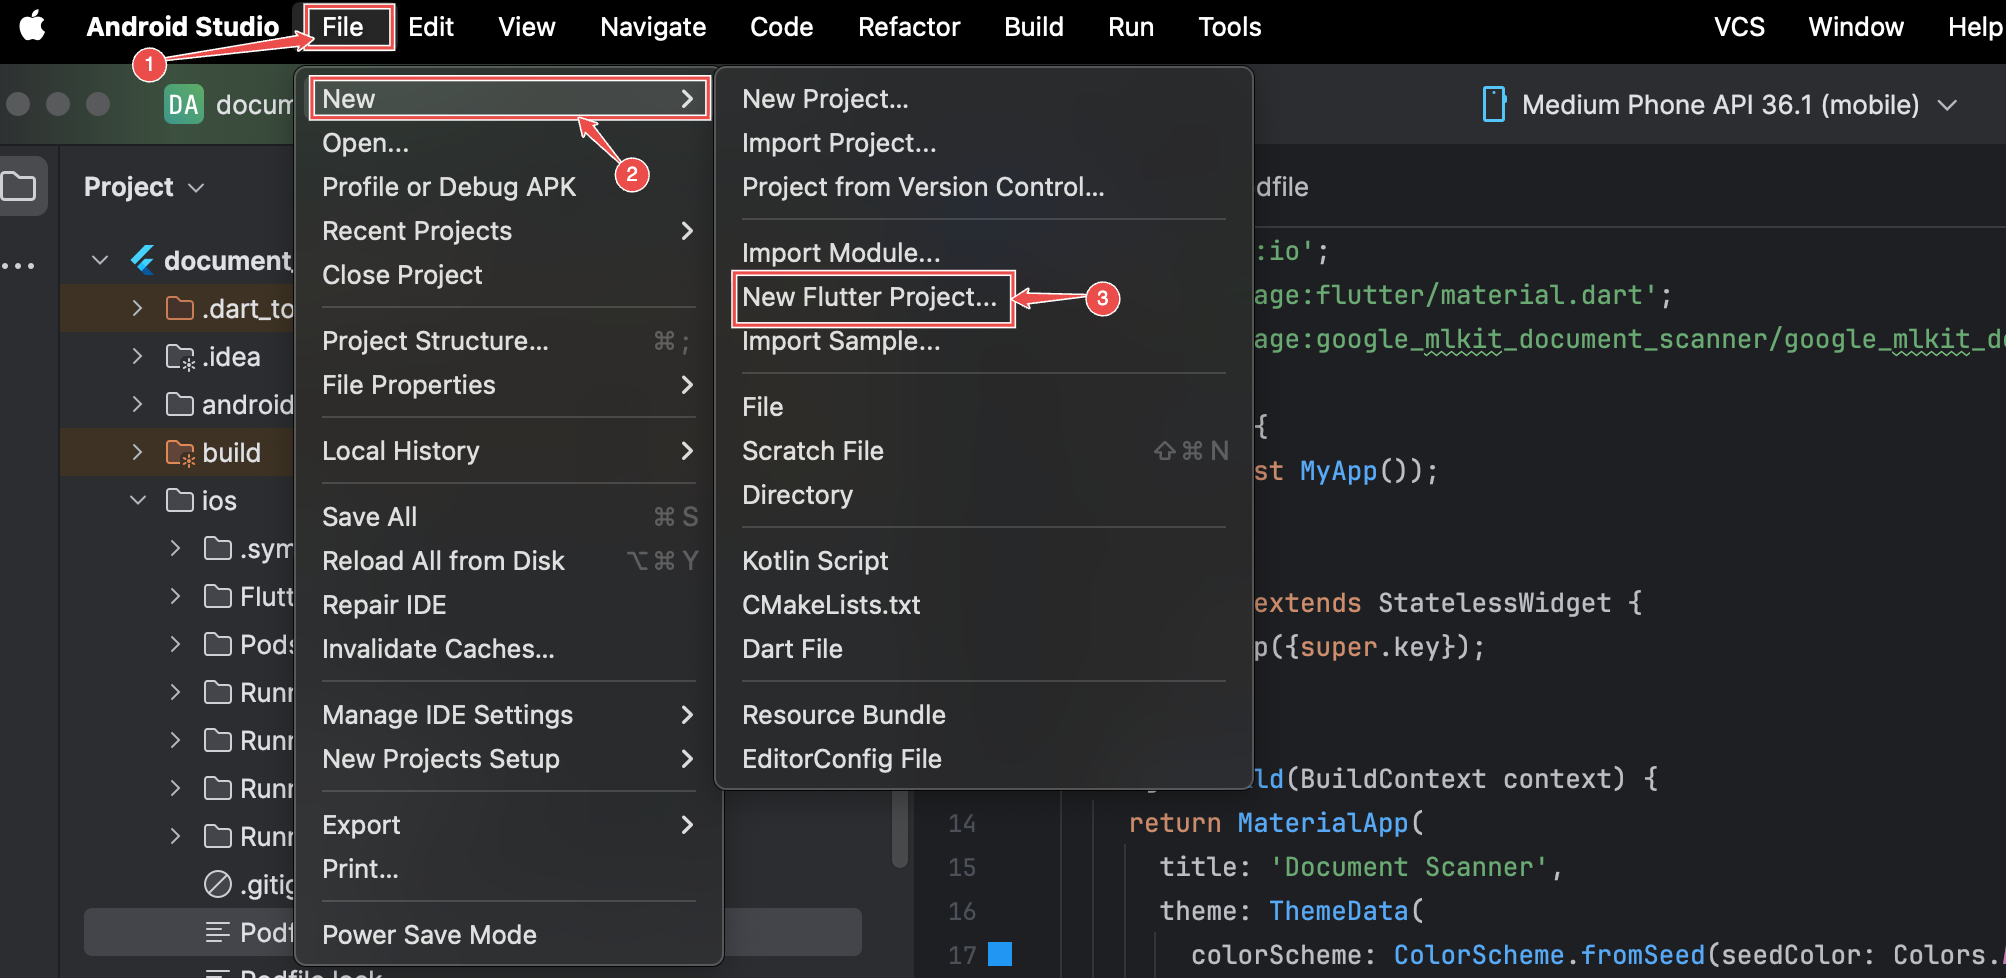
- Select the Flutter Generator and click Next.
- Name your project (using lowercase with underscores, e.g., “document_scanner_app”) and choose a location for your project directory. For this tutorial, you can leave the rest of the settings as they are.
- Click Create.
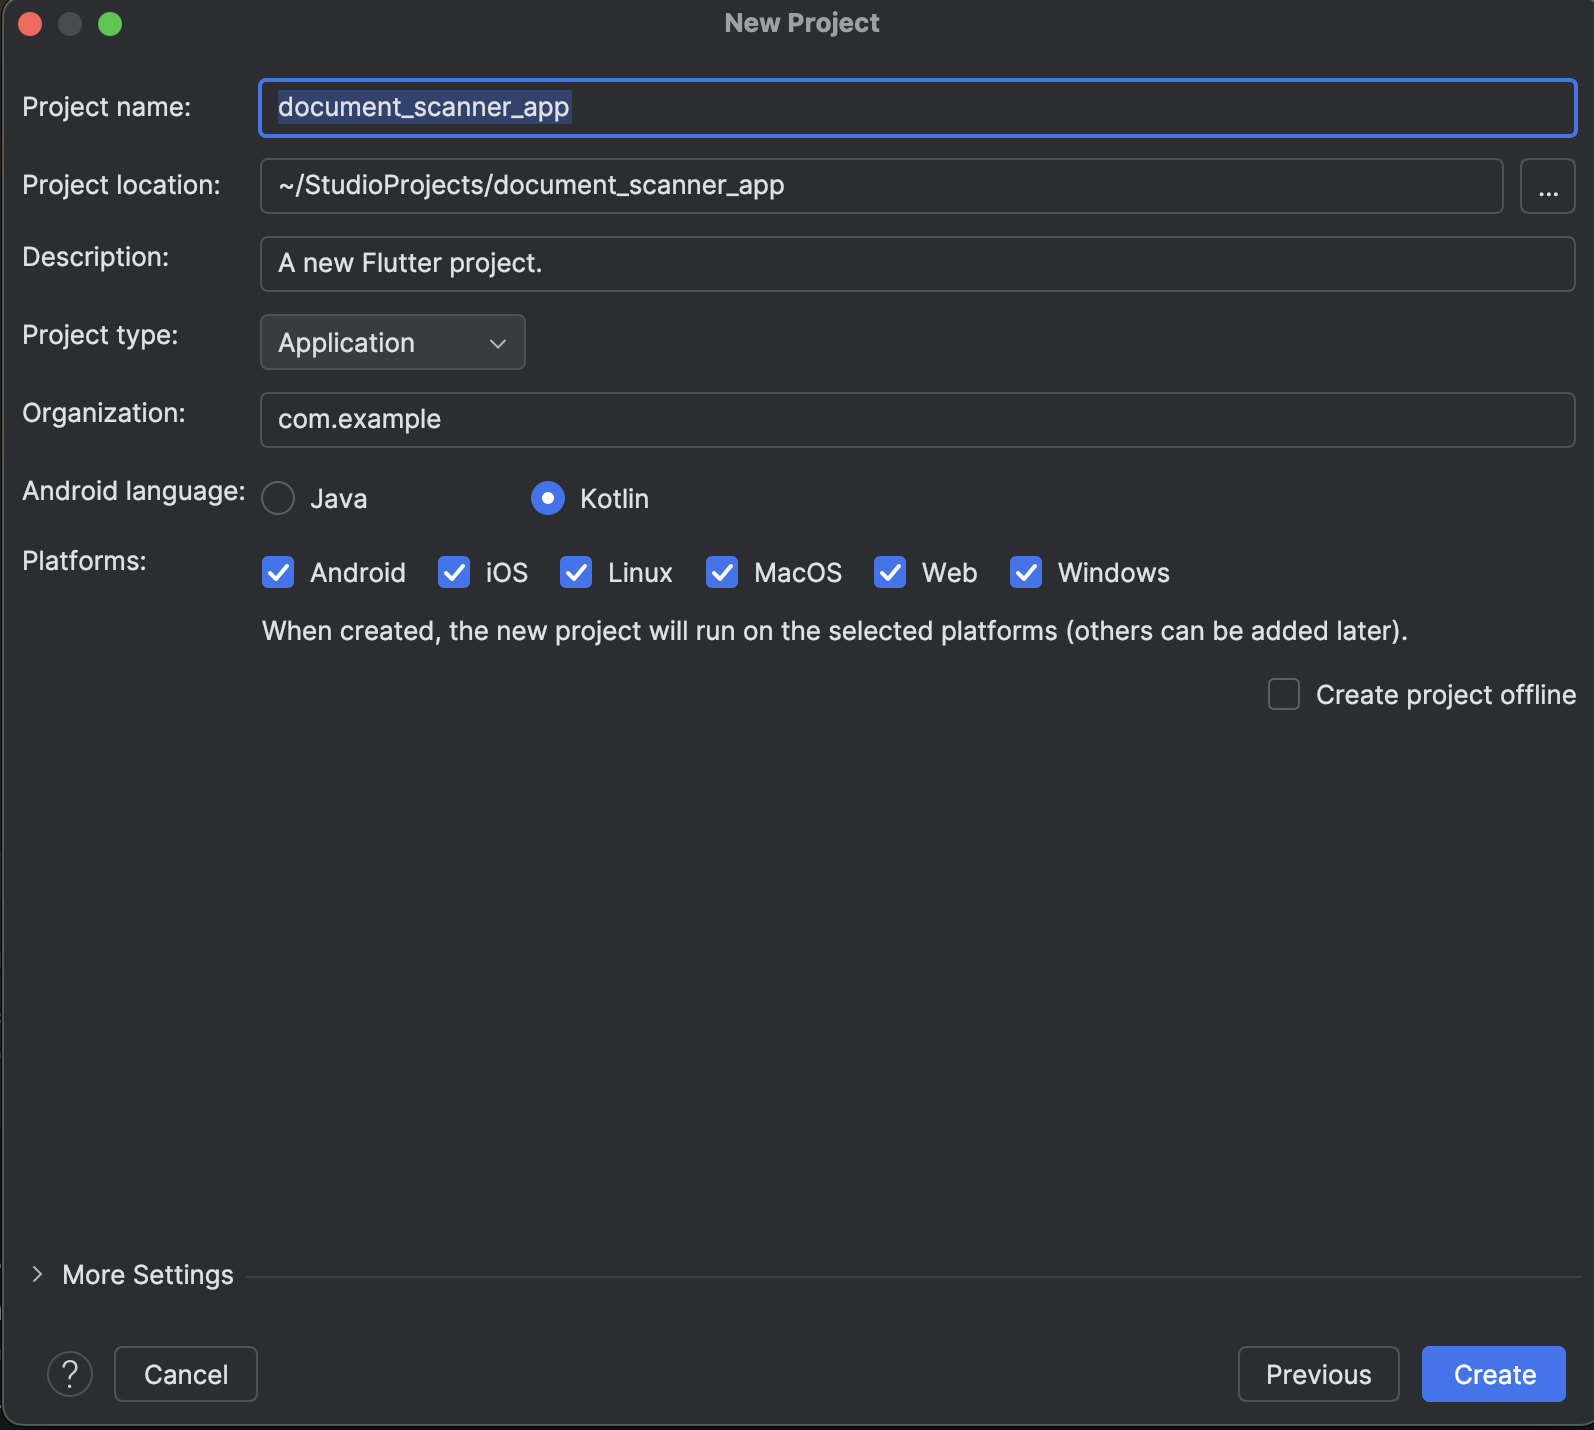
Android Studio will create the project structure and run flutter pub get automatically.
Step 2: Add the dependencies
- In the Project view (left sidebar), navigate to and open pubspec.yaml.
- Find the
dependenciessection. - Add the google_mlkit_document_scanner package:
dependencies:
  flutter:
    sdk: flutter
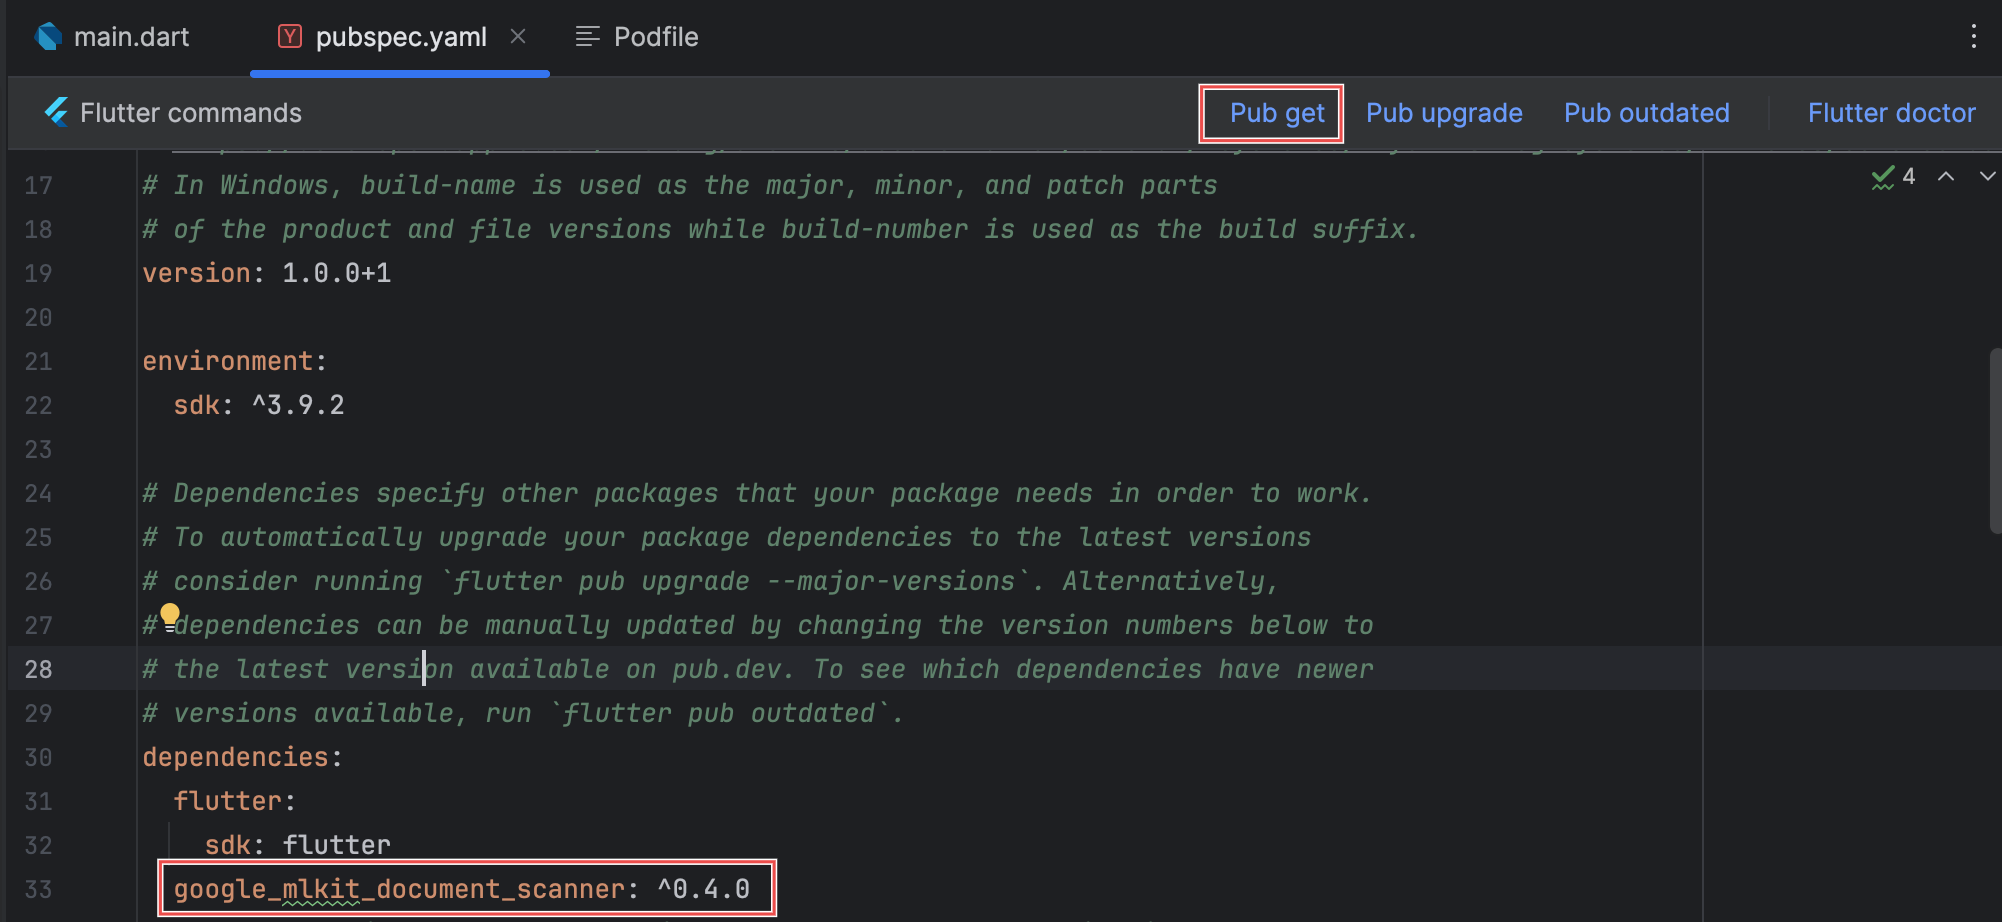
  google_mlkit_document_scanner: ^0.4.0
After saving the pubspec.yaml file, the Pub get option will appear above your code editor window. Click it to fetch and install the project dependencies.
Step 3: Configure the native projects
Android
By default, Flutter sets the minimum supported Android SDK to API level 21 (Android 5.0 Lollipop). Google ML Kit requires Android API level 21 (Lollipop) or higher, so Flutter’s default configuration already satisfies this requirement.
You can check this by opening android/app/build.gradle and looking for the defaultConfig section:
 defaultConfig {

        applicationId = "com.example.document_scanner_app"
        minSdk = flutter.minSdkVersion
        targetSdk = flutter.targetSdkVersion
        versionCode = flutter.versionCode
        versionName = flutter.versionName
    }
iOS
The google_mlkit_document_scanner package requires iOS 15.5 or higher. To ensure this requirement is met, do the following:
- Navigate to ios/Podfile.
- Find the following line (usually line 2):
# platform :ios, '13.0'- Uncomment it and change the value (remove the
#).
platform :ios, '15.5'Step 4: Implement the document scanning feature
Now that everything is set up, you can integrate the document scanning library into your project.
Open lib/main.dart and replace its contents with the following code:
import 'dart:io';
import 'package:flutter/material.dart';
import 'package:google_mlkit_document_scanner/google_mlkit_document_scanner.dart';

void main() {
  runApp(const MyApp());
}

class MyApp extends StatelessWidget {
  const MyApp({super.key});

  @override
  Widget build(BuildContext context) {
    return MaterialApp(
      title: 'Document Scanner',
      theme: ThemeData(
        colorScheme: ColorScheme.fromSeed(seedColor: Colors.blue),
        useMaterial3: true,
      ),
      home: const DocumentScannerPage(),
    );
  }
}

class DocumentScannerPage extends StatefulWidget {
  const DocumentScannerPage({super.key});

  @override
  State<DocumentScannerPage> createState() => _DocumentScannerPageState();
}

class _DocumentScannerPageState extends State<DocumentScannerPage> {
  DocumentScanner? _documentScanner;
  List<String> _scannedImages = [];
  bool _isScanning = false;

  @override
  void initState() {
    super.initState();
    _initializeScanner();
  }

  void _initializeScanner() {
    final options = DocumentScannerOptions(
      documentFormat: DocumentFormat.jpeg,
      mode: ScannerMode.full, // Full UI with all features
      pageLimit: 5, // Maximum pages per scanning session
      isGalleryImport: true, // Allow importing existing images
    );
    _documentScanner = DocumentScanner(options: options);
  }

  Future<void> _scanDocument() async {
    if (_documentScanner == null) return;

    setState(() {
      _isScanning = true;
    });

    try {
      final result = await _documentScanner!.scanDocument();

      if (result != null && result.images.isNotEmpty) {
        setState(() {
          _scannedImages = result.images;
        });

        if (mounted) {
          ScaffoldMessenger.of(context).showSnackBar(
            SnackBar(
              content: Text('Scanned ${result.images.length} page(s)'),
              backgroundColor: Colors.green,
            ),
          );
        }
      } else {
        if (mounted) {
          ScaffoldMessenger.of(context).showSnackBar(
            const SnackBar(
              content: Text('No documents scanned'),
              backgroundColor: Colors.orange,
            ),
          );
        }
      }
    } catch (e) {
      if (mounted) {
        String errorMessage = 'Error: ${e.toString()}';

        // Check if it's the simulator/emulator issue
        if (e.toString().contains('MissingPluginException')) {
          errorMessage = 'Document scanner requires a physical device.\nPlease run on a real iPhone or Android phone.';
        }

        ScaffoldMessenger.of(context).showSnackBar(
          SnackBar(
            content: Text(errorMessage),
            backgroundColor: Colors.red,
            duration: const Duration(seconds: 4),
          ),
        );
      }
    } finally {
      setState(() {
        _isScanning = false;
      });
    }
  }

  void _clearScans() {
    setState(() {
      _scannedImages.clear();
    });
  }

  @override
  void dispose() {
    _documentScanner?.close();
    super.dispose();
  }

  @override
  Widget build(BuildContext context) {
    return Scaffold(
      appBar: AppBar(
        title: const Text('Document Scanner'),
        backgroundColor: Theme.of(context).colorScheme.inversePrimary,
        actions: [
          if (_scannedImages.isNotEmpty)
            IconButton(
              icon: const Icon(Icons.delete_outline),
              onPressed: _clearScans,
              tooltip: 'Clear scans',
            ),
        ],
      ),
      body: Center(
        child: _scannedImages.isEmpty
            ? Column(
          mainAxisAlignment: MainAxisAlignment.center,
          children: [
            Icon(
              Icons.document_scanner_outlined,
              size: 100,
              color: Colors.grey[400],
            ),
            const SizedBox(height: 24),
            Text(
              'No documents scanned yet',
              style: TextStyle(
                fontSize: 18,
                color: Colors.grey[600],
              ),
            ),
            const SizedBox(height: 16),
            Text(
              'Tap the button below to scan',
              style: TextStyle(
                fontSize: 14,
                color: Colors.grey[500],
              ),
            ),
          ],
        )
            : ListView.builder(
          padding: const EdgeInsets.all(16),
          itemCount: _scannedImages.length,
          itemBuilder: (context, index) {
            return Card(
              margin: const EdgeInsets.only(bottom: 16),
              child: Column(
                crossAxisAlignment: CrossAxisAlignment.start,
                children: [
                  Padding(
                    padding: const EdgeInsets.all(12),
                    child: Text(
                      'Page ${index + 1}',
                      style: const TextStyle(
                        fontSize: 16,
                        fontWeight: FontWeight.bold,
                      ),
                    ),
                  ),
                  Image.file(
                    File(_scannedImages[index]),
                    fit: BoxFit.contain,
                  ),
                  Padding(
                    padding: const EdgeInsets.all(12),
                    child: Text(
                      _scannedImages[index],
                      style: TextStyle(
                        fontSize: 12,
                        color: Colors.grey[600],
                      ),
                      maxLines: 1,
                      overflow: TextOverflow.ellipsis,
                    ),
                  ),
                ],
              ),
            );
          },
        ),
      ),
      floatingActionButton: FloatingActionButton.extended(
        onPressed: _isScanning ? null : _scanDocument,
        icon: _isScanning
            ? const SizedBox(
          width: 20,
          height: 20,
          child: CircularProgressIndicator(
            strokeWidth: 2,
            color: Colors.white,
          ),
        )
            : const Icon(Icons.document_scanner),
        label: Text(_isScanning ? 'Scanning...' : 'Scan Document'),
      ),
    );
  }
}
Let’s break down the most important parts.
DocumentScannerPage – state management
class DocumentScannerPage extends StatefulWidget {
  const DocumentScannerPage({super.key});

  @override
  State<DocumentScannerPage> createState() => _DocumentScannerPageState();
}StatefulWidgetis a widget with mutable state, used when the UI must update based on user actions; it creates a separate State object that persists across rebuilds.
State class – variables
class _DocumentScannerPageState extends State<DocumentScannerPage> {
  DocumentScanner? _documentScanner;
  List<String> _scannedImages = [];
bool _isScanning = false;DocumentScanner?is the scanner instance (nullable with?).List<String> _scannedImagesstores file paths of scanned documents.bool _isScanningtracks if scanning is in progress (for loading indicator).- Leading underscore
_makes variables private to this file.
Initialization
@override
void initState() {
  super.initState();
  _initializeScanner();
}

void _initializeScanner() {
  final options = DocumentScannerOptions(
    documentFormat: DocumentFormat.jpeg,
    mode: ScannerMode.full,
    pageLimit: 5,
    isGalleryImport: true,
  );
  _documentScanner = DocumentScanner(options: options);
}initState()is called once when widget is first created.DocumentScannerOptionsconfigures the scanner:documentFormat: jpeg: save as JPEG imagesmode: full: full scanning experience (vs. base mode)pageLimit: 5: allow up to 5 pages per scanisGalleryImport: true: allow importing from gallery
Scanning function
Future<void> _scanDocument() async {
  if (_documentScanner == null) return;

  setState(() {
    _isScanning = true;
  });

  try {
    final result = await _documentScanner!.scanDocument();

    if (result != null && result.images.isNotEmpty) {
      setState(() {
        _scannedImages = result.images;
      });

      if (mounted) {
        ScaffoldMessenger.of(context).showSnackBar(
          SnackBar(
            content: Text('Scanned ${result.images.length} page(s)'),
            backgroundColor: Colors.green,
          ),
        );
      }
    } else {
      // Handle no documents scanned
    }
  } catch (e) {
    // Handle errors
    if (mounted) {
      String errorMessage = 'Error: ${e.toString()}';

      if (e.toString().contains('MissingPluginException')) {
        errorMessage = 'Document scanner requires a physical device.\nPlease run on a real iPhone or Android phone.';
      }

      ScaffoldMessenger.of(context).showSnackBar(
        SnackBar(
          content: Text(errorMessage),
          backgroundColor: Colors.red,
          duration: const Duration(seconds: 4),
        ),
      );
    }
  } finally {
    setState(() {
      _isScanning = false;
    });
  }
}
async/await pattern:
Future<void>means the function returns a Future (asynchronous operation).asyncmarks the function as asynchronous.awaitwaits for the scanner to complete before continuing.
setState():
- Tells Flutter to rebuild the widget.
- Updates
_isScanningto show/hide loading indicator. - CRITICAL: Always wrap state changes in
setState().
Scanner result:
result.imagescontains a list of file paths to the scanned images.- Returns
nullif the user cancels.
mounted check:
- Ensures the widget still exists before showing the SnackBar.
- Prevents errors if the user navigates away during scanning.
Error handling:
try-catchcatches any errors, with special handling forMissingPluginException(emulator error).finallyalways executes (resets the loading state).
Clear function
void _clearScans() {
  setState(() {
    _scannedImages.clear();
  });
}- Clears the list of scanned images.
- Wrapped in
setState()to trigger UI rebuild.
Cleanup
@override
void dispose() {
  _documentScanner?.close();
  super.dispose();
}dispose()is called when widget is removed permanently.- Closes the scanner to free up resources.
?safely calls close only if the scanner exists.
Step 5: Run the app
To test the app, select your device from the top bar’s dropdown menu.

When the app launches:
- Tap the Scan Document button.
- Grant Camera permission if prompted.
- The document scanner will open automatically.
- Point your camera at the document you want to scan.
- The scanner provides two options:
- Auto-detect edges: The app automatically captures the document once edges are detected.
- Manual capture: Tap the camera button to capture the document manually.

Conclusion
This concludes our tutorial on how to set up a document scanning app in Flutter using ML Kit.
Free solutions like this one can be great for prototyping and personal projects. However, they have their drawbacks.
Since google_mlkit_document_scanner is a wrapper for Google’s ML Kit, its functionality depends entirely on this third-party library. Companies relying on ML Kit for their scanning needs won’t be able to submit feature requests nor count on help when things don’t work as expected.
We developed the Scanbot Document Scanner SDK to help companies overcome these hurdles. Our goal was to provide a developer-friendly solution for a wide range of platforms that consistently delivers high-quality results, even in challenging circumstances – enterprise-grade support included.
In the following tutorial, we’ll show you how to set up a document scanning app using the Scanbot Flutter Document Scanner SDK.
Building a Flutter document scanner app with the Scanbot SDK
To set up our app, we’ll follow these steps:
- Preparing the project
- Initializing the SDK
- Implementing the scanning feature
- Implementing the PDF export feature
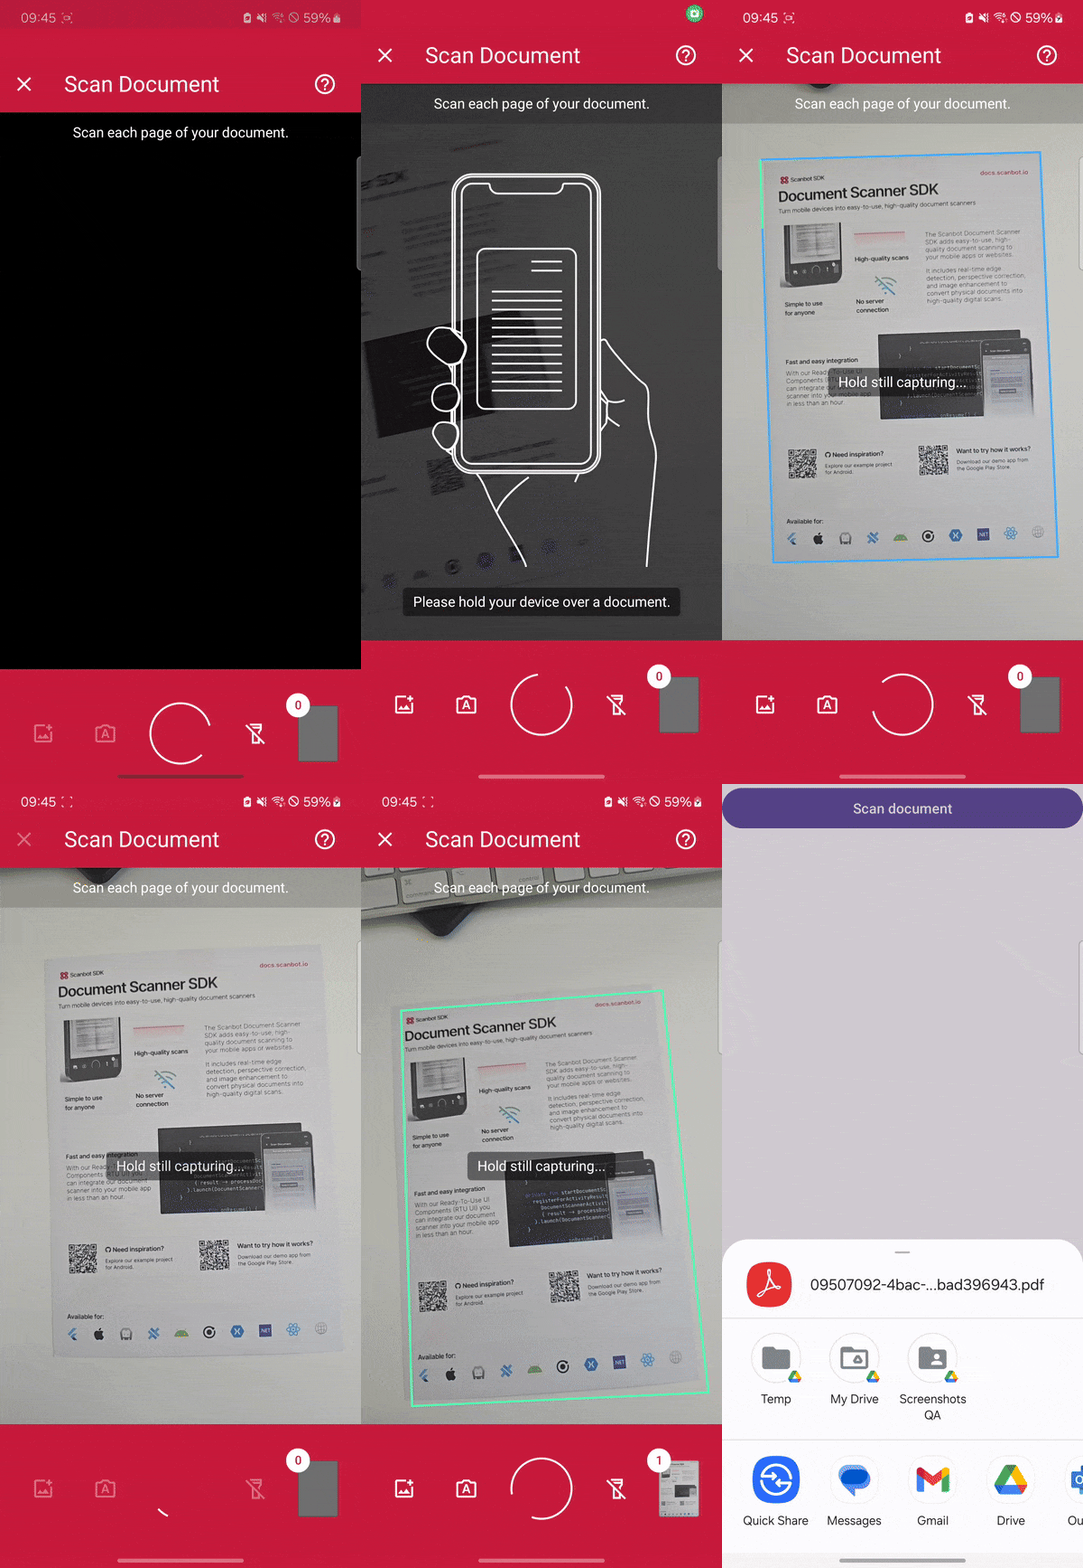
Thanks to the SDK’s Ready-to-Use UI Components, we’ll have an intuitive user interface out of the box.
Let’s get started!
Step 1: Prepare the project
After you’ve created a new Flutter project, add the scanbot_sdk dependency to pubspec.yaml.
dependencies:
  flutter:
    sdk: flutter
  scanbot_sdk: ^7.0.1
Then fetch the package.
flutter pub get💡 We use Document Scanner SDK version 7.0.1 in this tutorial. You can find the latest version in the changelog.
Now set the necessary camera permissions in android/app/src/main/AndroidManifest.xml …
<uses-permission android:name="android.permission.CAMERA" />
<uses-feature android:name="android.hardware.camera" />
… and ios/Runner/Info.plist.
<key>NSCameraUsageDescription</key>
<string>Grant camera access to scan documents.</string>
Step 2: Initialize the SDK
Before we can use the Document Scanner SDK, we need to initialize it. Make sure to call the initialization after entering the main widget creation. This ensures the SDK is correctly initialized.
In lib/main.dart, import the Scanbot SDK package:
import 'package:scanbot_sdk/scanbot_sdk.dart';
import 'package:scanbot_sdk/scanbot_sdk_ui_v2.dart';
Within your main widget, initialize the Scanbot SDK. This is typically done in the initState method of your main widget’s state class:
class _MyHomePageState extends State<MyHomePage> {
  @override
  void initState() {
    super.initState();
    _initScanbotSdk();
  }

  Future<void> _initScanbotSdk() async {
    var config = ScanbotSdkConfig(
      licenseKey: "",
      loggingEnabled: true,
    );

    try {
      await ScanbotSdk.initScanbotSdk(config);
      print('Scanbot SDK initialized successfully');
    } catch (e) {
      print('Error initializing Scanbot SDK: $e');
    }
  }
  //...
💡 Without a license key, our SDK only runs for 60 seconds per session. This is more than enough for the purposes of our tutorial, but if you like, you can generate a license key using your app identifier.
Step 3: Implement the scanning feature
Now we’ll create a simple user interface that includes a button to initiate the document scanning process.
Still in lib/main.dart, and in your main widget’s state class, define a widget with a button labeled “Scan Document”:
class _MyHomePageState extends State<MyHomePage> {
  // ... (existing code)

  @override
  Widget build(BuildContext context) {
    return Scaffold(
      appBar: AppBar(
        title: Text('Document Scanner'),
      ),
      body: Center(
        child: ElevatedButton(
          onPressed: _startDocumentScanner,
          child: Text('Scan Document'),
        ),
      ),
    );
  }

  Future<void> _startDocumentScanner() async {
    // To be implemented in the next step
  }
}
Next, let’s connect the button with our RTU UI’s scanning screen.
Within the _startDocumentScanner method, configure and launch the Document Scanner UI. This involves creating a DocumentScanningFlow configuration and starting the scanner:
Future<void> _startDocumentScanner() async {

  // Launch the Scanbot Document Scanner UI
    var configuration = multiPageScanningFlow();
    var documentResult = await ScanbotSdkUiV2.startDocumentScanner(configuration);

    // Check if the scanning operation was successful
    if(documentResult.status == OperationStatus.OK) {
    }
}

DocumentScanningFlow multiPageScanningFlow() {
    // Create the default configuration object.
    var configuration = DocumentScanningFlow();

    // Customize text resources, behavior and UI:
    // ...

    return configuration;
    }
}
In this tutorial, we use a default configuration object. It will start the Document Scanner UI with the default settings: in multi-page scanning mode with an acknowledge screen after scanning each page. You can customize the UI and behavior of the Document Scanner by modifying the configuration object. For more information on how to customize the Document Scanner UI, please refer to the RTU UI documentation.
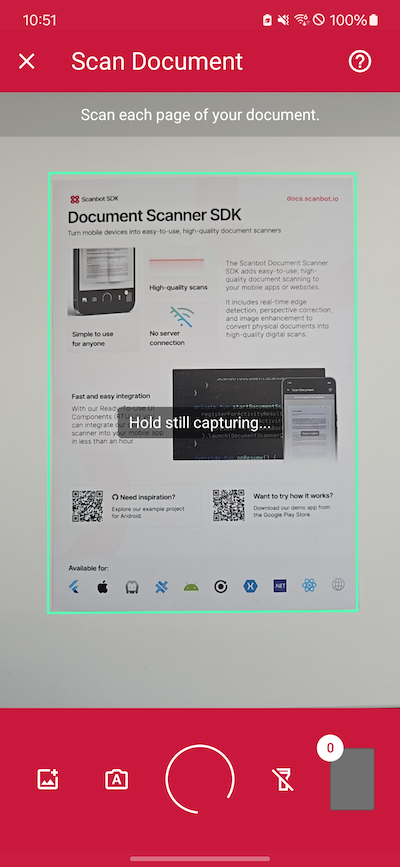
If you want, you can now run the app to try out the scanner without the PDF export feature.
Step 4: Implement the PDF export feature
Once again, we’ll use the share_plus package to implement the share dialog. Add the dependency to pubspec.yaml and run flutter pub get once more.
dependencies:
  flutter:
    sdk: flutter
  scanbot_sdk: ^7.0.1
  share_plus: ^11.1.0
Back in main.dart, import the package.
import 'package:share_plus/share_plus.dart';To enable users to scan documents, generate a PDF, and share it, we need to modify the _startDocumentScanner method. This method will first launch the document scanner, then process the scanned document to generate a PDF, and finally provide an option to share it.
Future<void> _startDocumentScanner() async {
    var configuration = multiPageScanningFlow();
    var documentResult = await ScanbotSdkUiV2.startDocumentScanner(
      configuration,
    );

    if (documentResult.status == OperationStatus.OK) {

      // Convert the scanned document into a PDF file
      var result = await ScanbotSdk.document.createPDFForDocument(
        PDFFromDocumentParams(
          documentID: documentResult.data!.uuid,
          pdfConfiguration: PdfConfiguration(
          pageSize: PageSize.A4,
          pageDirection: PageDirection.PORTRAIT
          )
        )
      );

      // Extract the PDF file URI and trigger the sharing process
      final pdfURI = result.pdfFileUri.replaceFirst("file://", "");
      await _sharePdf(pdfURI);
    }
  }

  // Method to share the generated PDF file
  Future<void> _sharePdf(String pdfURI) async {
    if (pdfURI.isEmpty) return;

    final file = File(pdfURI);
    if (!file.existsSync()) {
      ScaffoldMessenger.of(
        context,
      ).showSnackBar(SnackBar(content: Text("PDF file not found")));
      return;
    }

    // Locate the UI box to ensure proper sharing dialog positioning
    final box = context.findRenderObject() as RenderBox?;
    await Share.shareXFiles(
      [XFile(pdfURI)],
      text: "Share PDF file!",
      sharePositionOrigin: box!.localToGlobal(Offset.zero) & box.size,
    );
  }

  DocumentScanningFlow multiPageScanningFlow() {
    var configuration = DocumentScanningFlow();
    return configuration;
  }
Now you can share a scanned document as a PDF file and use it. For example, you can send it via email or save it to a cloud storage.

Conclusion
And that’s it! You’ve successfully integrated a fully functional document scanner into your app 🎉
If this tutorial has piqued your interest in integrating document scanning functionalities into your Flutter app, make sure to take a look at the other neat features in the Flutter Document Scanner SDK’s documentation – or run our example project for a more hands-on experience.
Should you have questions about this tutorial or run into any issues, we’re happy to help! Just shoot us an email via tutorial-support@scanbot.io.
Happy scanning! 🤳

