In this tutorial, you’ll learn how to set up a simple document scanning web app using jscanify, an open-source JavaScript library that uses OpenCV.js to detect documents from image files or a live camera stream.
We’ll show you two approaches for how to set this up:
- Using only HTML and JavaScript, resulting in a single index.html (jump to section)
- Using React with Vite to set up a fully functional web app (jump to section)
All you need is a way to test the app’s live scanning functionalities (for camera access, the page must be served over HTTPS or localhost) and Node.js version 16 or higher if you’d like to try the React approach. As for jscanify and OpenCV.js, we’ll integrate them via CDNs in this example.
Approach A: Single HTML file
For the simplest implementation, we’ll include the UI, CSS, the script tags for jscanify and OpenCV.js, and the JavaScript that wires everything together in a single HTML file.
Create a new index.html in your project folder and paste the following code. We’ll break down each part of it further below.
<!DOCTYPE html>
<html lang="en">

<head>
    <meta charset="UTF-8" />
    <title>jscanify Document Scanner Demo</title>
    <style>
        body {
            font-family: sans-serif;
            padding: 20px;
            max-width: 900px;
            margin: auto;
        }

        canvas,
        video {
            display: block;
            margin-top: 20px;
            border: 1px solid #ccc;
            max-width: 100%;
            height: auto;
        }

        pre {
            background: #f0f0f0;
            padding: 10px;
            margin-top: 10px;
            white-space: pre-wrap;
        }

        button.save-btn,
        button#startCameraBtn,
        button#captureBtn {
            margin-top: 10px;
            padding: 8px 16px;
            cursor: pointer;
            background-color: #007bff;
            color: white;
            border: none;
            border-radius: 4px;
            font-size: 14px;
        }

        #cameraContainer {
            margin-top: 40px;
        }
    </style>
</head>

<body>
    <h1>jscanify Document Scanner Demo</h1>

    <!-- SCAN FROM FILE -->
    <h2>Scan From File</h2>
    <input type="file" id="fileInput" accept="image/*" />
    <div id="uploadPreview"></div>

    <!-- LIVE DETECTION -->
    <h2>Live Detection</h2>
    <button id="startCameraBtn">Start Camera</button>
    <div id="cameraContainer" style="display:none;">
        <video id="video" autoplay playsinline></video>
        <canvas id="highlightCanvas"></canvas>
        <button id="captureBtn">📸 Capture Scanned Document</button>
        <div id="cameraResult"></div>
    </div>

    <script async src="https://docs.opencv.org/4.x/opencv.js"></script>
    <script src="https://cdn.jsdelivr.net/gh/ColonelParrot/jscanify@master/src/jscanify.min.js"></script>

    <script>
        window.addEventListener("load", () => {
            const scanner = new jscanify();

            // --- SCAN FROM FILE ---
            const fileInput = document.getElementById("fileInput");
            const uploadPreview = document.getElementById("uploadPreview");

            fileInput.addEventListener("change", e => {
                const file = e.target.files[0];
                if (!file) return;

                const img = new Image();
                img.onload = () => {
                    uploadPreview.innerHTML = "";

                    // Highlighting
                    const hl = scanner.highlightPaper(img);
                    uploadPreview.appendChild(hl);

                    // Extracting
                    const scan = scanner.extractPaper(img, 500, 700);
                    uploadPreview.appendChild(scan);

                    // Save button
                    const saveBtn = document.createElement("button");
                    saveBtn.textContent = "💾 Save Scanned Image";
                    saveBtn.className = "save-btn";
                    saveBtn.addEventListener("click", () => {
                        const dataUrl = scan.toDataURL("image/png");
                        const a = document.createElement("a");
                        a.href = dataUrl;
                        a.download = "scanned_document.png";
                        a.click();
                    });
                    uploadPreview.appendChild(saveBtn);

                    // Corner points
                    const mat = cv.imread(img);
                    const contour = scanner.findPaperContour(mat);
                    const corners = scanner.getCornerPoints(contour);
                    const pre = document.createElement("pre");
                    pre.textContent = JSON.stringify(corners, null, 2);
                    uploadPreview.appendChild(pre);
                };
                img.src = URL.createObjectURL(file);
            });

            // --- LIVE DETECTION ---
            const startCameraBtn = document.getElementById("startCameraBtn");
            const cameraContainer = document.getElementById("cameraContainer");
            const video = document.getElementById("video");
            const highlightCanvas = document.getElementById("highlightCanvas");
            const captureBtn = document.getElementById("captureBtn");
            const cameraResult = document.getElementById("cameraResult");
            let stream = null;
            let highlightInterval = null;

            startCameraBtn.addEventListener("click", async () => {
                if (stream) {
                    // Stop camera if running
                    stream.getTracks().forEach(track => track.stop());
                    stream = null;
                    cameraContainer.style.display = "none";
                    startCameraBtn.textContent = "Start Camera";
                    clearInterval(highlightInterval);
                    return;
                }

                try {
                    stream = await navigator.mediaDevices.getUserMedia({ video: { facingMode: "environment" } });
                    video.srcObject = stream;
                    await video.play();
                    cameraContainer.style.display = "block";
                    startCameraBtn.textContent = "Stop Camera";

                    const ctx = highlightCanvas.getContext("2d");

                    // Resize canvas to video size
                    highlightCanvas.width = video.videoWidth;
                    highlightCanvas.height = video.videoHeight;

                    // Continuous highlight loop
                    highlightInterval = setInterval(() => {
                        ctx.drawImage(video, 0, 0, highlightCanvas.width, highlightCanvas.height);
                        const hlCanvas = scanner.highlightPaper(highlightCanvas);
                        // Clear and draw highlight result on highlightCanvas
                        ctx.clearRect(0, 0, highlightCanvas.width, highlightCanvas.height);
                        ctx.drawImage(hlCanvas, 0, 0);
                    }, 100); // 10 fps approx

                } catch (err) {
                    alert("Error accessing camera: " + err.message);
                }
            });

            captureBtn.addEventListener("click", () => {
                if (!stream) return;

                // Extract scanned document from the current highlighted canvas
                cameraResult.innerHTML = "";

                // Extract paper from highlightCanvas (which has current video frame)
                const scan = scanner.extractPaper(highlightCanvas, 500, 700);
                cameraResult.appendChild(scan);

                // Save button for camera scan
                const saveBtn = document.createElement("button");
                saveBtn.textContent = "💾 Save Scanned Image";
                saveBtn.className = "save-btn";
                saveBtn.addEventListener("click", () => {
                    const dataUrl = scan.toDataURL("image/png");
                    const a = document.createElement("a");
                    a.href = dataUrl;
                    a.download = "scanned_document.png";
                    a.click();
                });
                cameraResult.appendChild(saveBtn);

                // Corner points
                const mat = cv.imread(highlightCanvas);
                const contour = scanner.findPaperContour(mat);
                const corners = scanner.getCornerPoints(contour);
                const pre = document.createElement("pre");
                pre.textContent = JSON.stringify(corners, null, 2);
                cameraResult.appendChild(pre);
            });

        });
    </script>
</body>

</html>
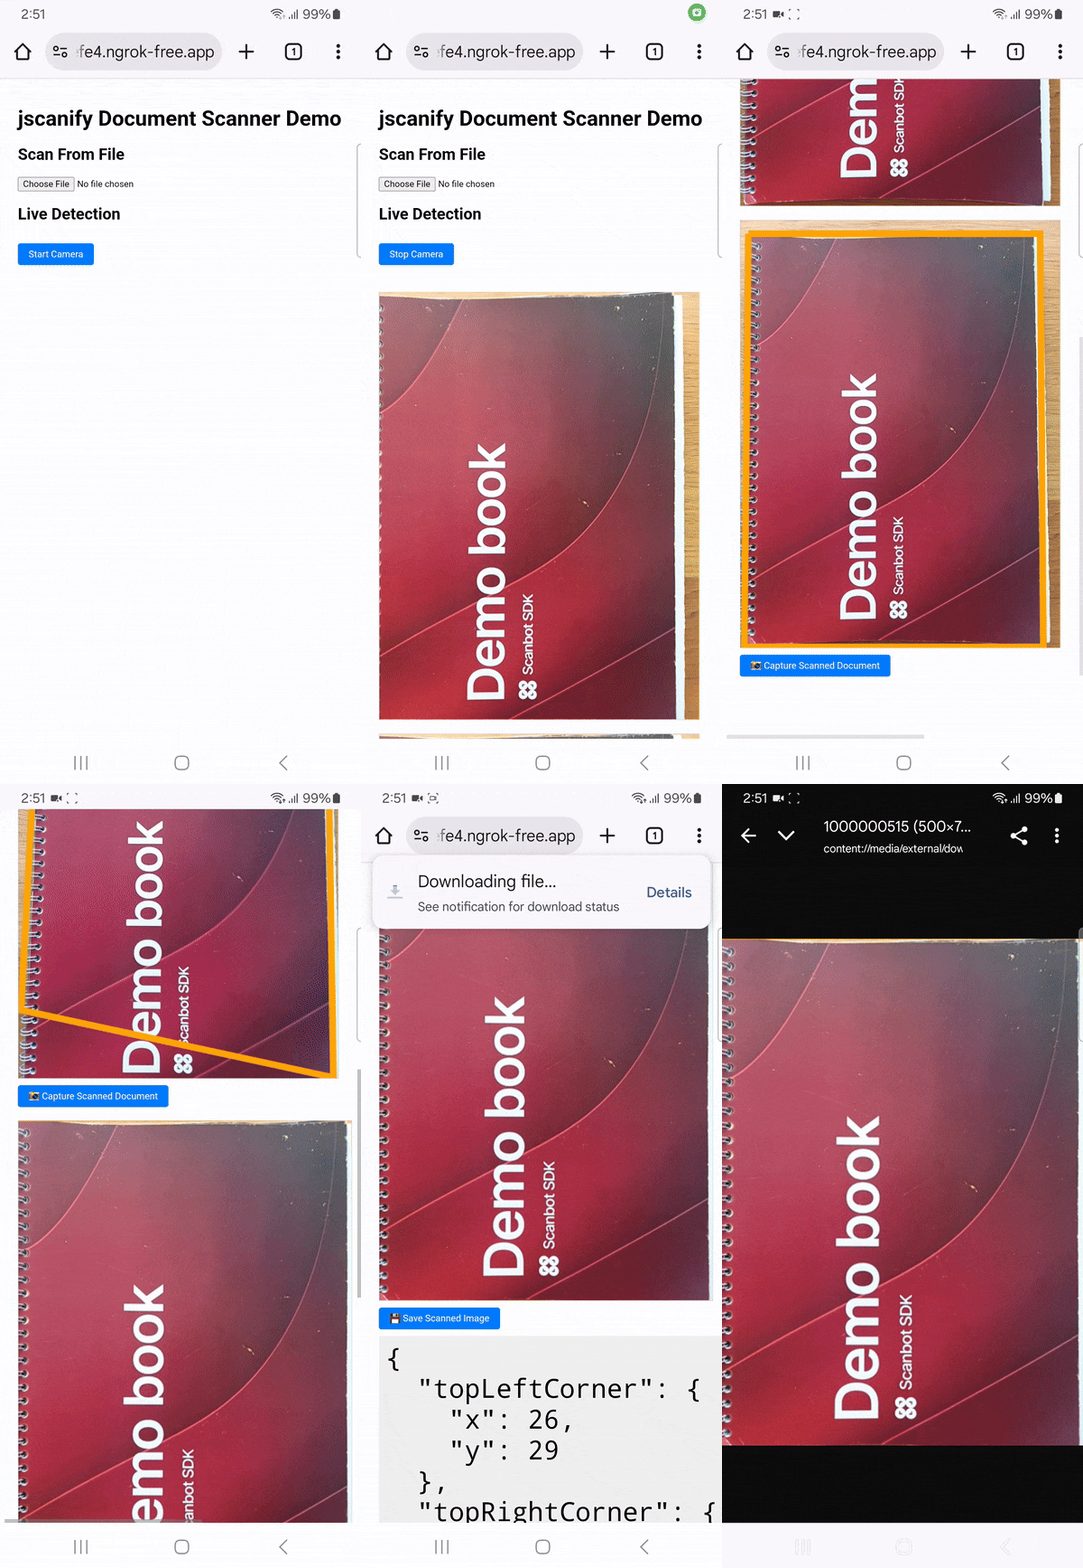
Our app gives users the option to upload an image of a document or use their device’s camera to capture one. OpenCV automatically detects the document and highlights it, letting the user then extract and save it.

Let’s take a closer look at the code.
HTML layout
<input type="file" id="fileInput" accept="image/*" />
<div id="uploadPreview"></div>
Lets users upload an image. uploadPreview is where the highlighted and scanned results are displayed.
<button id="startCameraBtn">Start Camera</button>
<div id="cameraContainer" style="display:none;">
  <video id="video" autoplay></video>
  <canvas id="highlightCanvas"></canvas>
  <button id="captureBtn">📸 Capture Scanned Document</button>
  <div id="cameraResult"></div>
</div>- Clicking the Start Camera button toggles the camera on or off.
videoshows the live camera feed.highlightCanvasoverlays the document highlighting.captureBtncaptures and processes the current frame.cameraResultshows the scanned image from the camera.
Script dependencies
<script async src="https://docs.opencv.org/4.x/opencv.js"></script>
<script src="https://cdn.jsdelivr.net/gh/ColonelParrot/jscanify@master/src/jscanify.min.js"></script>- OpenCV.js handles contour detection and corner finding.
- Jscanify highlights and extracts the documents.
JavaScript logic
const scanner = new jscanify();- Instantiates the scanner object that provides key methods:
highlightPaper(image)extractPaper(image, width, height)findPaperContour(mat)getCornerPoints(contour)
Uploading an image
fileInput.addEventListener("change", e => { ... });Triggered when a user selects an image.
const img = new Image();
img.onload = () => {
  ...
};
img.src = URL.createObjectURL(file);
Loads the image from the file input. Once loaded, the document is processed.
Highlighting and extracting
const hl = scanner.highlightPaper(img);
const scan = scanner.extractPaper(img, 500, 700);highlightPaper: Draws the detected document outline.extractPaper: Crops and warps the document into a flat scan.
Save button
const saveBtn = document.createElement("button");
saveBtn.addEventListener("click", () => {
  const dataUrl = scan.toDataURL("image/png");
  ...
});
Converts the scanned canvas to a downloadable PNG file.
Corner detection
const mat = cv.imread(img);
const contour = scanner.findPaperContour(mat);
const corners = scanner.getCornerPoints(contour);
Uses OpenCV to read the image, find contours, and extract corner coordinates. Corners are shown as JSON for reference.
Starting the camera
startCameraBtn.addEventListener("click", async () => { ... });- Requests access to the rear camera.
- Displays the video feed and continuously highlights the document.
Highlight loop
highlightInterval = setInterval(() => {
  ctx.drawImage(video, 0, 0);
  const hlCanvas = scanner.highlightPaper(highlightCanvas);
  ...
}, 100);- Every 100 ms (~10 fps), the current video frame is drawn on the canvas.
highlightPaperdraws the document outline in real-time.
Capturing the document
captureBtn.addEventListener("click", () => { ... });- Captures the current canvas frame.
- Extracts the document and displays the scanned version.
- Adds a save button to download the result.
- Detects and shows corner points using OpenCV.
Approach B: React app
To build our React app, we’ll create a reusable component and safely include the global scripts. We’ll load OpenCV and jscanify into index.html via CDNs and then reference window.cv and window.jscanify from React.
Step 1: Create the project
To create a JavaScript-based React project, run the following commands:
npm create vite@latest react-jscanify-demo -- --template react
cd react-jscanify-demo
npm install
Step 2: Add OpenCV.js and jscanify
Next, open the generated index.html and add the script tags for OpenCV.js and jscanify.
<script async src="https://docs.opencv.org/4.x/opencv.js"></script>
<script src="https://cdn.jsdelivr.net/gh/ColonelParrot/jscanify@master/src/jscanify.min.js"></script>
This publishes the cv and jscanify globals in the page, which the React component will wait for before using.
Your index.html should now look like this:
<!doctype html>
<html lang="en">

<head>
    <meta charset="UTF-8" />
    <link rel="icon" type="image/svg+xml" href="/vite.svg" />
    <meta name="viewport" content="width=device-width, initial-scale=1.0" />
    <title>Vite + React</title>
    <script async src="https://docs.opencv.org/4.x/opencv.js"></script>
    <script src="https://cdn.jsdelivr.net/gh/ColonelParrot/jscanify@master/src/jscanify.min.js"></script>
</head>

<body>
    <div id="root"></div>
    <script type="module" src="/src/main.jsx"></script>
</body>

</html>
Step 3: Add the React component
Next, open App.jsx and insert the following code. We’ll take a closer look at it further below.
import React, { useEffect, useRef, useState } from "react";

function App() {
  const [scanner, setScanner] = useState(null);
  const [uploadResult, setUploadResult] = useState(null);
  const [cameraScanResult, setCameraScanResult] = useState(null);
  const [cameraActive, setCameraActive] = useState(false);

  const videoRef = useRef(null);
  const canvasRef = useRef(null);
  const streamRef = useRef(null);
  const intervalRef = useRef(null);

  // Wait until OpenCV and jscanify are loaded
  useEffect(() => {
    const waitForLibs = () => {
      if (window.cv && window.jscanify) {
        setScanner(new window.jscanify());
      } else {
        setTimeout(waitForLibs, 100);
      }
    };
    waitForLibs();

    return () => stopCamera();
  }, []);

  const stopCamera = () => {
    if (intervalRef.current) clearInterval(intervalRef.current);
    if (streamRef.current) {
      streamRef.current.getTracks().forEach(t => t.stop());
    }
    setCameraActive(false);
  };

  const startCamera = async () => {
    if (!scanner) return;

    try {
      const stream = await navigator.mediaDevices.getUserMedia({
        video: {
          facingMode: "environment",
        },
      });
      streamRef.current = stream;

      // Wait until video element is rendered
      const waitForVideo = () =>
        new Promise(resolve => {
          const check = () => {
            if (videoRef.current) resolve();
            else requestAnimationFrame(check);
          };
          check();
        });

      await waitForVideo();

      const video = videoRef.current;
      video.srcObject = stream;
      await video.play();

      const canvas = canvasRef.current;
      canvas.width = video.videoWidth;
      canvas.height = video.videoHeight;
      const ctx = canvas.getContext("2d");

      intervalRef.current = setInterval(() => {
        ctx.drawImage(video, 0, 0, canvas.width, canvas.height);
        try {
          const resultCanvas = scanner.highlightPaper(canvas);
          ctx.clearRect(0, 0, canvas.width, canvas.height);
          ctx.drawImage(resultCanvas, 0, 0);
        } catch (err) {
          console.warn("Highlight error:", err);
        }
      }, 200);

      setCameraActive(true);
    } catch (err) {
      console.error("Camera access error:", err);
      alert("Could not access camera: " + err.message);
    }
  };

  const captureFromCamera = () => {
    if (!scanner || !canvasRef.current) return;
    const canvas = canvasRef.current;

    try {
      const scan = scanner.extractPaper(canvas, 500, 700);
      const mat = window.cv.imread(canvas);
      const contour = scanner.findPaperContour(mat);
      const corners = scanner.getCornerPoints(contour);
      setCameraScanResult({ scan, corners });
    } catch (err) {
      alert("Capture failed. Try again.");
    }
  };

  const onFileChange = e => {
    if (!scanner) return;
    const file = e.target.files[0];
    if (!file) return;

    const img = new Image();
    img.onload = () => {
      try {
        const hl = scanner.highlightPaper(img);
        const scan = scanner.extractPaper(img, 500, 700);
        const mat = window.cv.imread(img);
        const contour = scanner.findPaperContour(mat);
        const corners = scanner.getCornerPoints(contour);
        setUploadResult({ hl, scan, corners });
      } catch (err) {
        alert("Error processing image.");
      }
    };
    img.src = URL.createObjectURL(file);
  };

  const saveImage = canvas => {
    const link = document.createElement("a");
    link.download = "scanned.png";
    link.href = canvas.toDataURL("image/png");
    link.click();
  };

  return (
    <div style={{ padding: 20, fontFamily: "sans-serif", maxWidth: 800, margin: "auto" }}>
      <h1>jscanify Document Scanner Demo</h1>

      {/* Upload Option */}
      <section>
        <h2>Scan From File</h2>
        <input type="file" accept="image/*" onChange={onFileChange} />
        {uploadResult && (
          <div>
            <h3>Highlighted</h3>
            <div ref={el => el && uploadResult.hl && el.appendChild(uploadResult.hl)} />

            <h3>Scanned</h3>
            <div style={{ position: "relative", display: "inline-block" }}>
              <div ref={el => el && uploadResult.scan && el.appendChild(uploadResult.scan)} />
              <button onClick={() => saveImage(uploadResult.scan)} style={{ position: "absolute", top: 8, right: 8 }}>
                💾 Save
              </button>
            </div>

            <h4>Corner Points</h4>
            <pre>{JSON.stringify(uploadResult.corners, null, 2)}</pre>
          </div>
        )}
      </section>

      {/* Camera Option */}
      <section style={{ marginTop: 40 }}>
        <h2>Live Detection</h2>
        <button onClick={cameraActive ? stopCamera : startCamera}>
          {cameraActive ? "Stop Camera" : "Start Camera"}
        </button>

        {/* Always render video and canvas to avoid ref issues */}
        <video ref={videoRef} style={{ display: "none" }} />
        <canvas ref={canvasRef} style={{ width: "100%", marginTop: 10, border: "1px solid #ccc" }} />

        {cameraActive && (
          <>
            <button onClick={captureFromCamera} style={{ marginTop: 10 }}>
              📸 Capture Scan
            </button>
          </>
        )}

        {cameraScanResult && (
          <>
            <h3>Scanned from Camera</h3>
            <div style={{ position: "relative", display: "inline-block" }}>
              <div ref={el => el && cameraScanResult.scan && el.appendChild(cameraScanResult.scan)} />
              <button onClick={() => saveImage(cameraScanResult.scan)} style={{ position: "absolute", top: 8, right: 8 }}>
                💾 Save
              </button>
            </div>

            <h4>Corner Points</h4>
            <pre>{JSON.stringify(cameraScanResult.corners, null, 2)}</pre>
          </>
        )}
      </section>
    </div>
  );
}

export default App;
Let’s break down each element:
- Imports & state: Initializes
useStateanduseRefto manage the scanner instance, camera state, and DOM elements (videoRef,canvasRef, etc.). - React hooks:
useEffecthandles the library load and cleanup;useStatemanages results and toggles;useRefprovides persistent references. - Library loading (useEffect): Waits for
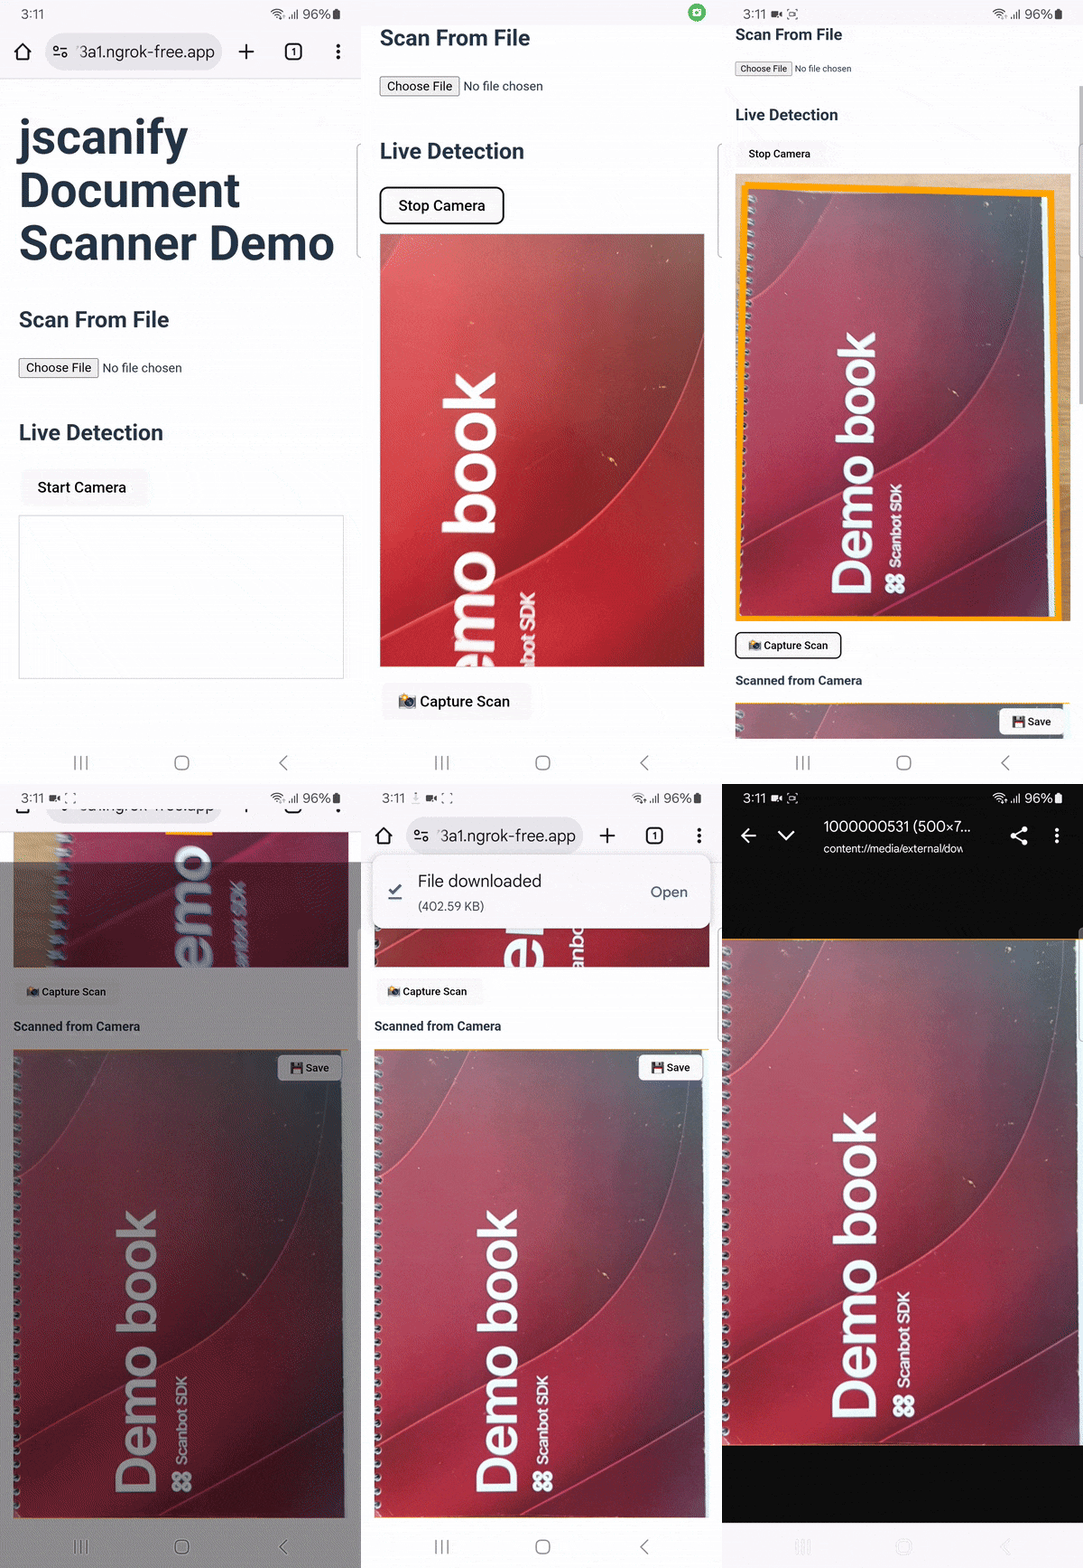
window.cvandwindow.jscanifyto be available, then setsscannerwithnew window.jscanify(). - scanner.highlightPaper(canvas or image): Detects and draws a highlighted outline of the document on a canvas or uploaded image.
- scanner.extractPaper(canvas or image, 500, 700): Crops and perspective-corrects the document into a scanned version (fixed output size).
- startCamera: Uses
navigator.mediaDevices.getUserMedia()to stream video, draws frames to a canvas, and appliesscanner.highlightPaper()in intervals. - stopCamera: Stops the media tracks and clears the highlight interval with
clearInterval(intervalRef.current). - captureFromCamera: Extracts the document using
scanner.extractPaper(canvas, 500, 700)and detects corners with OpenCV (cv.imread,scanner.findPaperContour,scanner.getCornerPoints). - onFileChange: Loads selected image, calls
scanner.highlightPaper(img)andscanner.extractPaper(img, 500, 700), and extracts corners. - saveImage(canvas): Converts the canvas to a PNG using
canvas.toDataURL("image/png")and downloads it via a temporary anchor link.
Step 4: Run your app
Now you can run your app with the following command:
npm run dev
Conclusion
This concludes our tutorial on how to set up a simple document scanning web app using jscanify.
Using open-source libraries that rely on OpenCV can be great for prototyping and personal projects. However, this approach is rarely viable for developing business solutions, since the work involved in maintaining an app without dedicated support is unpredictable.
We developed the Scanbot Web Document Scanner SDK to help enterprises overcome the hurdles presented by community-driven scanning software. Our goal was to provide a developer-friendly solution for a wide range of platforms that consistently delivers high-quality results – even in challenging circumstances.
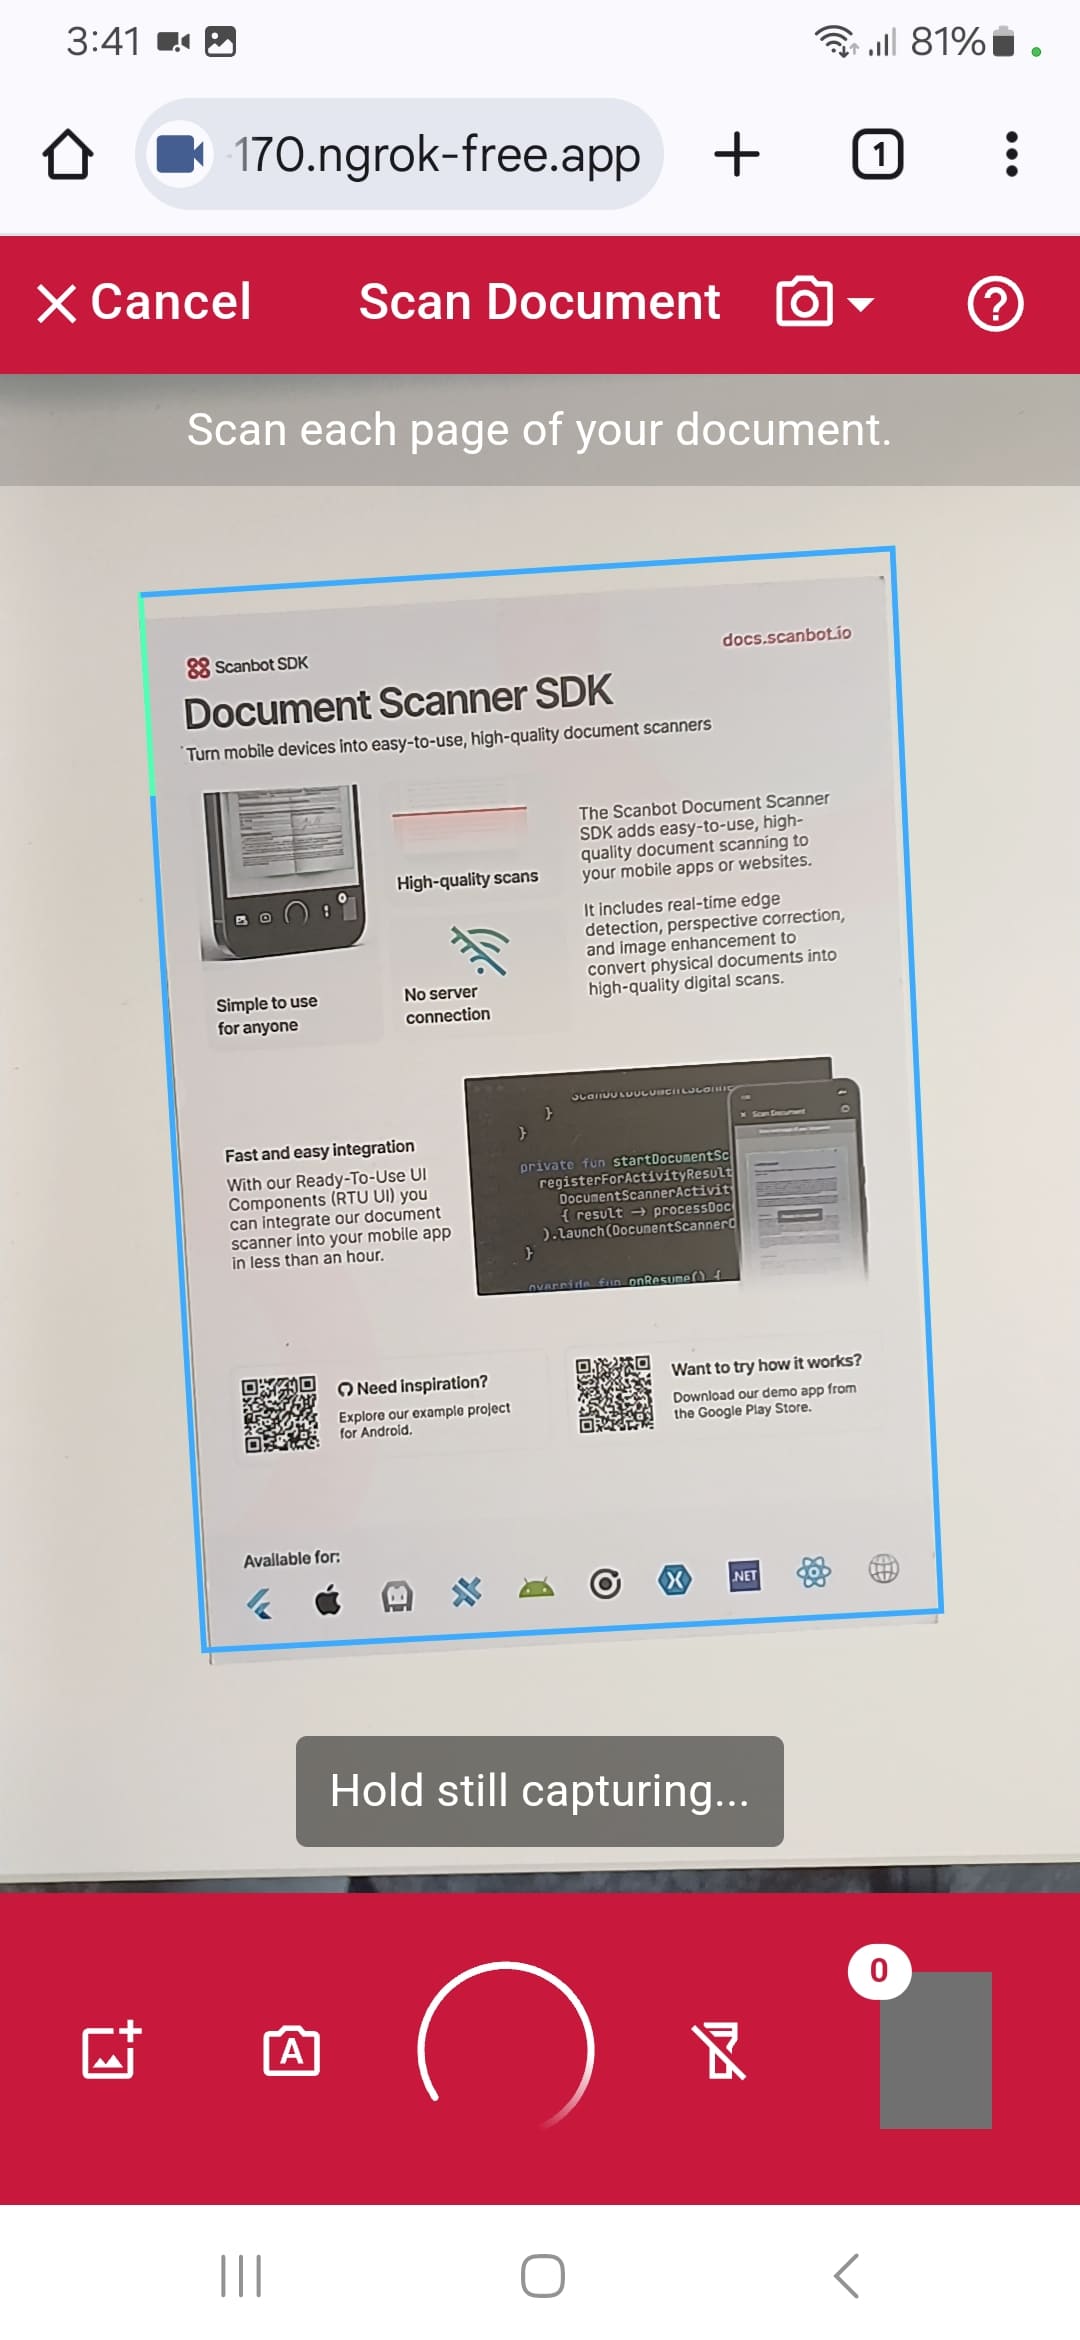
In the next sections, we’ll show you how to set up a fully functional document scanning web app using the Scanbot SDK – both in a single HTML file and as a React app.
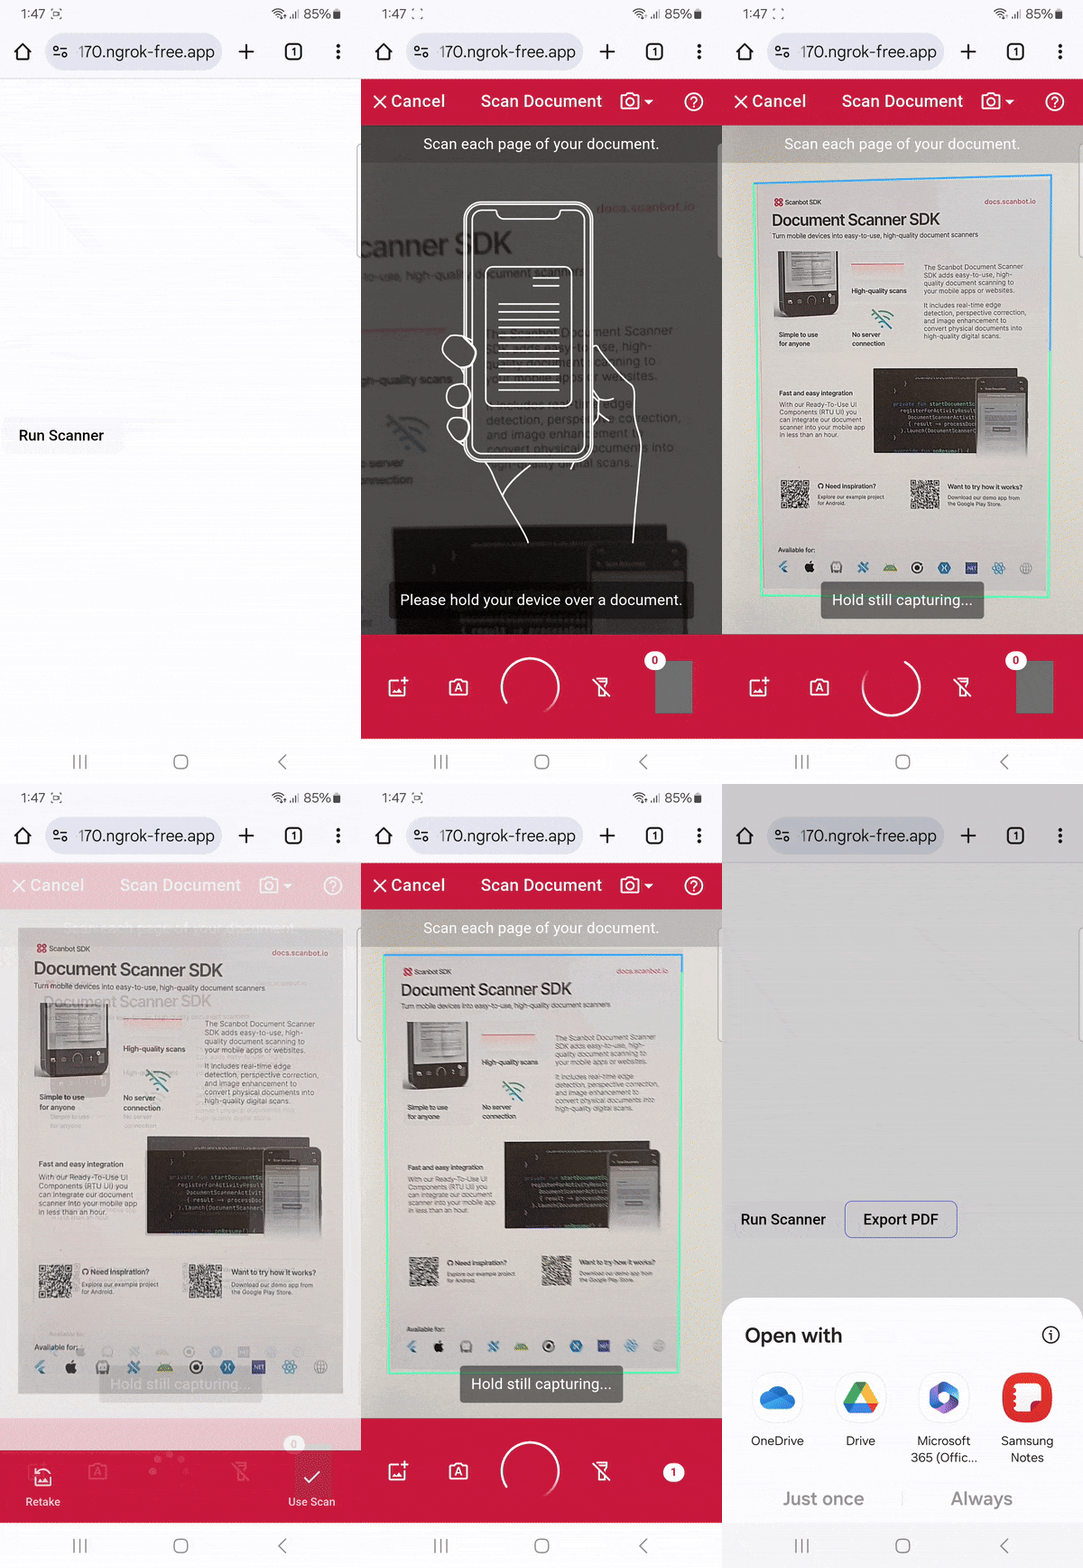
Building a JS camera document scanner with the Scanbot Web Document Scanner SDK
Once again, we’ll cover two approaches for setting up our browser-based document scanner:
- Using only HTML and JavaScript, resulting in a single index.html (jump to section)
- Using React with Vite to set up a fully functional web app (jump to section)
Approach A: Single HTML file
Just as with our jscanify example, we’ll include the document scanning library – in this case scanbot-web-sdk – via a CDN.
Create a new index.html in your project folder and paste the following code, which we’ll break down further below.
<!DOCTYPE html>
<html lang="en">

<head>
    <meta charset="UTF-8">
    <meta name="viewport" content="width=device-width, initial-scale=1.0, maximum-scale=1.0, user-scalable=0" />
    <title>Web Document Scanner</title>
</head>

<body style="margin: 0">
    <button id="scan-document">Scan document</button>
    <pre id="result"></pre>
    <script type="module">
        import "https://cdn.jsdelivr.net/npm/scanbot-web-sdk@7.0.0/bundle/ScanbotSDK.ui2.min.js";
        const sdk = await ScanbotSDK.initialize({
            enginePath:
                "https://cdn.jsdelivr.net/npm/scanbot-web-sdk@7.0.0/bundle/bin/complete/"
        });
        document
            .getElementById("scan-document")
            .addEventListener("click", async () => {
                const config = new ScanbotSDK.UI.Config.DocumentScanningFlow();
                const scanResult = await ScanbotSDK.UI.createDocumentScanner(config);
                const pages = scanResult?.document?.pages;

                if (!pages || !pages.length) {
                    return;
                }

                const options = { pageSize: "A4", pageDirection: "PORTRAIT", pageFit: "FIT_IN", dpi: 72, jpegQuality: 80 };
                const bytes = await scanResult?.document?.createPdf(options);

                function saveBytes(data, name) {
                    const extension = name.split(".")[1];
                    const a = document.createElement("a");
                    document.body.appendChild(a);
                    a.style = "display: none";
                    const blob = new Blob([data], { type: `application/${extension}` });
                    const url = window.URL.createObjectURL(blob);
                    a.href = url;
                    a.download = name;
                    a.click();
                    window.URL.revokeObjectURL(url);
                }

                saveBytes(bytes, "document-scan.pdf");
            });
    </script>
</body>

</html>
Let’s take a closer look at the JavaScript:
import "https://cdn.jsdelivr.net/npm/scanbot-web-sdk@7.0.0/bundle/ScanbotSDK.ui2.min.js";imports the Scanbot Web SDK. Thetype="module"attribute is required for this import statement.const sdk = await ScanbotSDK.initialize({...});initializes the SDK. TheenginePathspecifies the location of the SDK’s core processing files.const config = new ScanbotSDK.UI.Config.DocumentScanningFlow();creates a configuration object for the document scanning user interface.const scanResult = await ScanbotSDK.UI.createDocumentScanner(config);launches the document scanner interface. The code waits for this process to complete before continuing.const pages = scanResult?.document?.pages;retrieves the array of scanned pages from the result.const options = {...};defines various PDF creation options, such as page size (A4), orientation (PORTRAIT), and image quality (jpegQuality).const bytes = await scanResult?.document?.createPdf(options);converts the scanned pages into a PDF file in the form of a byte array.function saveBytes(data, name) { ... }is a helper function that takes the PDF byte data and a filename and triggers a download.saveBytes(bytes, "document-scan.pdf");calls the function to save the generated PDF file with the name “document-scan.pdf”.
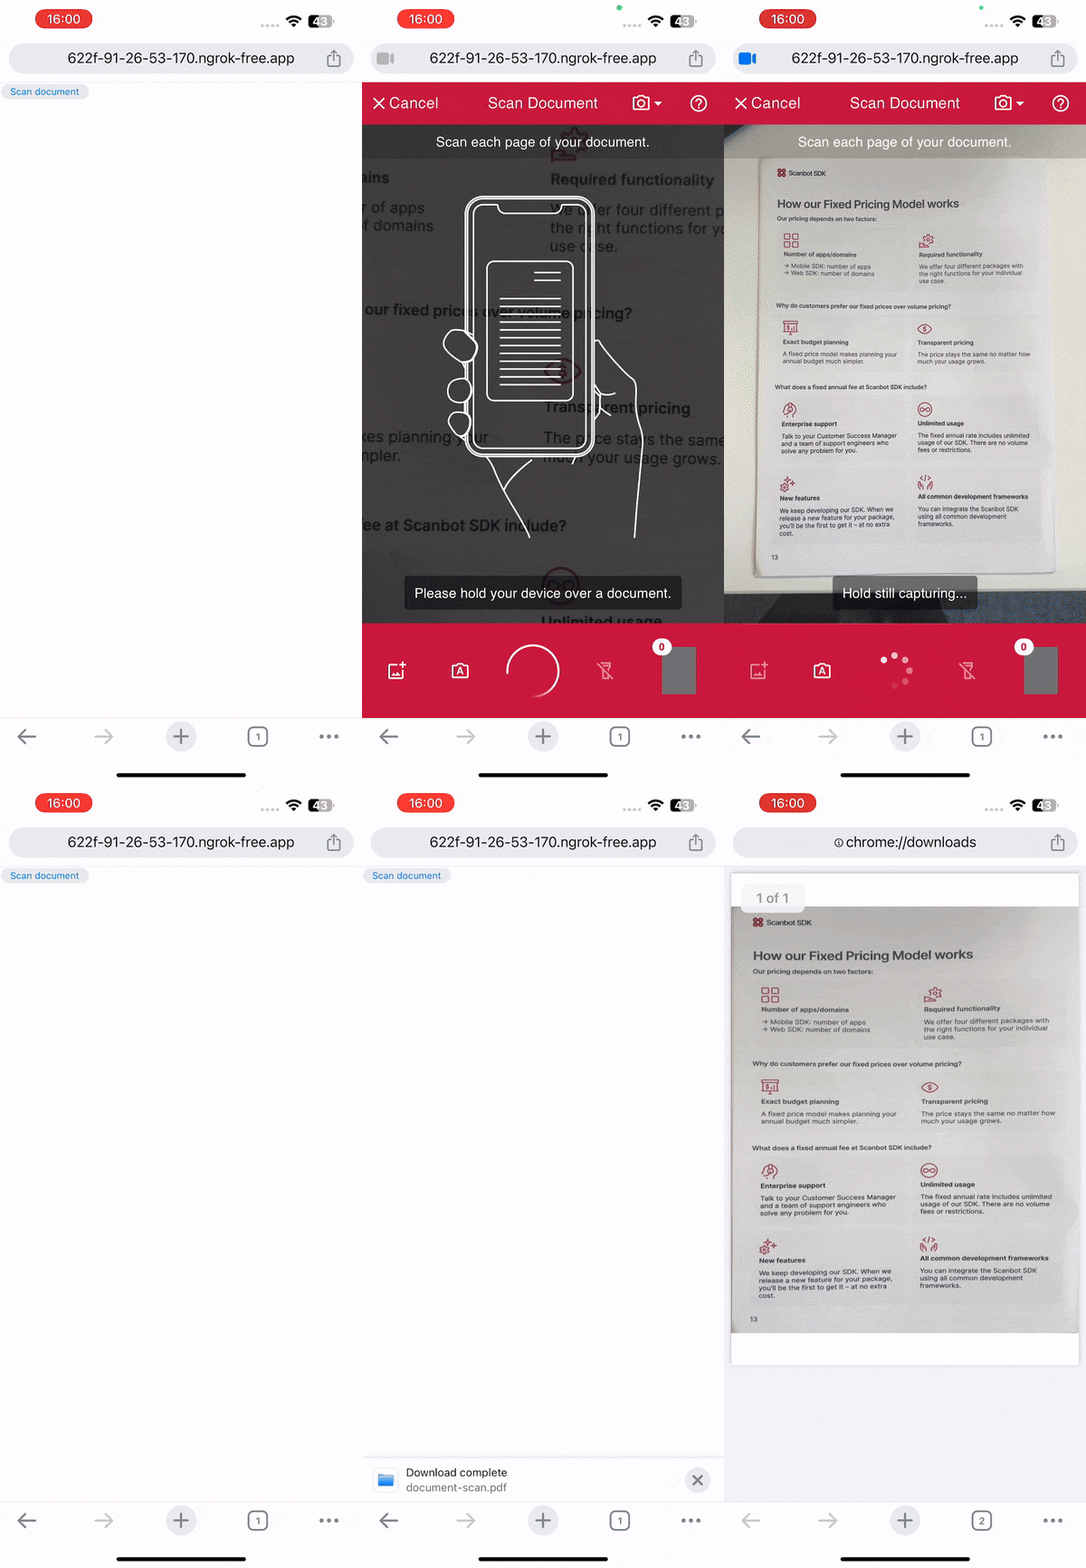
Run your app to test scanning a single- or multi-page document and exporting it as a PDF.

💡 To test your web app on your phone, you have a few options. One option is to use a service like ngrok, which creates a tunnel to one of their SSL-certified domains. Their Quick Start guide will help you get up and running quickly.
Approach B: React app
Now we’ll build the same app using React and Vite. We’ll follow these steps:
We’ll create our app by following these steps:
- Setting up the project
- Initializing the SDK
- Configuring the document scanner
- Implementing the PDF export feature
Let’s get started!
Step 1: Set up the project
We’ll be using Vite to set up our project. Vite is a modern build tool optimized for speed and performance.
Open a terminal and create a new Vite project with the following command:
npm create vite@latestYou will be asked to name your project. For this tutorial, let’s go with “scanbot-react-doc-tut”.
Then, when prompted to select a framework, choose React and select TypeScript as the variant.
Now run:
cd scanbot-react-doc-tut
npm install
npm run dev
Open src/App.tsx and replace the file’s contents with the following:
const App = () => {
  return <></>;
};

export default App;
Step 2: Initialize the SDK
Open another terminal, navigate to your project folder, and install the Scanbot Web SDK package with the following command:
npm i scanbot-web-sdkThe SDK contains WebAssembly binaries that should be hosted on your server. We ship these binaries with the npm package. Since Node.js doesn’t copy the binaries to the target automatically, you need to manually copy them to the desired destination (we recommend the public asset directory).
You can quickly copy them from node_modules to a folder called wasm in the public asset directory using the following command:
mkdir -p public/wasm && cp -r node_modules/scanbot-web-sdk/bundle/bin/complete/* public/wasm💡 To ensure these files are always copied to the same directory for all users and updated when the SDK itself is updated, you can add the command as a post-installation script to your package.json:
"postinstall": "mkdir -p public/wasm && cp -r node_modules/scanbot-web-sdk/bundle/bin/complete/* public/wasm"Now we can initialize ScanbotSDK within App.tsx. You have the option of leaving the licenseKey empty to use a trial mode that works for 60 seconds per session or getting a free 7-day trial by submitting the trial license form on our website.
Step 3: Configure the document scanner
First, we’ll need to create the configuration that we’ll use for the document scanner in App.tsx.
To create the configuration, we can call a method that returns an instance of the configuration object, which we can then modify as needed.
const config = new ScanbotSDK.UI.Config.DocumentScanningFlow();This config object will be what we use to make changes to the RTU UI. However, for now, let’s just use it to create our document scanner.
await ScanbotSDK.UI.createDocumentScanner(config);Now, let’s assign the scanner to a variable and wrap it within an asynchronous function so we can easily assign it to a button within our App. This allows us to easily trigger the scanner with a button press in our application.
Let’s name the variable “result”, since it will store the outcome returned by runDocumentScanner.
const runDocumentScanner = async () => {
    const config = new ScanbotSDK.UI.Config.DocumentScanningFlow();

    const result = await ScanbotSDK.UI.createDocumentScanner(config);

    return result;
}
To trigger the scanner with a button press, we add a button to our React component and assign the runDocumentScanner function to its onClick event.
return (
    <div>
        <button onClick={runDocumentScanner}>Run Scanner</button>
    </div>
);
Our App.tsx should now look like this:
import { useEffect } from "react";
import ScanbotSDK from 'scanbot-web-sdk/ui';

const App = () => {
    useEffect(() => {
        const init = async () => {
            await ScanbotSDK.initialize({
                licenseKey: "",
                enginePath: "/wasm/"
            });
        };

        init();
    }, []);

    const runDocumentScanner = async () => {
        const config = new ScanbotSDK.UI.Config.DocumentScanningFlow();

        const result = await ScanbotSDK.UI.createDocumentScanner(config);

        return result;
    }

    return (
        <div>
            <button onClick={runDocumentScanner}>Run Scanner</button>
        </div>
    );
}

export default App;
You can now run the app to check that everything works as expected.
Currently, you cannot do anything with the scanned pages, so let’s change that!
Step 4: Implement the PDF export feature
Let’s start by adding a state to store the scanned document.
import { useEffect, useState } from "react";
import ScanbotSDK from 'scanbot-web-sdk/ui';
import { DocumentScannerUIResult } from "scanbot-web-sdk/@types";

const [scanResult, setScanResult] = useState<DocumentScannerUIResult | null>(null);
Then we can set the value of scanResult in our runDocumentScanner function when the scanning results are returned. We’ll also add some basic error handling.
const runDocumentScanner = async () => {
    try {
        const config = new ScanbotSDK.UI.Config.DocumentScanningFlow();
        const result = await ScanbotSDK.UI.createDocumentScanner(config);

        if (result) {
            setScanResult(result);
        }

        return result;
    } catch (error) {
        console.error("Error during document scanning:", error);
    }
}
Now that we have our document stored, we can use the SDK’s built-in createPdf method to generate the PDF.
The createPdf method of the SDK allows you to pass options (all of which can be seen here) to customize your PDF. Then, we just need to add a helper function to allow us to download the file.
First, let’s import the necessary PDF configuration type.
import { PdfConfiguration } from "scanbot-web-sdk/@types";Now, let’s create our export functions.
const handleDocumentExport = async () => {
    if (!scanResult) return;

    try {
        const options: Partial<PdfConfiguration> = {
            pageSize: "A4",
            pageDirection: "PORTRAIT",
            pageFit: "FIT_IN",
            dpi: 72,
            jpegQuality: 80
        }

        const document = await scanResult.document.createPdf(options);
        await exportPdf(document);
    } catch (error) {
        console.error("Error exporting PDF:", error);
    }
}

const exportPdf = async (documentData: ArrayBuffer) => {
    const a = document.createElement("a");
    document.body.appendChild(a);
    a.style.display = "none";
    const blob = new Blob([documentData], {type: 'application/pdf'});
    const url = window.URL.createObjectURL(blob);
    a.href = url;
    a.download = 'Scanbot-Web-Document-Tutorial.pdf';
    a.click();
    window.URL.revokeObjectURL(url);
    document.body.removeChild(a);
}
Finally, we need to add a button to trigger the download to our page. We’ll only show this button once a document has been scanned.
return (
    <div>
        <button onClick={runDocumentScanner}>Run Scanner</button>
        {scanResult && <button onClick={handleDocumentExport}>Export PDF</button>}
    </div>
);
Our final app looks like this:
import { useEffect, useState } from "react";
import ScanbotSDK from 'scanbot-web-sdk/ui';
import { DocumentScannerUIResult, PdfConfiguration } from "scanbot-web-sdk/@types";

const App = () => {
    // State to store our scanning result
    const [scanResult, setScanResult] = useState<DocumentScannerUIResult | null>(null);

    // Initialize the SDK when the component mounts
    useEffect(() => {
        const init = async () => {
            try {
                await ScanbotSDK.initialize({
                    licenseKey: "",  // Empty for 60-second trial mode
                    enginePath: "/wasm/"
                });
            } catch (error) {
                console.error("Failed to initialize Scanbot SDK:", error);
            }
        };

        init();
    }, []);

    // Function to launch the document scanner UI
    const runDocumentScanner = async () => {
        try {
            const config = new ScanbotSDK.UI.Config.DocumentScanningFlow();

            const result = await ScanbotSDK.UI.createDocumentScanner(config);

            if (result) {
                setScanResult(result);
            }

            return result;
        } catch (error) {
            console.error("Error during document scanning:", error);
        }
    }

    // Helper function to download the PDF file
    const exportPdf = async (documentData: ArrayBuffer) => {
        const a = document.createElement("a");
        document.body.appendChild(a);
        a.style.display = "none";
        const blob = new Blob([documentData], {type: 'application/pdf'});
        const url = window.URL.createObjectURL(blob);
        a.href = url;
        a.download = 'Scanbot-Web-Document-Tutorial.pdf';
        a.click();
        window.URL.revokeObjectURL(url);
        document.body.removeChild(a);
    }

    // Function to handle the PDF export process
    const handleDocumentExport = async () => {
        if (!scanResult) return;

        try {
            const options: Partial<PdfConfiguration> = {
                pageSize: "A4",
                pageDirection: "PORTRAIT",
                pageFit: "FIT_IN",
                dpi: 72,
                jpegQuality: 80
            }

            const document = await scanResult.document.createPdf(options);
            await exportPdf(document);
        } catch (error) {
            console.error("Error exporting PDF:", error);
        }
    }

    return (
        <div>
            <button onClick={runDocumentScanner}>Run Scanner</button>
            {scanResult && <button onClick={handleDocumentExport}>Export PDF</button>}
        </div>
    );
}

export default App;
Now run the app again to test the PDF export feature.

Conclusion
🎉 Congratulations! You can now scan documents from your browser and export them as PDFs!
If this tutorial has piqued your interest in integrating document scanning functionalities into your web app or website, make sure to take a look at our SDK’s other neat features in our documentation – or run our example project for a more hands-on experience.
Integration guides are also available for the following Web frameworks:
Should you have questions about this tutorial or run into any issues, we’re happy to help! Just shoot us an email via tutorial-support@scanbot.io.
Happy scanning! 🤳

